
A 10-Minute Basketball Recovery Stretch Routine for Home
After a pickup game or practice, this 10-minute static stretching routine targets the calves, hamstrings, quads, hip flexors, glutes, and lower back with evidence-based hold times to reduce stiffness and speed recovery — no equipment needed, designed for your living room floor.
- Citation source
- International Journal of Sports Physical Therapy
- Evidence level
- general guideline
- Recommended frequency
- 30-60 minutes after play
A useful basketball recovery routine for home stretches starts when you get back from the court, not an hour later when your calves have started twitching under the coffee table. You do not need a recovery room. You need a wall, a patch of floor, and about 10 honest minutes while your legs are still warm.
The best window is the first 30–60 minutes after playing, when the game is over but your body has not fully cooled down yet. Basketball stresses the lower body through repeated jumping, cutting, stopping, and landing; Dr. Andy Tam’s basketball cool-down guidance for Men’s Health puts calves, hamstrings, hip flexors, and other lower-body areas at the front of the recovery conversation.[1] ATI Physical Therapy’s basketball stretching guidance similarly centers the ankles, feet, knees, and hips as common basketball pain points, which is why this routine starts below the waist and stays there for most of the session.[2]
The 10-minute no-equipment routine
Use 30-second static holds. Move slowly into each position, hold steady, breathe, then switch sides. The full version below uses one clean 30-second hold per side for most areas, with two calf angles because basketball calves take a beating. If one muscle group is clearly the problem area that night, repeat that stretch once per side instead of adding more random stretches.
| Time | Stretch | How long | Why it is here |
|---|---|---|---|
| 0:00–2:00 | Wall calf stretch: straight-knee, then bent-knee | 30 seconds per side for each version | Hits the calf area that handles jumping, braking, and repeated push-offs. |
| 2:00–3:00 | Hamstring stretch | 30 seconds per side | Gives the back of the thigh a quiet hold after sprinting, reaching, and decelerating. |
| 3:00–4:00 | Quad stretch | 30 seconds per side | Addresses the front of the thigh after defensive slides, stops, and landings. |
| 4:00–5:00 | Figure-four glute stretch | 30 seconds per side | Targets the glutes and deep hip area that help absorb cuts and changes of direction. |
| 5:00–6:00 | Half-kneeling hip flexor stretch | 30 seconds per side | Opens the front of the hip after running, crouching, and sitting on the ride home. |
| 6:00–7:00 | Seated 90/90 hip rotation or seated hip switch | 30 seconds per side | Gives the hips a second angle without turning the session into a workout. |
| 7:00–8:30 | Lower-back decompression: child’s pose or knees-to-chest | 60–90 seconds total | Lets the low back settle after jumping, contact, and trunk extension. |
| 8:30–9:30 | Cross-body shoulder stretch | 30 seconds per side | A quick nod to shooting, reaching, rebounding, and contact. |
| 9:30–10:00 | Overhead reach with slow breathing | 30 seconds total | Finishes with the ribs, lats, and trunk without stealing time from the legs. |
That is the whole session. The point is not to leave the floor feeling like you trained again. You should feel tension easing, not pain building. If a hold gets sharper as you stay in it, back off or stop.
How to do the stretches without wasting the 10 minutes
1. Wall calf stretch: straight knee, then bent knee
Put both hands on a wall. Step one foot back, keep the back heel down, and point the toes mostly forward. For the first 30 seconds, keep the back knee straight. You should feel the stretch higher in the calf. Switch sides.
Then repeat with the back knee slightly bent while the heel stays down. That usually moves the stretch lower toward the Achilles and soleus area. Do not pulse. Do not turn it into little calf raises. Basketball already gave your calves enough reps.
2. Hamstring stretch
Use whichever version you can control. Standing is simple: put one heel slightly forward, soften the other knee, hinge at the hips, and keep your chest long instead of rounding hard through your back. You are not trying to touch your toes. You are trying to hold a steady line through the back of the thigh for 30 seconds per side.
If standing balance is annoying after a long run, sit on the floor with one leg extended and the other knee bent. Hinge toward the extended leg. Same rule: tension is fine; sharp pain is not.
3. Standing quad stretch
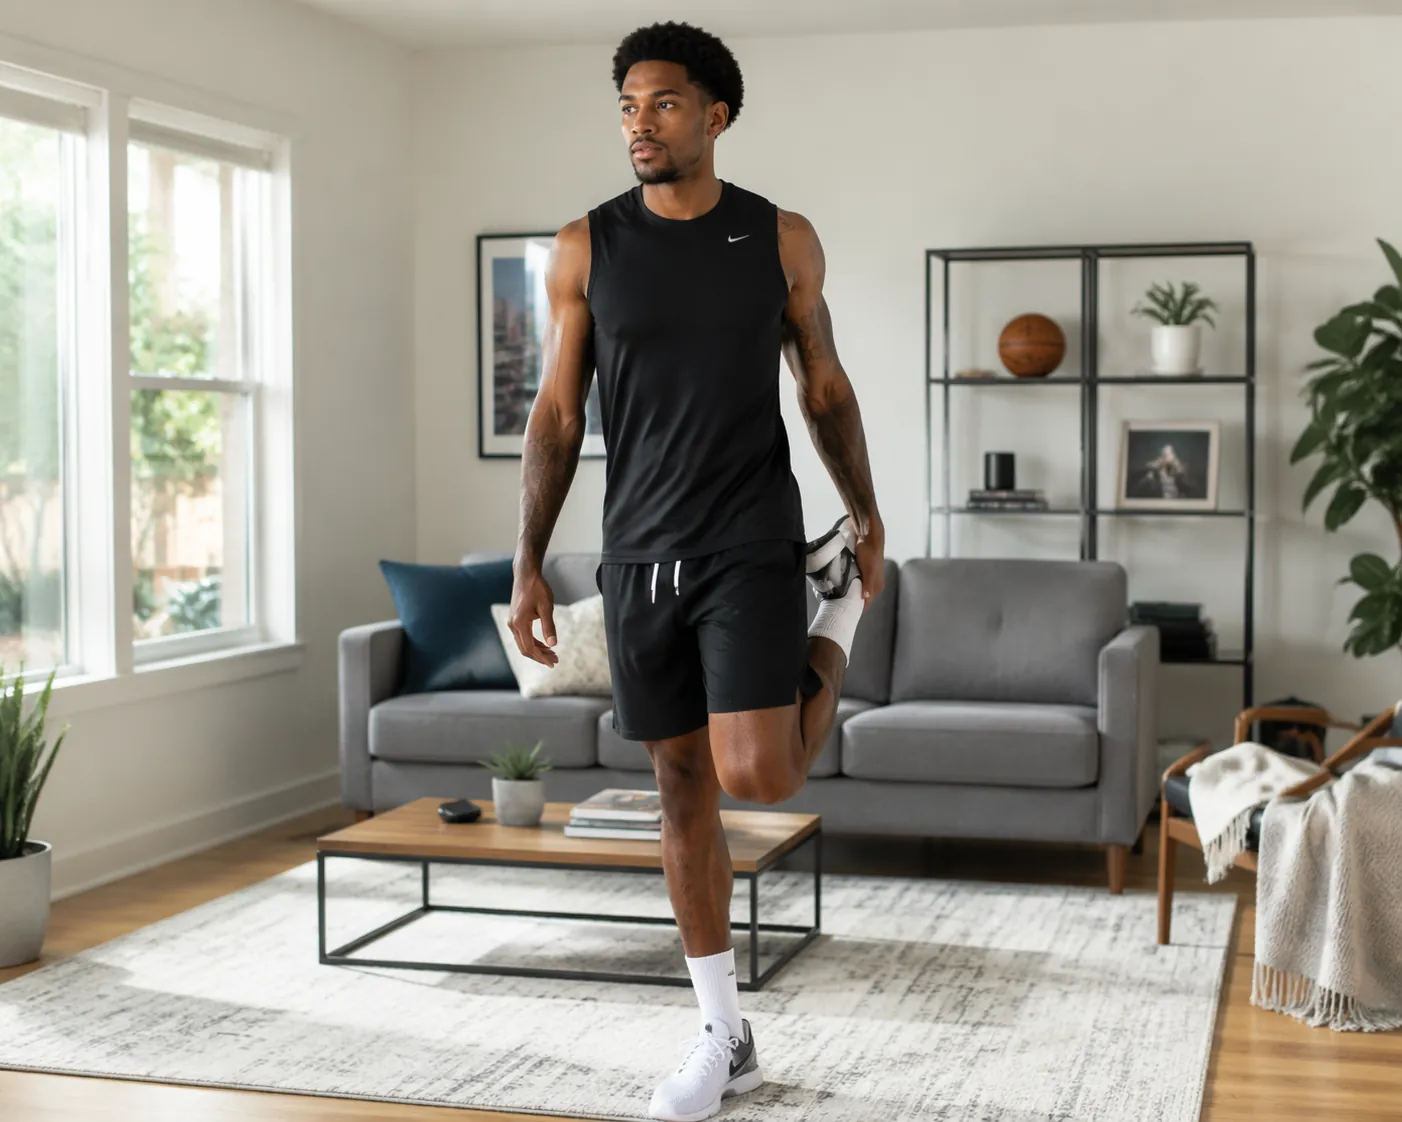
Stand near a wall or couch if balance is questionable. Grab one ankle, bring the heel toward the glutes, and keep the knees close instead of letting the stretching leg drift out to the side. Slightly tuck the pelvis so the stretch stays in the front of the thigh rather than yanking through the low back.
Hold 30 seconds, switch sides, and move on. If you are wobbling the whole time, use support. Balance practice is not the goal tonight.
4. Figure-four glute stretch
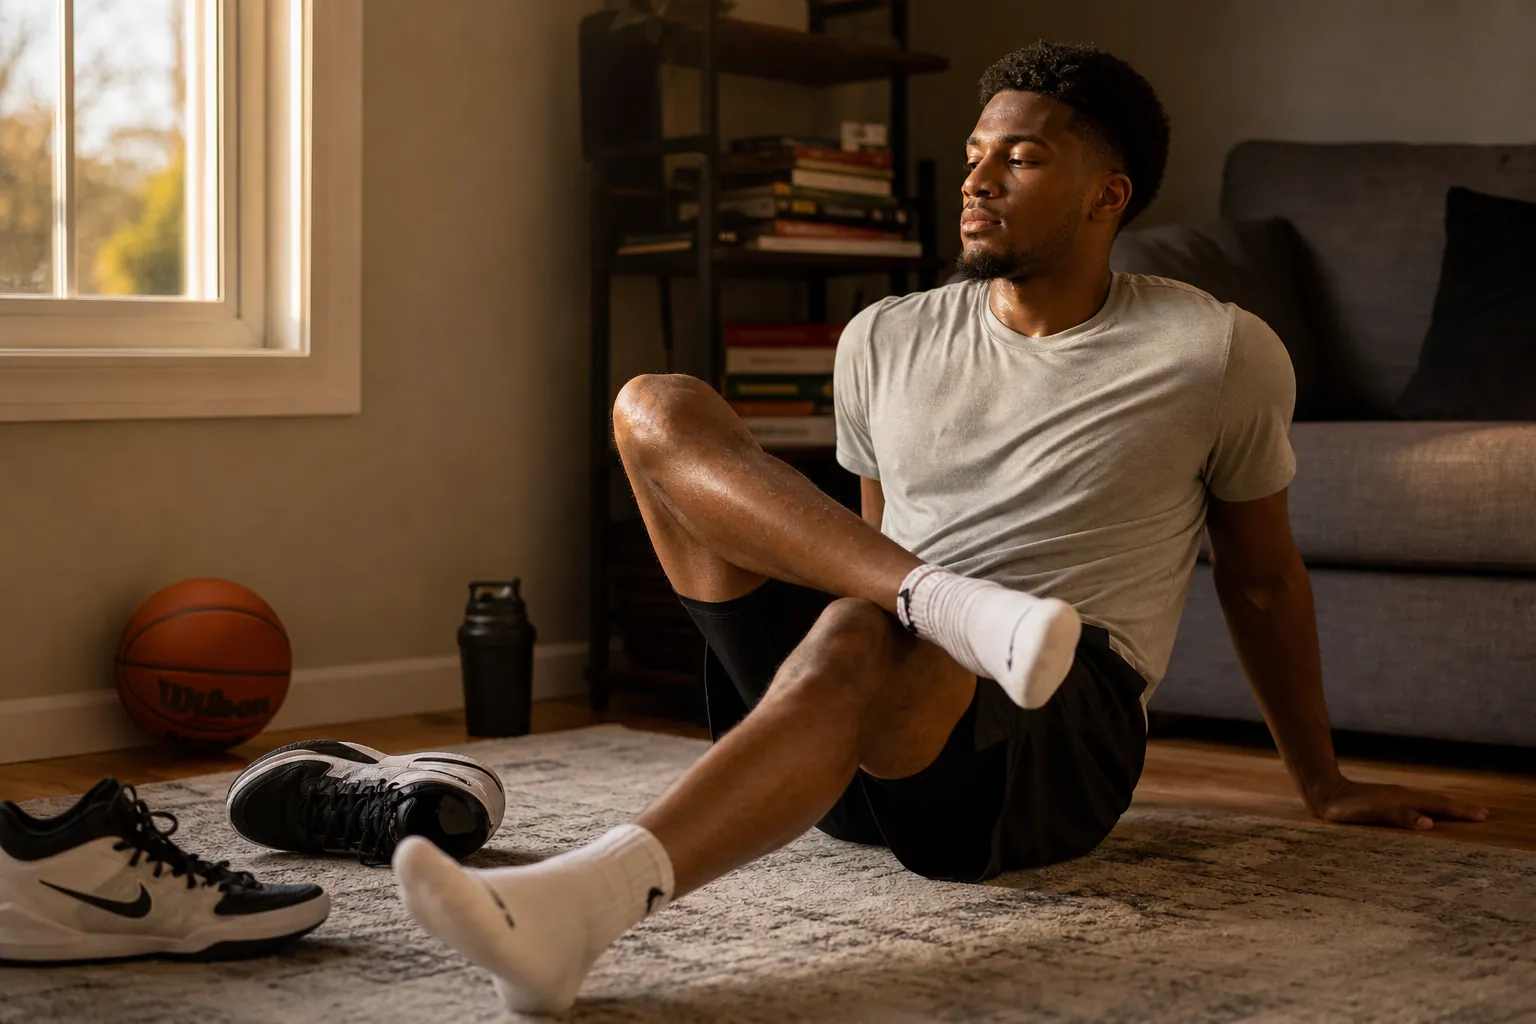
Sit on the floor, bend both knees, and cross one ankle over the opposite knee. Keep the crossed foot flexed lightly. Walk the bottom foot closer or farther until you feel the stretch in the glute of the crossed leg. Hold 30 seconds per side.
This one belongs in a basketball routine because cutting and landing are not neat straight-line events. The glutes and hips spend the game absorbing awkward angles. Forcing the knee down with your hand misses the point; adjust your body position until the stretch appears without a fight.
5. Half-kneeling hip flexor stretch
Kneel with one knee down and the other foot in front, like the bottom of a lunge. Tuck your pelvis slightly, squeeze the glute on the kneeling side, and shift forward just enough to feel the front of that hip. Hold 30 seconds, then switch.
The common mistake is leaning back and cranking the low back into extension. Keep the ribs stacked over the pelvis. The stretch should live at the front of the hip, not in your spine.
6. Seated 90/90 hip rotation
Sit with one leg bent in front of you and the other bent to the side so both knees are roughly at right angles. Stay tall, lean slightly over the front shin, and hold. Then switch sides. If the 90/90 position feels too aggressive, sit with knees bent and slowly let both knees fall side to side for a gentler hip switch.
This is the one stretch in the routine where you should be especially willing to downshift. Hip rotation work can expose tight spots fast after a game. Mild discomfort is normal; a pinching sensation in the front of the hip is a reason to change position or skip it.
7. Lower-back decompression
Pick child’s pose or knees-to-chest. For child’s pose, kneel, sit the hips back, reach the arms forward, and breathe into the back and ribs. For knees-to-chest, lie on your back and gently hug both knees in. Hold for 60–90 seconds total.
This is not a test of how far your spine can round. It is the part where your back gets to stop bracing after rebounds, drives, bumps, and late-game jumpers when your legs were already tired.
8. Cross-body shoulder stretch and overhead reach
Bring one arm across your chest and use the opposite arm to hold it gently. Keep the shoulder down rather than shrugging it into your ear. Hold 30 seconds per side.
Finish by reaching both arms overhead for about 30 seconds while breathing slowly. If overhead reaching pinches the shoulder, lower the arms and take the breath work without the reach. The upper body matters in basketball, but after a normal pickup run it should not steal half the recovery routine from your calves, hips, and posterior chain.
Why this order starts with the lower body
Generic post-workout stretch lists often treat basketball like a light jog with a ball nearby. That is not how most pickup games feel. Even if you are not playing above the rim, the game is still a pileup of small accelerations, hard stops, lateral slides, closeouts, rebounds, and landings where one foot does not always meet the floor at the angle you planned.
That is why calves come first. They help with push-off, absorb repeated landings, and work during deceleration. The straight-knee and bent-knee versions are not filler; they give you two useful angles on the lower leg instead of pretending one vague calf stretch covers everything.
Hamstrings, quads, glutes, and hip flexors come next because they share the ugly work: sprinting, stopping, changing direction, and controlling the hips and knees. ATI’s basketball guidance puts the lower-body joints and surrounding tissues at the center of common basketball complaints, and the Men’s Health cool-down sequence with Dr. Tam also prioritizes basketball-specific lower-body areas before broad recovery extras.[1][2]
The low-back stretch comes after the hips because a lot of postgame back stiffness is tied to the way tired hips and legs make the trunk brace. That does not mean stretching fixes back pain. It means, for a normal stiff-after-hoops night, it makes sense to let the hips and posterior chain calm down before asking the back to relax.
Why 30-second holds are enough
The 30-second hold is not just a convenient timer setting. Phil Page’s 2012 review in the International Journal of Sports Physical Therapy reported that static stretching held for 15–30 seconds produced the greatest change in range of motion, with no additional elongation beyond 2–4 repetitions per muscle group.[3] That is the useful evidence anchor for a home routine: hold long enough to matter, but do not turn recovery into a second workout.
For this 10-minute version, one focused 30-second hold per side is the base. If your left calf or right hip flexor is obviously tighter, give that area a second 30-second round and cut the overhead finisher short. The research supports repeat holds within reason; it does not require you to repeat every stretch until the routine becomes a 30-minute ceremony.[3]
The other rules are boring because they work: stretch warm, do not bounce, and do not force pain. Mayo Clinic’s stretching guidance emphasizes warming up before stretching, avoiding bouncing, and expecting tension rather than pain.[4] After basketball, you already have the warm part handled if you get to the routine soon enough. The main job is not rushing the hold.
Static stretching also should not be sold as a magic fix for soreness, poor sleep, dehydration, or playing five hard games after three weeks off. It is one useful recovery piece. It can help you come down from the game and reduce the kind of next-morning stiffness that makes stairs feel personal, but it is not medical treatment and it is not a guarantee.
What to skip, add, or change
Skip bouncing. Skip forcing end range. Skip turning every stretch into a flexibility contest. The last useful inch is usually not worth the irritation it causes, especially after a game when your legs are tired and your judgment is not exactly fresh.
A foam roller or massage ball can be useful if one calf, quad, or glute always feels stubborn, but it is optional. NBPA and Hospital for Special Surgery recovery guidance discusses broader recovery tools and habits such as massage, active recovery, sleep, and hydration in an elite basketball context.[5] For a recreational player at home, the practical takeaway is smaller: soft-tissue work can sit next to stretching, but it is not the price of admission.
If you want to add light movement before stretching, keep it easy: walk around the apartment, take a few relaxed bodyweight squats, or pace while you drink water. Do not sneak in lunges, jumps, or core work and call it recovery. If you are sweating again, you have drifted.
Change the routine if a position gives you sharp joint pain, swelling, numbness, tingling, or symptoms that do not feel like normal muscle tightness. That is when the answer is not a better stretch variation; it is getting checked by a qualified healthcare provider.
The version you will actually remember
If the full table disappears from your brain the second you walk in the door, remember the order: calves, hamstrings, quads, glutes, hips, low back, shoulders. Hold each side for 30 seconds. Start within 30–60 minutes after the last run if you can. Repeat only the one or two areas that clearly need it.
That is enough for a real home basketball recovery stretch routine. Hit the basketball-stressed muscle groups while they are still warm, hold steady instead of bouncing, and stop after the useful work is done.
References
- 5 Basketball Cool Down Stretches for Recovery After Playing Hoops — Men's Health
- Basketball Stretches for Ballers — ATI Physical Therapy
- Current Concepts in Muscle Stretching for Exercise and Rehabilitation — IJSPT — 2012
- Stretching: Focus on Flexibility — Mayo Clinic
- Recovery After Games — Am I Doing Enough? — NBPA / Hospital for Special Surgery
This is general fitness education, not medical advice. For diagnosis or treatment of pain or injury, consult a qualified clinician.
Pick your next session
Browse all routines to find an appropriately-spaced next session.
Spot something off?
This content sits adjacent to health guidance — tell us if a citation or figure needs a correction.