
Pass Rusher Injury Recovery Exercises You Can Do at Home
This article provides a structured home exercise program for high school and college pass rushers recovering from shoulder, knee, hamstring, or ankle injuries. Each injury type includes progressive stages from initial recovery movements to position-specific drills using minimal equipment, backed by orthopaedic evidence and NFL combine injury data.
- Citation source
- AAOS, E3 Rehab, Trifecta Therapeutics
- Evidence level
- General guideline
A pass rusher stuck at home usually does not need a speech. He needs to know whether today is a shoulder day, a knee day, a hamstring day, or an ankle day — and whether the exercise in front of him actually matches the tissue that is healing.
That matters because “football rehab” gets sloppy fast. A defensive end with a sore AC joint does not need the same plan as an outside linebacker coming off a hamstring strain. A knee injury is not an ankle mobility problem with a different label. And a player who can jog straight ahead is not automatically ready to drop into a three-point stance, post with one arm, rip through contact, bend the corner, and re-accelerate after flipping his hips.
Before using any of these pass rusher injury recovery exercises at home, get guidance from a physical therapist, athletic trainer, sports medicine physician, or orthopaedist. The movements below are commonly used strengthening, mobility, and return-to-movement exercises. They do not diagnose an injury, replace imaging, decide whether surgery is needed, or clear an athlete for contact.
Use This Guide by Injury Site, Not by Motivation Level
If you only have a resistance band, a towel, a chair, a PVC pipe or broomstick, and a few yards of floor space, you have enough to train the early and middle stages of most home progressions. You do not have enough to self-clear for a game. Keep that line bright.
| If the injured area is... | Start with... | Do not rush toward... |
|---|---|---|
| Shoulder | Pain-free range of motion, scapular control, band rotation, rows | Posting, punching, long-arm work, falling on the arm |
| Knee | Quad control, hip control, slow squats or sit-to-stands, balance | Cutting, jumping, contact, low stance under fatigue |
| Hamstring | Easy range, isometrics, bridges, then slider eccentrics | Sprinting, hard get-offs, hip-flip re-acceleration |
| Ankle | Swelling control as directed, dorsiflexion mobility, calf strength, balance | Edge bend, violent plants, wide rush angles |
Move forward only when the previous level stays controlled: pain is acceptable only within the limits your clinician gives you, swelling does not spike afterward, range of motion is improving rather than being forced, and the athlete can repeat the movement without limping, shrugging, twisting, or protecting the injured side.
For a compact setup, bands and floor space beat a room full of equipment. If you are building a tiny training corner around rehab and later strength work, this compact home gym decision framework is more useful than buying random football gadgets.
Why These Four Injury Areas Get Their Own Lanes
The NFL Combine injury data is not a perfect mirror for a high school hallway or a college apartment floor. It only includes athletes good enough to reach the Combine. Still, it explains why shoulder, knee, ankle, and hamstring work should not be buried under one generic lower-body circuit.
In a study of injuries identified at the NFL Scouting Combine, 53.7% of defensive linemen had knee injuries and 52.8% had ankle injuries. Across football players in the study, the shoulder was the most common injury site at 51.9%; AC joint injuries made up 46.1% of shoulder injuries, and labral injuries made up 14.6%.[1]
The same study found performance associations that should get a pass rusher’s attention. Defensive linemen with prior knee injuries averaged fewer games started, tackles, quarterback hits, and sacks in their first two NFL seasons, with quarterback hits and sacks showing statistically significant differences. Defensive linemen with shoulder injuries were drafted later on average than those without shoulder injuries: 115.9 versus 91.1 overall pick position.[1]
That does not prove a home exercise fixes draft position or restores sacks. It does say these are not side issues. For a rusher, the shoulder is the post and punch. The knee is stance depth, force acceptance, and change of direction. The hamstring is acceleration and re-acceleration. The ankle is dorsiflexion, low pad level, and edge bend.
Shoulder Recovery: Rebuild the Arm Before You Ask It to Post
Shoulder rehab for a pass rusher has a trap built into it. The athlete feels fine doing curls, push-ups, or light band work, then gets back to football and realizes posting against a tackle is a different animal. The shoulder has to tolerate rotation, reach, retraction, and force through a long arm. Start with the boring pieces first.
Early Shoulder Stage: Motion Without Fighting the Joint
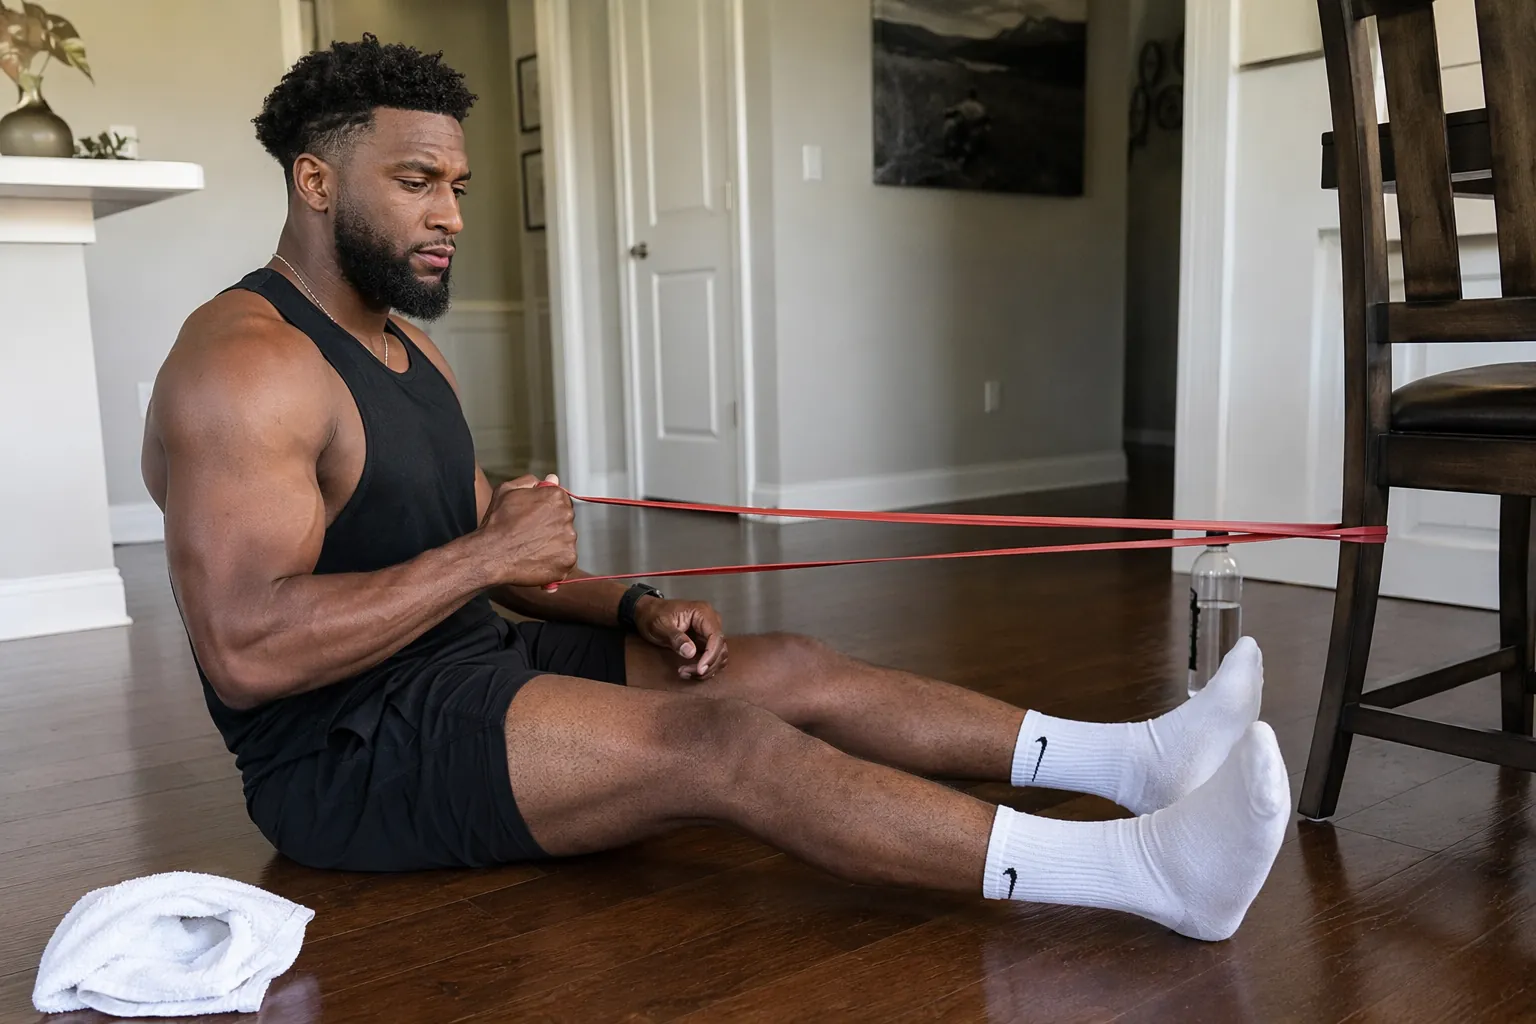
The AAOS Rotator Cuff and Shoulder Conditioning Program includes pendulum work, cross-body and sleeper stretches, internal and external rotation with a band, and standing rows as part of a shoulder conditioning routine commonly performed over a 4-to-6-week period.[2]
- Pendulum: Lean on a table or chair with the uninjured arm. Let the injured arm hang and make small circles. The shoulder should move because the body rocks gently, not because the athlete is yanking the arm around.
- Sleeper stretch: Lie on the involved side only if approved and comfortable. Keep the shoulder and elbow around 90 degrees, then gently guide the forearm toward the floor. This should feel like a controlled stretch, not a pinching contest.
- Scapular setting: Stand tall, pull the shoulder blade slightly back and down, then relax. Do not crank the low back or shrug the neck to fake control.
A parent or coach watching this stage should look for compensation. If every rep comes with the shoulder hiking toward the ear, the athlete is not ready to load that pattern harder.
Middle Shoulder Stage: Band Rotation and Rows
Once the clinician allows strengthening, a light resistance band is enough. Anchor it to a door, chair leg, or rack that will not move. Keep the ribs down and the elbow position clean.
- Band external rotation: Elbow at the side, forearm across the stomach, rotate the hand outward while the elbow stays pinned near the ribs.
- Band internal rotation: Same setup, but rotate the hand inward toward the stomach.
- Standing row: Pull the band toward the ribs while the shoulder blade moves back under control. Do not turn it into a low-back lean.
- Wall slide: Slide the forearms up a wall while keeping the movement smooth and pain-guided.
For a defensive end, this is where the shoulder starts becoming useful again, but it is still not football. A clean external rotation set means the cuff can control the arm in a simple position. It does not mean the athlete should start striking bags in the garage.
Late Shoulder Stage: Post-and-Punch Mechanics Without Contact
Performance coaches use lineman movements such as PVC push-ups with an isometric hold to train unilateral post-and-punch qualities, but those are healthy-athlete drills unless a medical professional adapts them for the rehab stage.[3]
- Wall post hold: Stand in a staggered stance and place one palm on the wall at shoulder height. Gently build pressure for a short hold. The shoulder should feel stable, not jammed.
- Half-speed wall strike: From a controlled stance, strike the wall with an open hand and reset. Keep the strike light until the shoulder handles repeated posting without symptoms.
- PVC post hold: Hold a PVC pipe vertically against the floor or wall and apply light pressure with one hand to rehearse a long-arm line without body collision.
- Shadow punch sequence: Step, post, replace the hand, and recover the arm. No bag. No partner. No finish move yet.
The shoulder has to earn contact. If wall work brings back pain, dead-arm heaviness, instability, numbness, or next-day swelling, that is not a toughness checkpoint. That is a reason to stop and get re-evaluated.
Knee Recovery: Treat Stance Depth Like a Privilege
Knee injuries are where home plans need the least ego. An ACL reconstruction, partial tear, meniscus injury, patellar tendon problem, or general knee sprain can all look like “my knee hurts,” but they do not share the same rules. E3 Rehab’s ACL material separates rehab into criteria-based progressions that address swelling, range of motion, quadriceps strength, gait, running, jumping, cutting, and return to sport rather than relying on the calendar alone.[4]
Early Knee Stage: Extension, Quad Control, and Walking Quality
If a clinician has cleared early movement, the first home job is usually simple: restore motion, calm swelling as directed, and get the quadriceps firing. Do not hide a bad gait under a hoodie and call it progress.
- Heel prop: Rest the heel on a pillow or rolled towel so the knee can work toward full extension, using only the range approved by the clinician.
- Quad set: With the leg straight, tighten the thigh and try to press the back of the knee toward the floor. Hold briefly, then relax.
- Heel slide: Slide the heel toward the hips and back out again within the allowed range.
- Assisted straight-leg raise: Only if the athlete can keep the knee straight without lag and the clinician allows it.
The pass-rush connection is not dramatic yet. A player who cannot straighten the knee, control the quad, or walk without limping has no business testing a get-off.
Middle Knee Stage: Squat Pattern, Hip Control, and Single-Leg Balance
When swelling, range, and pain are under control and the clinician progresses loading, the knee needs to accept force with the hip and foot helping instead of dumping everything into the joint.
- Chair sit-to-stand: Sit to a chair and stand up with even pressure through both feet. Progress by lowering the chair height only if control stays clean.
- Wall squat hold: Slide down a wall to a comfortable depth and hold. Do not chase a low stance yet.
- Step-up: Use a low step. Drive through the whole foot and keep the knee from collapsing inward.
- Single-leg balance: Stand on the involved leg near a wall or chair. Add head turns or light band rows only after basic balance is steady.
A position coach can watch knee position, but should not become the clinician. If the athlete cannot control a step-up, the answer is not louder coaching. The answer is less load, more control, and medical guidance if symptoms keep showing up.
Late Knee Stage: Controlled Stance Before Cutting
The late home stage starts to look more like football, but it still needs brakes. A pass rusher’s stance is a loaded knee position. A speed rush plant is a loaded knee position. A counter move is a loaded knee position with rotation and surprise added.
- Two-point stance hold: Hold a comfortable stance for short intervals, then stand up and check symptoms.
- Three-point stance entry: Move slowly into the stance and back out. The goal is position tolerance, not first-step speed.
- Lateral weight shift: From an athletic stance, shift weight side to side without the knee diving inward.
- Low step-out: Step one foot diagonally out and back, staying tall enough to control the knee.
Jumping, cutting, and contact should wait for the rehab professional’s criteria. A knee can feel “pretty good” in the living room and still be unprepared for the first awkward plant against a tackle’s outside hand.
Hamstring Recovery: Sliders Help, but Sprinting Has to Be Earned
Hamstring rehab is where athletes get tricked by straight-line comfort. Walking improves, jogging feels decent, and then the first real burst opens the whole problem again. The hamstring is not just a muscle you stretch behind the thigh. For a pass rusher, it helps produce and control violent hip extension during the get-off, then has to tolerate length and speed when the athlete re-accelerates after a hip flip.
Early Hamstring Stage: Pain-Guided Motion and Isometrics
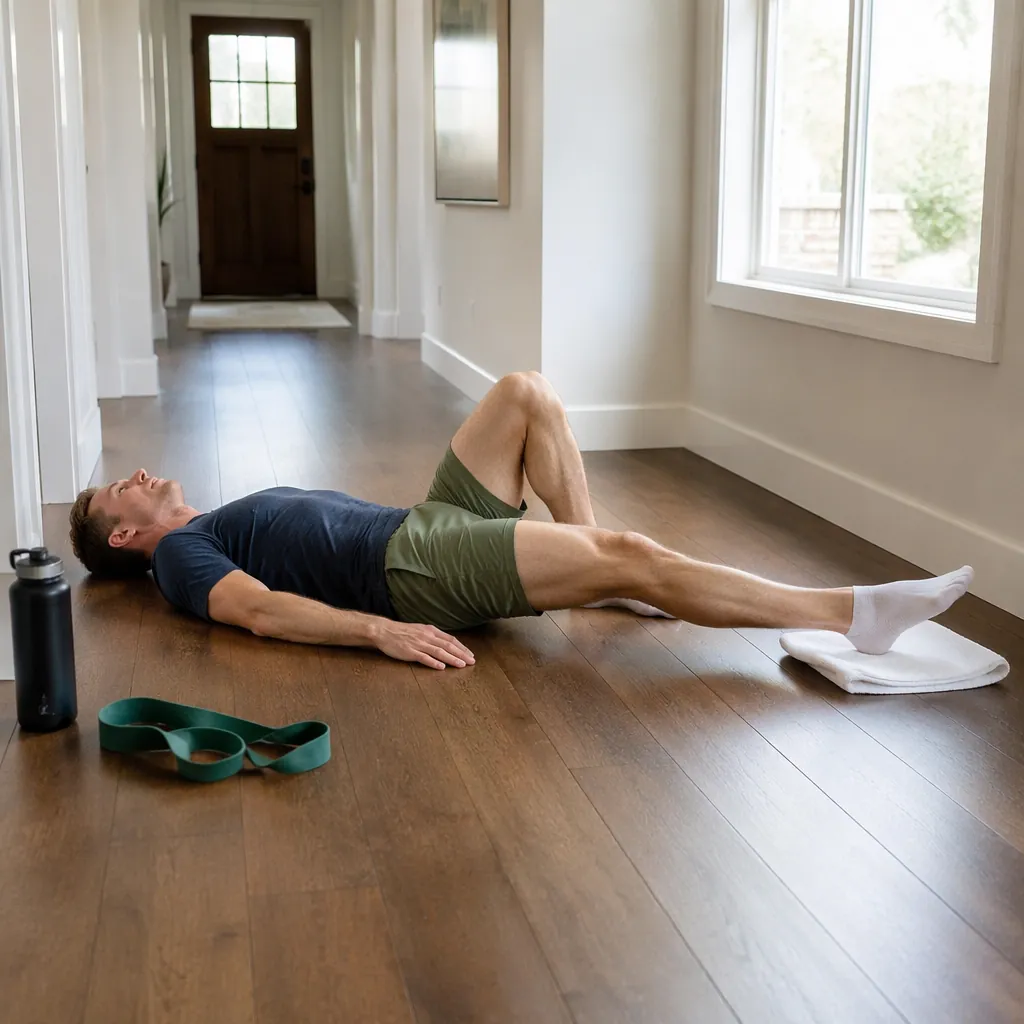
E3 Rehab’s hamstring strain material uses pain-guided progressions and includes early loading, bridges, hip hinges, hamstring sliders, and sprint reintroduction when appropriate.[5]
- Easy heel dig: Lie on the back with the knee bent. Dig the heel lightly into the floor and hold. The hamstring should work without a sharp grab.
- Bridge hold: Lift the hips with both feet planted. Keep the ribs down and do not arch the back to avoid the hamstring.
- Short-range hip hinge: Stand tall, push the hips back slightly, and return. Keep the range small until the athlete can move without guarding.
This stage should feel almost too controlled. That is fine. A mild strain and a more serious strain do not deserve the same timeline, and pain rules should come from the clinician handling the case.
Middle Hamstring Stage: The Slider Progression
A towel on a hard floor is enough to make hamstring work serious. E3 Rehab describes a slider progression that can move from double-leg eccentric sliders to single-leg variations and then single-leg sliders, depending on tolerance and stage.[5]
- Double-leg bridge slider: Start in a bridge with both heels on towels or sliders. Slowly slide both heels away, then reset with control.
- Double-leg eccentric, assisted return: Slide out slowly, drop the hips, pull the heels back in, and bridge again. This keeps the hard part on the lengthening phase.
- Single-leg emphasis: Shift more work to the injured side only when both-leg sliders are clean and symptoms stay within the allowed range.
- Single-leg slider: One heel works while the other leg stays off the floor or lightly assists, depending on the clinician’s progression.
The slider is not magic. It is useful because it loads the hamstring while it lengthens, which is closer to what the muscle eventually has to tolerate at speed. If the athlete turns every rep into a low-back bridge or cramps immediately, the progression is too far ahead.
Late Hamstring Stage: Running, Then Sprinting, Then Rush Timing
E3 Rehab presents a case example of return to sprinting as early as 14 days after a mild hamstring strain, with pain kept at 4 out of 10 or lower. That should be read as a mild-strain example under defined pain limits, not a promise for every athlete with a hamstring injury.[5]
- Walk-jog intervals: Use only after normal walking, basic strengthening, and clinician guidance support it.
- Build-up runs: Gradually increase speed over distance instead of jumping straight into a hard start.
- Submaximal get-off rhythm: From a two-point stance, take one or two smooth steps at controlled speed.
- Hip-flip walk-through: Open the hips and re-accelerate at walk-through speed before adding tempo.
A pass rusher should not make the first hard sprint a pass-rush rep. Sprint exposure has to come back in layers: controlled running, faster running, acceleration, then football timing. The hamstring does not care that the athlete is bored.
Ankle Recovery: Dorsiflexion Is Not Optional for Edge Bend
An ankle injury shows up in a rusher’s game before the athlete wants to admit it. The stance gets taller. The first step widens. The corner turns into a loop. That is often a dorsiflexion and force-acceptance problem, not a lack of effort.
Trifecta Therapeutics highlights ankle band mobilization as a way to work on dorsiflexion range needed for football positions, while also organizing therapeutic exercise around position-specific demands.[6]
Early Ankle Stage: Range, Calf Activation, and Foot Control
- Ankle pumps: Move the foot up and down through a comfortable range, especially when swelling management and motion are part of the clinician’s plan.
- Ankle alphabet: Trace letters with the foot to restore comfortable motion in multiple directions.
- Towel scrunch: Pull a towel toward the body with the toes to wake up the foot.
- Seated calf raise: Lift and lower the heel while seated, keeping pressure through the big toe and ball of the foot.
If swelling keeps coming back or the athlete cannot bear weight normally, the home program should not quietly turn into a test of pain tolerance. Get the ankle checked.
Middle Ankle Stage: Dorsiflexion and Balance
The ankle has to bend forward over the foot for a low stance and a tight corner. If the heel pops up early or the foot collapses inward, the rusher will usually find a workaround. Workarounds become habits.
- Knee-to-wall dorsiflexion: Face a wall, keep the heel down, and move the knee toward the wall. Use a pain-free distance and compare sides without forcing range.
- Band ankle mobilization: With clinician approval, anchor a band low around the ankle and move into a controlled knee-over-toe position.
- Standing calf raise: Rise onto both toes and lower slowly. Progress toward single-leg work only when tolerated.
- Single-leg balance: Stand near support and keep the arch active. Add light head turns or band pulls later.
Late Ankle Stage: Low Stance and Edge Shape
Only after walking, calf work, balance, and dorsiflexion are behaving should the ankle see pass-rush shapes.
- Stance hold: Hold a two-point or three-point stance at a depth the ankle can own without the heel lifting or the knee collapsing.
- Edge lean hold: Place a hand on the wall, lean the body slightly like the start of a corner, and keep the foot tripod stable.
- Slow arc walk: Walk a curved path at low speed, keeping the ankle under control instead of rolling to the outside edge.
- Submaximal speed-rush step: Take one controlled step on an angle, reset, and watch for ankle wobble or protective movement.
The ankle’s job is not just to stop hurting. It has to let the athlete get low enough to threaten the edge without stealing motion from the knee, hip, or low back.
The Bridge Back to Pass Rushing
General return-to-running is a checkpoint, not the finish line. A pass rusher has to handle stance load, first-step violence, upper-body posting, hip rotation, ankle bend, and repeated efforts with short rest. Jogging around the block does not prove any of that.
Former professional defensive lineman Craig Roh has described solo defensive-line work such as wall strikes, stance holds, and hip-flip drills as part of position practice away from a full team setting. That kind of material is useful for translating late rehab into football movement, but it is experiential football context, not medical evidence.[7]
| Bridge drill | What it tests | Use it after... |
|---|---|---|
| Stance hold | Knee, ankle, hip, and trunk tolerance in a pass-rush start position | Walking, basic strength, and range are controlled |
| Shadow rush | Sequence, rhythm, and foot placement without contact | Stance entry and first steps are symptom-free |
| Wall strike | Shoulder posting and hand timing without a live blocker | Band rotation, rows, and light wall post holds are tolerated |
| Hip-flip drill | Rotation and re-acceleration mechanics | Running progressions and lower-body control are cleared |
| PVC post or adapted lineman bodyweight drill | Post-and-punch line, trunk stiffness, and unilateral control | The athlete is cleared for higher-load upper-body patterns |
Stance Holds
Start with the stance before the start. A two-point stance usually gives more room to adjust than a three-point stance. Hold for a short interval, stand up, and check the injured area. If the knee caves, the ankle lifts, the hamstring guards, or the shoulder cannot tolerate the hand-down position, stay here.
A stance hold is not conditioning. It is a position audit. The athlete is proving he can own the shape before adding speed.
Shadow Rushes
A shadow rush is a pass-rush rep without a blocker, bag, or finish. Step, angle, replace the feet, and recover. Keep it at walk-through speed first. The value is in seeing whether the athlete changes mechanics to protect the injury.
- Shoulder athlete: Keep the hands active but light; no violent club or long-arm finish.
- Knee athlete: Watch the plant leg during the second and third step, not just the first step.
- Hamstring athlete: Keep acceleration submaximal and avoid sudden re-bursts.
- Ankle athlete: Keep the rush angle narrow enough to control the foot.
Wall Strikes
Wall strikes belong late, especially after shoulder injuries. Put the athlete in a staggered stance, strike the wall lightly with an open hand, and reset. The wall gives feedback without a moving opponent. It also exposes whether the athlete can brace the trunk and shoulder together instead of just slapping with the arm.
Do not turn wall strikes into a toughness drill. If the athlete starts hitting harder because he misses practice, the drill has lost its job.
Hip-Flip Re-Acceleration
The hip flip is where hamstrings, knees, and ankles get exposed. Walk it first: rush upfield, open the hips, turn the corner shape, and take two controlled steps. Then add tempo only if the previous session did not create symptoms.
For a hamstring athlete, the danger is the re-acceleration after the turn. For a knee athlete, it is the plant and rotation. For an ankle athlete, it is the outside-foot load and bend. That is why one drill can be right for one player and too early for another.
Adapted Lineman Bodyweight Work
Healthy lineman training sources use explosive bodyweight exercises such as reverse drop lunges and jump variations for first-step power, and NFL.com has published no-gym football exercises for players training away from a facility.[3][8] Those can be useful after rehab, but they should not be dropped into the middle of an injury plan just because they look football-specific.
The safer order is simple: rehab control first, position shape second, speed third, contact last. A towel slider earns more respect than a sloppy jump if the hamstring is still healing. A band row matters more than a push-up contest if the shoulder cannot stabilize.
When to Hold, Progress, or Stop
Progression should be conditional. Calendar time can help organize a plan, but symptoms and movement quality decide whether the athlete has actually adapted.
| Decision | What it looks like at home |
|---|---|
| Hold the current stage | Mild symptoms stay within clinician-approved limits, movement quality is mostly clean, and the athlete is still adapting |
| Progress carefully | No symptom spike afterward, no swelling increase, no limp or compensation, and both sides look closer in control |
| Stop and contact a professional | Sharp pain, instability, locking, giving way, numbness, major swelling, night pain, or repeated symptom flare-ups |
| Do not return to play yet | The athlete has not been cleared for sprinting, cutting, contact, or full football practice by qualified medical staff |
Clearance belongs to qualified medical professionals. The home program can make appointments more productive and keep the athlete from drifting, but it cannot replace return-to-play testing.
Once the athlete has finished rehab and been cleared for broader conditioning, a structured bodyweight or sandbag plan can rebuild general work capacity without pretending to be medical care. This bodyweight and sandbag fitness routine fits better after clearance than during the uncertain middle of injury recovery.
A pass rusher recovers more safely when the plan respects both pieces of the problem: the injured tissue and the job the player has to return to. Shoulder, knee, hamstring, and ankle injuries do not earn the same exercises just because they happened on the same field. Use the home work to build the next clean step, then let the medical team decide when the athlete is ready for the next football demand.
References
- Epidemiology of Injuries Identified at the NFL Scouting Combine and Their Impact on Performance — PMC
- Rotator Cuff and Shoulder Conditioning Program — AAOS/OrthoInfo
- Top 4 Bodyweight Exercises For Football LINEMAN — Garage Strength
- ACL Rehab — E3 Rehab
- Hamstring Strain Rehab — E3 Rehab
- Therapeutic Exercises for Football by Position — Trifecta Therapeutics
- Solo workouts — D-Line Examples / Craig Roh
- No Gym? No Problem: 5 home exercises for football players — NFL.com
This is general fitness education, not medical advice. For diagnosis or treatment of pain or injury, consult a qualified clinician.
Pick your next session
Browse all routines to find an appropriately-spaced next session.
Spot something off?
This content sits adjacent to health guidance — tell us if a citation or figure needs a correction.