Foam Rolling and Active Recovery for Home Gym Training
A practical, evidence-based guide for self-coached home gym trainees who want to reduce post-workout soreness and maintain performance between sessions — covering foam rolling technique and timing, active recovery day structure, and weekly schedule templates that work with 2- to 4-day training splits.
Why Recovery Is the Missing Piece in Most Home Gym Setups
Training at home removes a lot of friction — no commute, no wait for equipment, no scheduling around a facility's hours. But it also removes something most people don't notice until it becomes a problem: the built-in guardrails that a coach, a class structure, or even a shared gym environment quietly provides.
When you train alone, there's no one to notice that you've hit the same muscle groups three days in a row. There's no programmed deload week baked into your schedule. There's no coach watching your form deteriorate under fatigue and telling you to call it. The result is a pattern that's extremely common in home gym trainees: progressive overtraining drift — where accumulated fatigue quietly erodes performance, motivation, and eventually tissue tolerance, without any single session feeling like the problem.
- No coach to enforce rest days or notice cumulative fatigue
- No built-in programming guardrails around session frequency or muscle group spacing
- Easy access to equipment makes it tempting to train on days the body needs to recover
- Soreness is often misread as a sign to push harder rather than a signal to recover
Structured recovery — specifically, foam rolling with correct technique and timing, combined with deliberately programmed active recovery days — is the system that fills this gap. It doesn't require a gym, a trainer, or expensive equipment. It requires a foam roller, floor space, and a schedule you actually follow.
Active Recovery vs. Passive Rest: What the Evidence Shows
Passive rest — doing nothing on a non-training day — is sometimes the right call. If you're injured, sick, sleep-deprived, or genuinely exhausted, full rest is appropriate. But for most home gym trainees recovering from a normal strength session, low-intensity movement on off-days produces measurably better outcomes than sitting still.
The physiological case is straightforward: low-intensity movement increases blood flow, which delivers oxygen-rich blood to muscle tissue and simultaneously accelerates the removal of cellular waste produced during training. This process — returning the body to homeostasis — happens faster with gentle movement than with complete inactivity.
Research cited by NASM references Rhea et al. (2003), which recommends spacing strength training sessions with one to two recovery days in between to allow adequate adaptation. This isn't just about soreness management — it's about giving the neuromuscular system time to consolidate the training stimulus before adding another one.
The distinction between active recovery and additional training volume is critical and worth stating plainly: active recovery is not a workout. It is not an opportunity to add extra sets, increase intensity, or make up for a missed session. The moment your heart rate climbs above 60% of your maximum, you've shifted from recovery into training — and you've negated the purpose of the day.
How Foam Rolling Actually Works
Foam rolling is categorized as self-myofascial release (SMR) — a technique for applying sustained pressure to soft tissue to reduce tension and improve mobility. Understanding the mechanism matters because it explains why technique and timing affect outcomes, and it helps you avoid the inaccurate explanations that are still common online.
When you apply sustained pressure to a tender spot in a muscle, you're activating the Golgi tendon organ (GTO) — a sensory receptor embedded in the musculotendinous junction that monitors tension. Sustained pressure triggers a reflex called autogenic inhibition: the GTO overrides the muscle spindle's activity, signaling the muscle to release rather than contract. This allows fascial adhesions and trigger points to relax and, over time, realign.
The most directly relevant clinical evidence comes from Pearcey et al. (2015), a controlled study in which participants performed 20 minutes of foam rolling immediately post-exercise and again at 24 and 48 hours after training. The protocol targeted the quadriceps, adductors, hamstrings, IT band, and gluteals — muscle groups directly relevant to home gym lower-body training. The results showed moderate-to-large reductions in muscle tenderness (Cohen d ranging from 0.59 to 0.84), along with attenuated decrements in sprint speed, power output, and dynamic strength-endurance.
"A 20-minute bout of foam rolling on a high-density roller immediately postexercise and every 24 hours thereafter may reduce the likelihood of muscle tenderness and decrements in multijointed dynamic movements." — Pearcey et al. (2015)
Foam Rolling Fundamentals: Timing, Duration, and Technique
Getting the technique right matters more than the equipment you use. A $35 foam roller used correctly outperforms an expensive massage tool used carelessly. Here's what the evidence and clinical guidelines support.
When to Roll
- Post-workout: Roll the muscle groups you trained, immediately after your session. This is the primary window targeted by the Pearcey (2015) protocol and the most important session to not skip.
- 24 hours post-exercise: A second rolling session the following day, even if it's a rest day. This is when DOMS typically peaks and when continued rolling has the most impact on soreness and performance preservation.
- 48 hours post-exercise: A third session if soreness persists. This aligns with the full Pearcey protocol and is especially useful after heavy lower-body training.
- Pre-workout: Rolling before training safely increases range of motion at a joint without reducing force output or muscle activation — an advantage over static stretching, which can temporarily reduce power. Use it as part of your warm-up for tight areas.
Duration and Cadence
| Parameter | Guideline | Source Basis |
|---|---|---|
| Time per muscle group | 30–90 seconds; maximum 2 minutes | NASM / Houston Methodist |
| Rolling cadence | Slow and controlled — approximately 1 inch per second (~50 bpm) | Pearcey et al. (2015) protocol |
| Pressure | As much body weight as tolerable; do not bounce or rush through pain | NASM / Harvard Health |
| Trigger point hold | Hold on the most tender spot until discomfort reduces (30–90 seconds) | NASM SMR guidelines |
| Textured roller knobs | Limit to under 30 seconds per point to avoid bruising | Houston Methodist |
What to Avoid
- Do not roll directly over joints — knees, elbows, ankles, shoulder blades, and the pelvis are all off-limits. Rolling over bone can cause hyperextension or tissue damage.
- Do not roll the lower lumbar spine. This is explicitly contraindicated by NASM guidelines. The thoracic spine (upper and mid back) is safe to roll; the lumbar region is not.
- Do not roll acutely inflamed or injured tissue. If an area is visibly swollen, bruised, or producing sharp pain, leave it alone and consult a healthcare provider.
Muscle-by-Muscle Foam Rolling Guide for Home Gym Movements
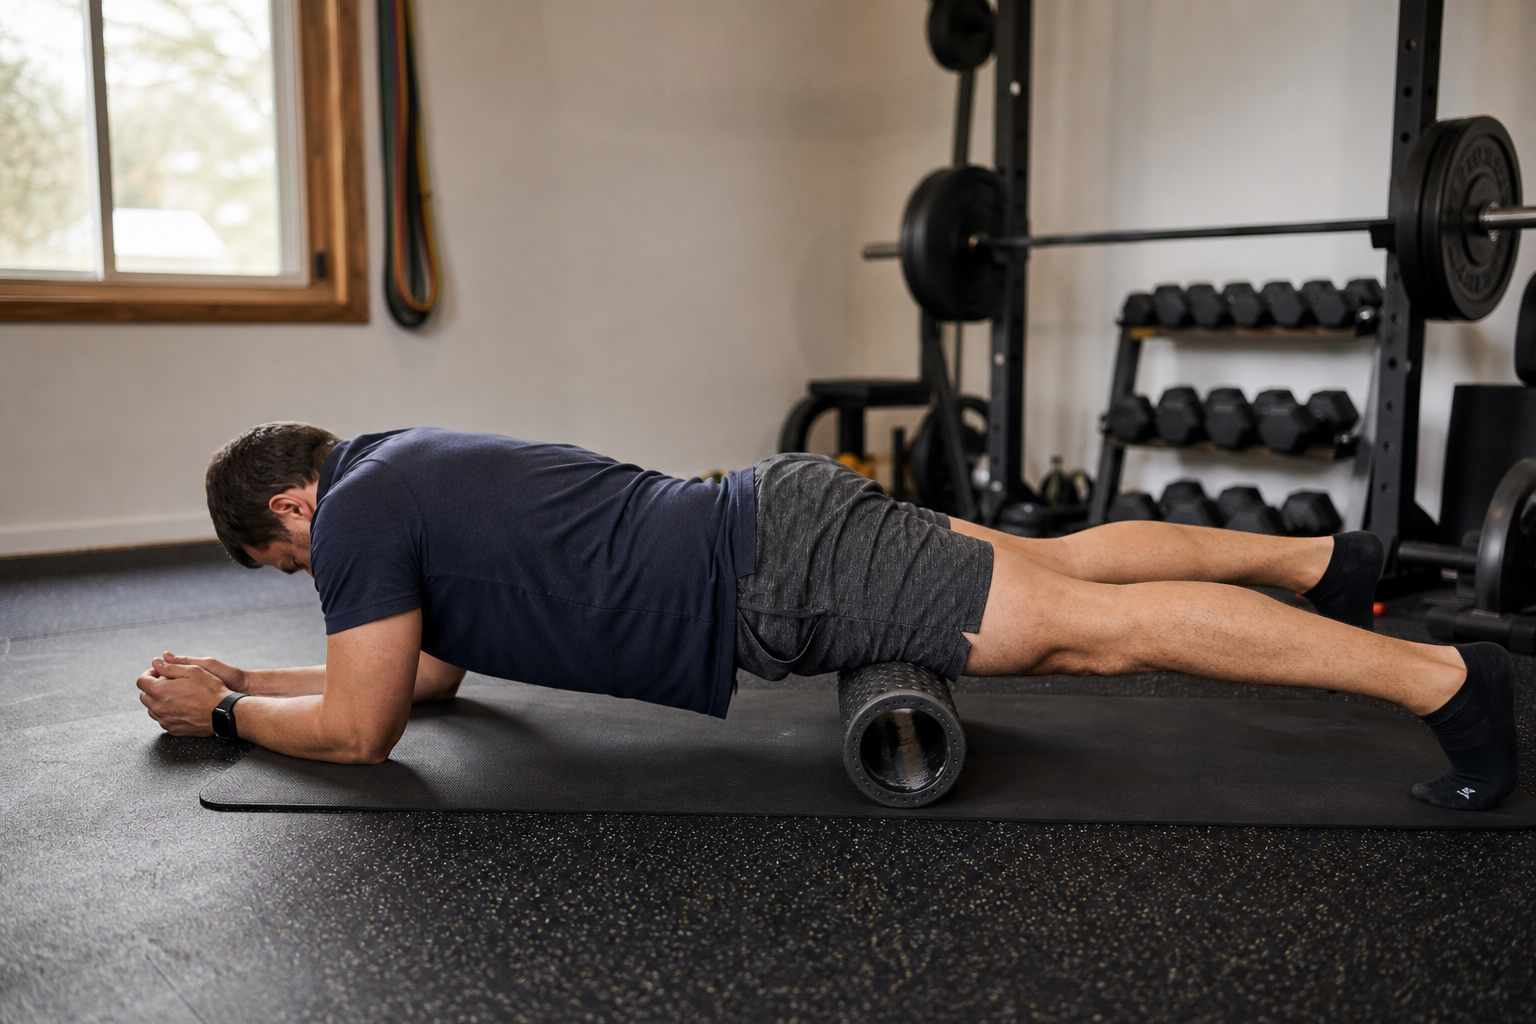
The following guide covers the muscle groups most loaded by common home gym movements — squats, deadlifts, presses, and rows. For each region, the positioning note describes how to set up on the roller. Roll slowly through the full muscle length, pause on tender spots, and hold until the discomfort reduces before moving on.
| Muscle Group | Relevant Home Gym Movements | Positioning | Notes |
|---|---|---|---|
| Quadriceps | Squats, leg press, lunges | Prone (face down); roller under front of thigh, from just below the hip (ASIS) toward the top of the kneecap | Work each leg separately; rotate slightly inward and outward to cover the full quad |
| Adductors (inner thigh) | Squats, deadlifts | Prone; roller positioned along the inner thigh at roughly 45°, from the groin toward the knee | Keep the target leg extended; use the opposite leg for support |
| Hamstrings | Deadlifts, Romanian deadlifts, leg curls | Seated on the floor; roller under the back of the thigh; use hands behind you for support | Cross one ankle over the other to increase pressure on a single leg |
| IT band / TFL | Squats, lateral movements | Side-lying; roller along the outer thigh from the greater trochanter toward the lateral knee | This area is often very tender — reduce body weight on the roller if needed; do not roll onto the knee |
| Glutes / Piriformis | Squats, deadlifts, hip hinge patterns | Seated on the roller; cross one ankle over the opposite knee (figure-4 position); lean toward the crossed-leg side | Shift weight to find tender spots; the piriformis sits deep in the glute and responds well to sustained pressure |
| Calves | Any standing or jumping movement; loaded carries | Seated; roller under the calf; use hands behind you for support; cross one leg over the other to increase pressure | Rotate the foot inward and outward to cover the medial and lateral heads of the gastrocnemius |
| Latissimus dorsi | Pull-ups, rows, lat pulldowns | Side-lying with the arm outstretched overhead; roller positioned in the axillary (armpit) region along the side of the torso | Roll slowly from the armpit toward the mid-back; this area is often neglected in home gym recovery |
| Thoracic spine (upper/mid back) | Overhead press, rows, any pulling movement | Supine (face up); roller behind the upper back, perpendicular to the spine; arms crossed over the chest or hands behind the head; extend gently over the roller | Work from the mid-back upward toward the shoulders; stop at the base of the neck |
A Full Active Recovery Day Routine for Home Gym Trainees
This routine runs approximately 30 minutes and requires only a foam roller, a resistance band (optional), and floor space. The goal throughout is to keep your heart rate below 60% of your maximum. If you don't have a heart rate monitor, use the talk test: you should be able to speak in full sentences without pausing to breathe.
Part 1: Optional Light Cardio (5–10 minutes)
Start with a brisk walk, an easy spin on a stationary bike, or gentle movement of your choice. The purpose is to elevate your heart rate slightly and begin increasing blood flow to working tissue before the mobility and rolling work. Keep the pace conversational throughout.
Part 2: Mobility Flow (10–12 minutes)
| Exercise | Sets / Reps or Duration | What It Addresses |
|---|---|---|
| Cat-cow | 2 sets × 10 slow reps | Thoracic and lumbar mobility; gentle spinal decompression |
| World's greatest stretch | 2 sets × 5 reps per side | Hip flexors, thoracic rotation, hamstrings — the full posterior chain |
| Hip 90-90 stretch | 2 sets × 60 seconds per side | Hip internal and external rotation; piriformis and glute tension |
| Band pull-apart (or doorframe stretch) | 2 sets × 15 reps | Shoulder external rotation; upper back and posterior shoulder tension |
Part 3: Foam Rolling Sequence (10–12 minutes)
- Calves — 60 seconds per leg
- Hamstrings — 60 seconds per leg
- IT band / TFL — 60 seconds per side (reduce body weight if very tender)
- Quadriceps — 60–90 seconds per leg
- Adductors — 45–60 seconds per leg
- Glutes / piriformis — 60 seconds per side (figure-4 position)
- Lats — 45–60 seconds per side
- Thoracic spine — 60–90 seconds, working from mid-back toward shoulders
Roll slowly through each muscle group, pause on any tender spots for 30–90 seconds until the discomfort begins to ease, then continue. Do not rush. The cadence should feel deliberate — approximately one inch per second.
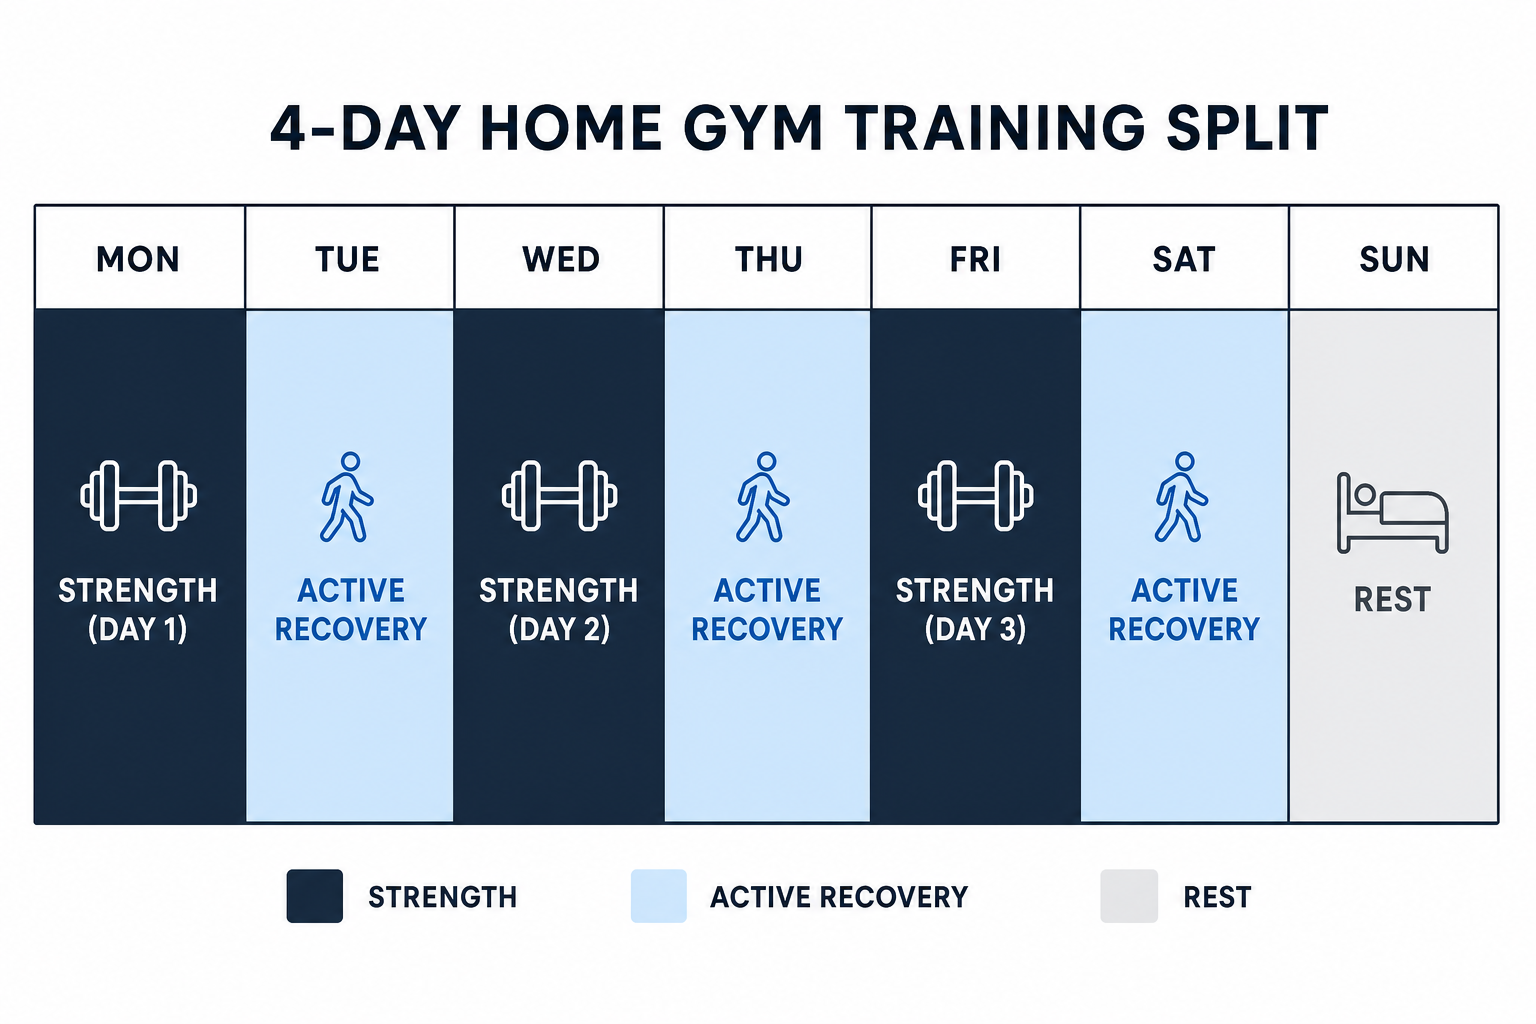
Weekly Schedule Templates: Where to Place Recovery in Your Training Week
The framework here is based on the NASM recommendation (citing Rhea et al., 2003) of spacing strength training days with one to two recovery days in between. The templates below show how to apply this across the most common home gym training splits. Select the template that matches your current schedule and use it as a starting point — it's not rigid, but the principle of not stacking consecutive strength days without a recovery buffer should hold.
| Split | Mon | Tue | Wed | Thu | Fri | Sat | Sun |
|---|---|---|---|---|---|---|---|
| 2-Day | Strength | Active Recovery | Rest | Strength | Active Recovery | Rest | Rest |
| 3-Day | Strength | Active Recovery | Strength | Active Recovery | Strength | Active Recovery | Rest |
| 4-Day | Strength | Active Recovery | Strength | Rest | Strength | Active Recovery | Strength |
When life disrupts the plan — a missed session, a schedule shift, a busy week — the priority is maintaining the recovery buffer rather than preserving the exact day sequence. If you end up training two days in a row, insert an active recovery day before the next strength session rather than pressing forward. The goal is accumulated adaptation over weeks, not perfect adherence to a single week's layout.
Common Mistakes That Reduce Foam Rolling Effectiveness
- Rolling too fast. Rapid back-and-forth movement over a sore area doesn't give the GTO enough time to activate. Slow down to approximately one inch per second and hold on tender spots.
- Rolling directly on joints or bones. Knees, elbows, ankles, the pelvis, and shoulder blades are not soft tissue targets. Rolling over bone can hyperextend joints or cause bruising. Stay on the muscle belly.
- Skipping the 24-hour and 48-hour follow-up sessions. The Pearcey (2015) protocol found that a single post-workout session was less effective than the three-session approach. The follow-up rolls on the days after training are where much of the DOMS-reduction benefit accumulates.
- Treating pain as a sign of progress. Discomfort during rolling — the "good hurt" of a tender trigger point releasing — is expected. Sharp or shooting pain is not. If rolling a specific area produces sharp pain, stop. Foam rolling should feel like productive pressure, not injury.
- Using active recovery days as extra training volume. This is the most consequential mistake. Adding a few sets of accessory work, bumping the bike resistance, or extending the session "just a little" crosses from recovery into training. Heart rate above 60% of your maximum means you're no longer recovering — you're adding to the load your body needs to absorb.
- Rolling the lower lumbar spine. Repeat for emphasis: the lower back is contraindicated for direct foam rolling. Address lower back tightness through hip and thoracic mobility work instead.
Optional Tools to Layer In Once the Basics Are Consistent
A standard cylindrical foam roller is the highest-ROI recovery tool available for home gym use. At $25–50 (the TriggerPoint Grid 13-inch roller is a commonly cited example at around $35 with a 500-lb capacity and a rigid core that doesn't compress under full body weight), it covers the full-body rolling protocol described above and holds up to years of regular use. Start here.
Once foam rolling and active recovery days are genuinely consistent habits — meaning you're doing them reliably, not occasionally — a few additional tools can add precision to specific problem areas:
- Lacrosse ball or dimple ball: More precise pressure than a roller for the glutes, piriformis, and upper back. Useful for trigger points in areas where a full roller is awkward to position. Cost: $5–15.
- Massage gun: Percussive therapy tools (such as the Theragun line) deliver deeper amplitude stimulation than a foam roller and are useful for targeted trigger-point work on large muscle groups. They're faster to use than a roller for spot treatment. Cost: $100–300+ depending on model. This is an upgrade, not a replacement for foundational rolling.
- Resistance bands: Useful for adding light-resistance mobility work to active recovery days — banded glute bridges, lateral band walks, and external rotation exercises keep the hips and shoulders mobile without creating meaningful training load. Cost: $10–25 for a set.
This is general fitness education, not medical advice. For diagnosis or treatment of pain or injury, consult a qualified clinician.
Pick your next session
Browse all routines to find an appropriately-spaced next session.
Spot something off?
This content sits adjacent to health guidance — tell us if a citation or figure needs a correction.