
How to Return to Sport After Injury With Home Exercises
The risky part of returning to sport usually does not look dramatic. It looks like a runner doing one extra acceleration because the calf felt fine for the first five. It looks like a soccer player cutting in a hallway because bodyweight squats stopped feeling interesting. Recurrence after return to sport is common enough to take seriously: reported one-year recurrence rates range from 12% to 63%, and re-injury risk can be 2 to 6 times higher when staged rehab is not completed before returning fully to sport.[1]
That does not mean you need a clinic-grade gym in your apartment. For many common sprains, strains, and tendinopathy flare-ups, home exercises for injury recovery after a sports break can carry you through much of the process: pain control, range of motion, early strength, balance, progressive loading, and the first pieces of sport preparation. The part that matters is not the brand of band or whether your living room looks like a training facility. It is whether the next exercise matches what the tissue can tolerate today and how it responds tomorrow.
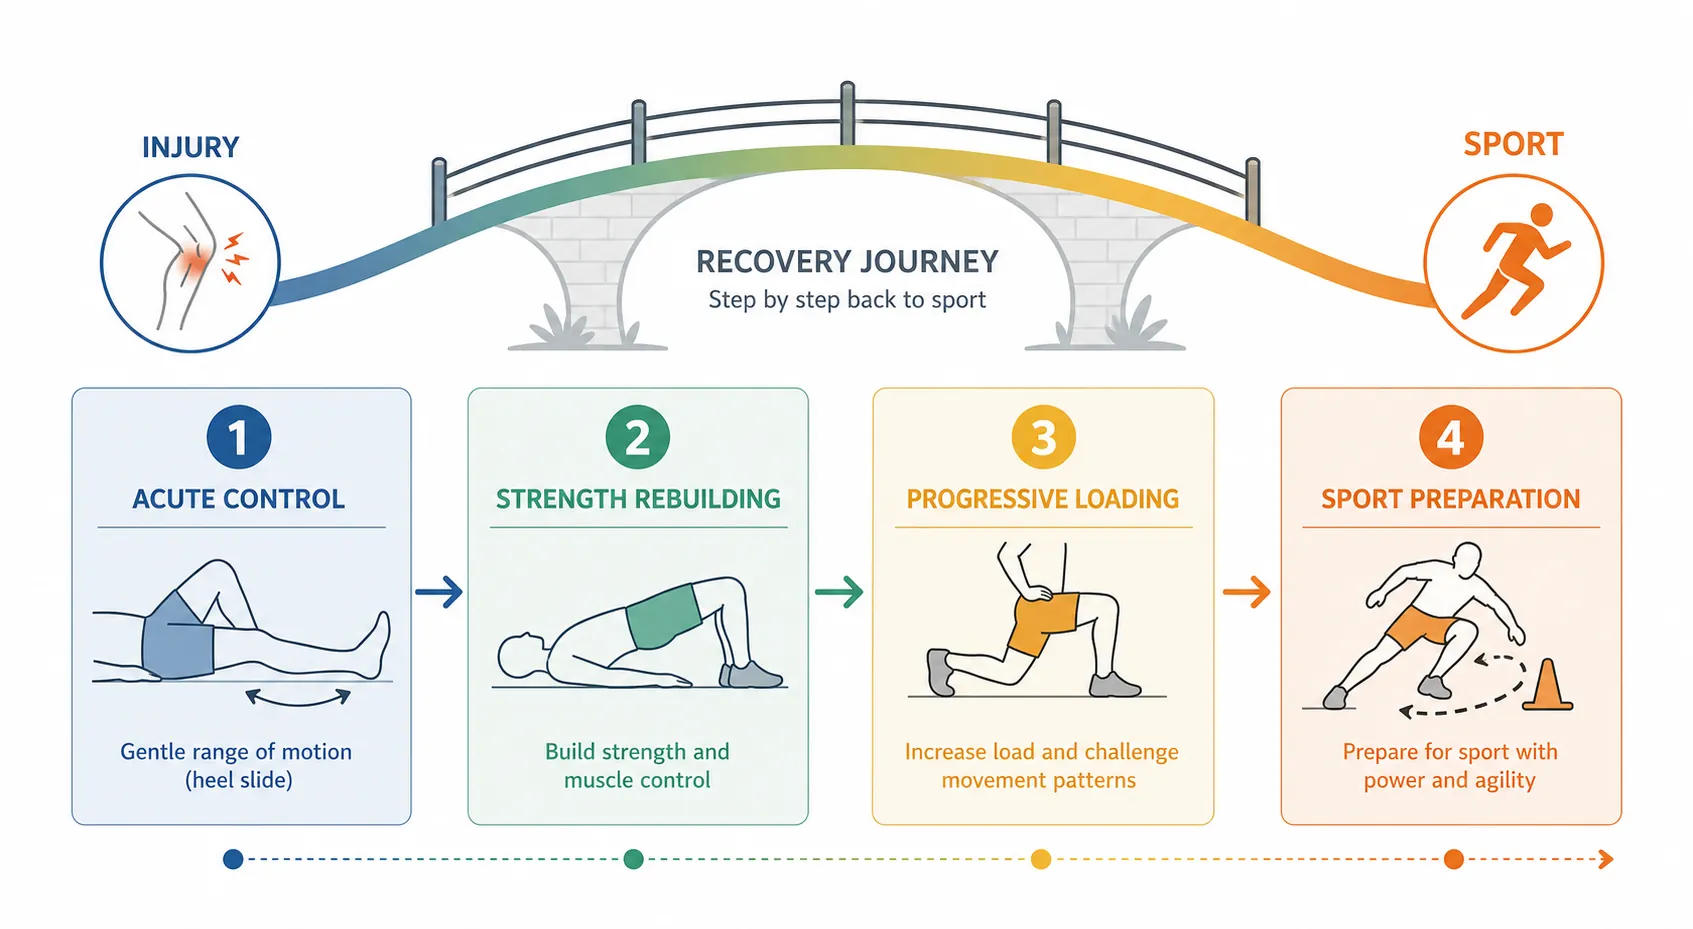
Use pain response as the gatekeeper
Before choosing exercises, set the rule that decides whether you stay in a phase, progress, or back off. A simple 0 to 3 pain-monitoring scale is useful because it keeps the decision close to the symptom instead of the calendar: 0 to 1 pain is generally acceptable, while 2 to 3 means you should reduce intensity, shorten the range, decrease volume, or return to the previous phase.[1]
The delayed response matters as much as the workout itself. If a drill feels manageable at 6 p.m. but the joint is more swollen, stiff, or protective the next morning, the body has already voted. Repeat the phase, reduce the load, or remove the exercise that caused the spike.
| Pain or symptom response | What it usually means | What to do next |
|---|---|---|
| 0 to 1 during exercise, no next-day increase | The current dose is likely tolerable | Repeat for several sessions before progressing |
| 2 to 3 during exercise | The dose is too high for now | Reduce range, resistance, speed, or repetitions |
| Symptoms rise later that day or the next morning | The total session exceeded recovery capacity | Drop volume or return to the previous phase |
| Sharp pain, giving way, new swelling, numbness, or worsening function | This is outside normal training discomfort | Stop and seek professional assessment |
Tissue timelines are another guardrail, not a clearance stamp. General recovery windows often cited for sports injuries are 2 to 4 weeks for muscle, 4 to 6 weeks for tendon, 6 to 8 weeks for bone, and 10 to 12 weeks for ligament tissue.[2] Severity, age, sleep, nutrition, previous fitness, and the exact injury can shift those ranges. Feeling better on a Tuesday does not mean a healing ligament has become ready for hard cutting on Wednesday.
Set up a recovery zone that keeps you honest
A useful home setup is boring in the best way: a mat or carpeted floor, a wall, a sturdy chair, a doorway, and one resistance band. That is enough for most Phase 1 through Phase 3 work. If you are turning a corner of a room into a training area, a 6 by 6 ft footprint is plenty for the early and middle phases; the bigger space problem usually arrives later, when running speed, landing noise, and change of direction enter the plan.
If you need help deciding how much room is realistic, use a small-space home gym layout as a space check, not as a shopping list. A mat can make floor work quieter and more repeatable; this guide to workout mats for small home gyms is most relevant if your floor is slick, hard, or shared with downstairs neighbors.
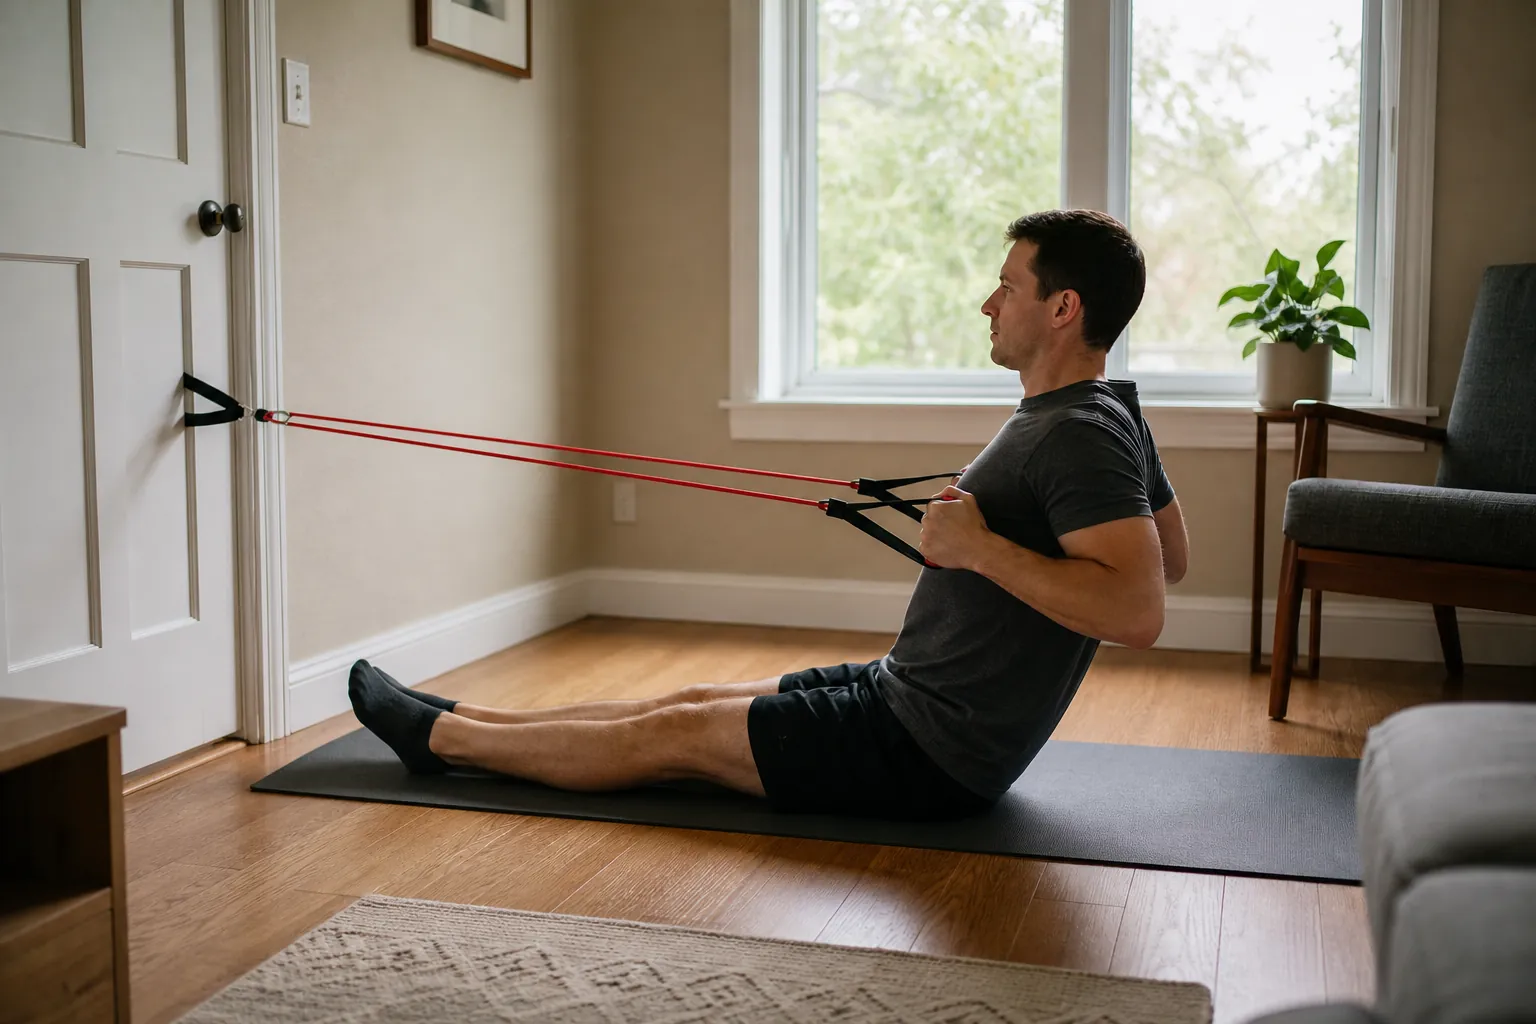
This is not a recommendation to rest until everything feels perfect. ACSM-aligned rehab guidance supports modified activity over extended inactivity once acute symptoms settle, because complete rest can delay healing and deconditioning.[3] ACSM’s resistance training update also supports home-based routines using bodyweight and elastic bands for strength and functional benefits.[4] The useful middle ground is controlled activity: enough load to remind the body what it needs to do, not so much that the injury has to defend itself.
The full phase progression
The CDC’s return-to-play progression for concussion uses a staged increase in activity, with advancement only when symptoms permit.[5] Musculoskeletal injuries are not concussions, so the details change, but the logic travels well: start with symptom-limited activity, restore basic movement, rebuild strength, then layer sport demands instead of jumping straight from “I can walk fine” to “I can play.”
| Phase | Main job | Home tools | Do not progress until |
|---|---|---|---|
| Phase 1: Acute symptom control | Calm pain and swelling while keeping gentle motion | Floor, wall, pillow, chair | Daily movement is improving and exercises stay in the 0 to 1 pain range |
| Phase 2: Early strength rebuilding | Restore basic strength, balance, and control | Chair, wall, step, light band | You can perform slow bodyweight patterns without symptom increase |
| Phase 3: Progressive loading | Build single-leg strength, trunk control, and tolerance to more volume | Band, doorway anchor, chair, 6 by 6 ft space | You tolerate harder sessions without next-day swelling, limp, or protective movement |
| Phase 4: Sport-specific preparation | Reintroduce landing, running speed, and change of direction | More space, outdoor surface, court, field, or gym | You can control landing, acceleration, and direction changes without symptoms or hesitation |
For a separate look at expected time ranges, keep this injury recovery timeline for returning to sport open as the companion piece. This guide is the “what to do next” side of the same problem.
Phase 1: Calm symptoms without becoming completely inactive
Phase 1 starts when the injury is still irritable: swelling, soreness, guarding, reduced range of motion, or pain with normal daily tasks. The aim is not fitness. The aim is to keep nearby joints moving, maintain a small amount of muscle activation, and avoid poking the injury every hour to see if it is still there.
Focus Physiotherapy’s early sports therapy framework includes R.I.C.E.-style symptom control, pain-free isometrics, heel slides, ankle alphabet, pendulum swings, and quad sets in the acute phase.[6] These are not glamorous exercises, which is part of the point. They let you do something useful before the injury is ready for squats, lunges, or running drills.
What to do at home
- R.I.C.E.-style symptom control: use rest from aggravating movements, ice if it helps symptoms, compression if appropriate, and elevation for swelling management. This is symptom control, not permission to stay motionless for a week.
- Pain-free isometrics: gently contract the injured area without moving through a painful range. Think of a light quad squeeze, glute squeeze, calf press into the floor, or shoulder external rotation into a wall.
- Heel slides: lie on your back and slide the heel toward you only as far as the knee or hip tolerates, then slide back out slowly.
- Ankle alphabet: draw letters with the foot while seated or lying down, keeping the movement smooth rather than forcing end range.
- Pendulum swings: for shoulder irritation, lean on a table or chair with the uninjured arm and let the affected arm move gently in small circles.
- Quad sets: sit or lie with the leg supported, tighten the thigh, hold briefly, and relax without lifting the heel or forcing knee pain.
Keep the dose small: several short bouts can be better than one determined session. If swelling increases, range of motion worsens, or you start limping more after the session, the phase is not failing; the dose is too high.
Move to Phase 2 when
- Normal daily movement is trending easier, not just temporarily numb after warming up.
- Gentle range-of-motion work stays at 0 to 1 pain during the session.
- Symptoms do not climb later that day or the next morning.
- You can contract the surrounding muscles without sharp pain or protective bracing.
Phase 2: Rebuild basic strength and control
This is where home rehab becomes powerful. You are no longer just calming the area down, but you are not proving sport readiness yet. Phase 2 asks a practical question: can the injured region share load with the rest of the body in slow, predictable patterns?
The usual home menu includes bodyweight squats, glute bridges, step-ups, clamshells, single-leg balance, wall slides, and resistance band rows.[6] For knee, ankle, hip, and many lower-body strains, the chair, wall, and a low step do more than people give them credit for. For shoulder and upper-back injuries, the wall and doorway band setup can bring back pulling and scapular control without needing machines.
Lower-body pattern work
- Chair squat: sit back to a chair, lightly touch, and stand. Use the chair height to control depth instead of chasing a full squat early.
- Glute bridge: lie on your back, feet on the floor, lift the hips, pause, and lower slowly. Keep the ribs down so the low back does not take over.
- Step-up: use a low step or sturdy stair. Step up slowly, control the knee and hip, then step down without dropping.
- Clamshell: lie on your side with knees bent, open the top knee without rolling the pelvis backward, then lower with control.
- Single-leg balance: stand near a wall or chair, lift one foot, and hold a quiet position. The support is there so you can practice control, not pretend you are in a balance contest.
Upper-body and trunk work
- Wall slide: stand with forearms on a wall and slide upward only through the range that stays smooth and pain-controlled.
- Band row: anchor a resistance band in a doorway, step back, pull the elbows toward the ribs, and pause before slowly returning.
- Dead bug variation: lie on your back and move one limb at a time while keeping the trunk quiet.
- Wall push-up: use the wall angle to keep load low, then progress later to a counter or bench if symptoms allow.
A good Phase 2 session should feel almost too controlled. That is not a flaw. Slow reps expose the compensations you can hide during faster movement: the knee that dives inward, the ankle that wobbles, the shoulder that shrugs, the hip that shifts away from the injured side.
| If you notice this | Change the exercise like this |
|---|---|
| Pain rises above 1 out of 3 | Raise the chair height, reduce step height, shorten the range, or remove the band |
| You shift away from the injured side | Use a mirror or wall reference and slow the rep down |
| Balance drill turns into repeated hopping or grabbing | Use fingertip wall support and shorten the hold |
| Next-day stiffness or swelling increases | Cut total sets first before removing the exercise entirely |
Move to Phase 3 when
- You can squat to a controlled depth without shifting, sharp pain, or next-day symptom increase.
- You can step up and down from a low height without collapsing at the knee, ankle, hip, or shoulder girdle.
- Balance work feels controlled with light support or no support.
- Band rows, wall slides, or other upper-body patterns do not cause delayed soreness that changes daily function.
Phase 3: Load the body enough to prepare it for sport
Phase 3 is where many athletes get impatient because the exercises start to look like training again. That is useful, and it is also where the second injury often gets invited in quietly. The goal is not to make every session hard. The goal is to build tolerance to more load, more single-leg demand, more trunk stiffness, and more repeated effort while symptoms stay boring.
The Phase 3 home list usually includes lunges, split squats, calf raises, plank variations, and banded lateral walks.[6] A single resistance band stored in a drawer can add meaningful difficulty here, and home exercise programs commonly rely on simple tools like bands, chairs, and floor space rather than large equipment.[8]
Progress the lower body
- Reverse lunge: step backward instead of forward to reduce braking demand. Keep the range short at first, then lower deeper only if symptoms stay quiet.
- Split squat: set the feet in place and move straight down and up. This removes the coordination demand of stepping while keeping single-leg loading.
- Calf raise: start with two legs, use a wall for balance, and lower slowly. Progress to more range or single-leg versions only when the tendon or ankle tolerates volume.
- Banded lateral walk: place the band above the knees or at the ankles depending on tolerance, take quiet side steps, and keep the pelvis level.
- Single-leg sit-to-stand variation: use a high chair and keep the nonworking foot lightly supported if needed. This is a progression, not an ego test.
Progress the trunk and upper body
- Front plank: begin from knees or an elevated surface if needed. Stop when position changes, not when willpower runs out.
- Side plank: use bent knees first, then longer lever positions later if the shoulder, hip, or trunk tolerates it.
- Band row progression: increase band tension by stepping farther from the anchor, not by yanking faster.
- Incline push-up: progress from wall to counter to bench height before considering floor push-ups.
- Pallof press: anchor the band to the side and press straight out while resisting rotation, useful when trunk control matters for cutting, swinging, or throwing.
Phase 3 also changes how you judge fatigue. A little muscular effort is expected. Limping, guarding, swelling, or a tendon that feels more reactive the next morning is not just “getting back in shape.” If one exercise repeatedly causes the delayed response, keep the phase but swap the exercise: split squat instead of lunge, two-leg calf raise instead of single-leg, side plank from knees instead of feet.
If you want more structure around limited-equipment programming, a training app can help track sets and progressions, but it should not override the phase criteria. This guide to strength training apps for limited equipment is most useful if you already know which phase you are in.
Move to Phase 4 when
- You can complete Phase 3 sessions without symptom increase during exercise or the next day.
- Single-leg strength drills are controlled on both sides, even if the injured side is not perfectly identical yet.
- You can balance, lunge, step, and brace without visible hesitation or protective movement.
- Daily life no longer reveals the injury every time you use stairs, carry a bag, or move quickly around the house.
Phase 4: Sport preparation is not just harder home exercise
Phase 4 is the place to be more conservative, not less. Plyometrics, high-speed running, and change-of-direction drills are not simply advanced versions of squats and planks. They add speed, impact, braking, reaction time, surface demands, and sometimes other people. A small apartment can handle some low-level preparation, but it is a poor place to fake a field, court, trail, or track.
E3 Rehab frames return-to-sport work around three broad demands: landing and plyometrics, high-speed running, and change of direction.[7] That sequence is a useful way to keep the work honest. If you cannot land quietly in place, high-speed running is not the next problem to solve. If acceleration feels fine but braking and turning create symptoms, you are not ready for full play.
Start with low-noise landing control
In a home setting, Phase 4 can begin with controlled, low-amplitude drills: heel raises with a faster upward phase, small pogo-style weight shifts, snap-downs to an athletic stance, or step-off landings from a very low height if you have a safe surface. The landing should be quiet, balanced, and repeatable. If you hear every rep, your downstairs neighbor is not the only one getting feedback.
Keep the first landing drills in place. Do not add lateral hops, rotational landings, or repeated jumps because one set felt fine. The first successful session is information, not clearance.
Move running and direction changes outside
High-speed running needs distance to build up, hold speed, and slow down. Change-of-direction work needs room to brake safely. That is where a hallway or tiny living room becomes a bad training partner. Use a track, quiet court, field edge, driveway, or gym lane when speed and cutting become central.
- For running sports: start with walk-jog intervals, then controlled strides, then faster accelerations if symptoms remain quiet.
- For court sports: start with shuffle patterns at low speed, then planned decelerations, then sharper cuts.
- For field sports: separate straight-line running from cutting before combining them.
- For throwing, swinging, or overhead sports: rebuild volume and intensity separately instead of returning with full-effort repetitions.
If you are expanding beyond a band and mat for later-phase work, this small-space home gym under $500 guide can help, but equipment is still secondary to space, landing control, and symptom response.
Do not ignore hesitation
Fear of movement after a serious injury is not weakness. It changes how people land, cut, accelerate, and protect themselves. Psychological readiness measures have been linked with return-to-sport outcomes; ACL-RSI scores below 56 out of 100 are associated with increased risk of abandoning sport, and kinesiophobia can affect up to 50% of athletes after serious injury.[1]
The practical response is slower exposure, not a pep talk. If you hesitate before every jump, flinch before cutting, or cannot trust the injured side even when strength work looks good, use lower-speed drills and consider professional assessment. Confidence should be rebuilt through evidence, not forced by frustration.
A sample week by phase
The exact dosage depends on the injury and your clinician’s instructions if you have them. The examples below are deliberately conservative and should be adjusted using the pain-response rule.
| Phase | Example home week | Main check |
|---|---|---|
| Phase 1 | Gentle range-of-motion and isometrics most days; short sessions; symptom control as needed | Less swelling, easier daily movement, no delayed flare |
| Phase 2 | Strength and balance 3 to 4 days; mobility or easy walking on other days if tolerated | Slow bodyweight patterns stay controlled |
| Phase 3 | Progressive strength 3 days; balance or trunk work 2 to 3 days; recovery days between harder sessions | Higher load does not create next-day symptoms |
| Phase 4 | Strength maintenance 2 to 3 days; landing, running, or sport drills separated by recovery time | Impact, speed, and direction changes remain controlled |
A common mistake is stacking everything that feels useful into the same day: squats, lunges, calf raises, balance, planks, band walks, then a test jog. If symptoms rise afterward, you will not know which part exceeded capacity. Change one major variable at a time: range, resistance, reps, speed, surface, or direction.
When home rehab is not enough
A home progression is appropriate for many recreational athletes after common injuries, especially when symptoms are improving and function is returning. It is not a substitute for assessment when the injury is severe, worsening, unstable, or unclear.
- Get assessed if you cannot bear weight, have major swelling, deformity, numbness, locking, giving way, or pain that is not improving.
- Get assessed if symptoms repeatedly flare despite reducing volume and returning to easier phases.
- Get assessed before high-speed running or cutting if the injury involved a serious ligament, tendon, bone, concussion, or surgery.
- Get assessed if fear, hesitation, or low confidence is changing how you move during sport-specific drills.
The responsible finish line is not “pain-free once.” It is repeated tolerance: the exercise feels controlled, the next day looks the same or better, and the next phase adds only one new demand at a time. Bodyweight work and one resistance band can get many athletes through the early and middle pathway. Full return to sport still has to earn its place through symptoms, staged loading, enough space for speed and direction changes, and sometimes a professional set of eyes.
References
- Returning to Sports After an Injury, Physioactif
- Getting Back in the Game: Sports Injury Recovery Timelines You Should Know, Moriarty PT
- What the ACSM Guidelines Say About Exercise Rehab and Recovery—and Why It Matters for Your Health, MN Spine and Sport
- Resistance Training Guidelines Update 2026, ACSM
- Returning to Sports, CDC HEADS UP
- Sports Therapy Exercises, Focus Physiotherapy
- Return to Sport Rehab, E3 Rehab
- Home Exercises for Injury Recovery, Peake Physical Therapy
Ready to adjust your schedule? Return to Routines to match cadence to your workouts.
Spot a citation issue?
This entry stays in general-population guideline territory and is not injury-specific or medical advice. If the cited figure or source looks outdated, sign in or create a free account to flag it, or reach us via the About page.