How to Set Up a Garage Gym on a Budget: A Phased Build Guide from $300 to $1,500
A practical, sequence-driven guide for budget-conscious lifters who want to cancel their gym membership and build a functional garage gym incrementally — covering space planning, flooring, three independently functional build phases, used equipment tactics, and the hidden costs most guides skip.
- Budget tier
- $300–$1,500
- Space type
- garage
Items included: —
Why a Garage Gym Beats a Gym Membership Over Two Years
The average US gym membership costs around $58 per month. That's $696 a year — money that disappears whether you show up or not, whether the equipment you need is available, and whether the parking lot is full on a Tuesday night. A garage gym eliminates all of that.
The math is straightforward. If you build a functional garage gym for $1,000 total and cancel your membership, your monthly savings cover the build cost in roughly 17 to 18 months. After that, you're training for free — indefinitely. The equipment doesn't depreciate to zero; a good barbell and iron plates will outlast a decade of memberships.
| Scenario | Year 1 Cost | Year 2 Cost | 24-Month Total |
|---|---|---|---|
| Gym membership ($58/mo) | $696 | $696 | $1,392 |
| Garage gym — Phase 1 only ($400 build) | $400 | $0 | $400 |
| Garage gym — Phase 1–2 ($900 build) | $900 | $0 | $900 |
| Garage gym — Full build ($1,300 build) | $1,300 | $0 | $1,300 |
The phased build approach in this guide is designed to reach break-even as efficiently as possible. Phase 1 alone — at $300 to $500 — pays for itself in under nine months against a $58/month membership. You don't need to complete all three phases before the math works in your favor.
Before You Buy Anything: The Pre-Purchase Space Checklist
The most expensive garage gym mistakes happen before a single piece of equipment is ordered. A rack that doesn't fit under your door opener, a barbell that clips the ceiling during overhead press, or a mat layout that blocks your car — these are all preventable with 30 minutes of measurement before you spend anything.
Work through this checklist in sequence. Don't skip to equipment research until you've completed it.
Ceiling Height
Measure from the floor to the lowest fixed obstruction — this may be the ceiling itself, a beam, or the bottom of the garage door track mechanism. Measure the door track clearance separately from the ceiling height. A garage may have 10-foot ceilings but a door opener mechanism that hangs down to 8.5 feet directly above your squat rack position. Both numbers matter.
| Ceiling Height | What It Allows | Key Limitation |
|---|---|---|
| 7–8 ft | Squats, bench press, deadlifts, rows | No overhead press, no pull-ups — eliminates most vertical movements |
| 8–9 ft | Overhead press for shorter users (under ~5'8") | Taller lifters will clip the ceiling on overhead work; pull-ups marginal |
| 9–10 ft | Full overhead press and pull-ups for most users | Plyometrics limited; jump rope requires care |
| 10 ft+ | All movements including plyometrics and box jumps | Ideal — no meaningful restrictions |
Floor Condition
Check for three things: visible cracks or uneven sections (a rack on a cracked floor can shift under load), any noticeable slope (water pooling near one wall is a sign), and moisture or dampness, especially along the perimeter walls. Minor cracks and slight slopes are common in older garages and are manageable — just position your primary lifting station on the flattest section.
Map Your Equipment Footprints Before Buying
Use painter's tape to mark out the footprint of equipment you're considering on the actual garage floor before purchasing anything. A power rack needs a minimum 8×8 foot working zone — that's the rack footprint plus the space to load and unload the bar, step back from the rack, and move around safely. Mark the car parking zone first, then work with what's left.
- Measure ceiling height to the lowest fixed obstruction (not just the ceiling itself)
- Measure garage door track clearance separately — mark where the opener mechanism hangs
- Check floor for cracks, slope, and moisture before choosing a mat layout
- Mark the car parking zone with tape first, then plan equipment around it
- Use painter's tape to outline the 8×8 ft minimum rack zone and bench footprint before buying
- Identify your electrical situation — is there an outlet near the intended equipment zone?
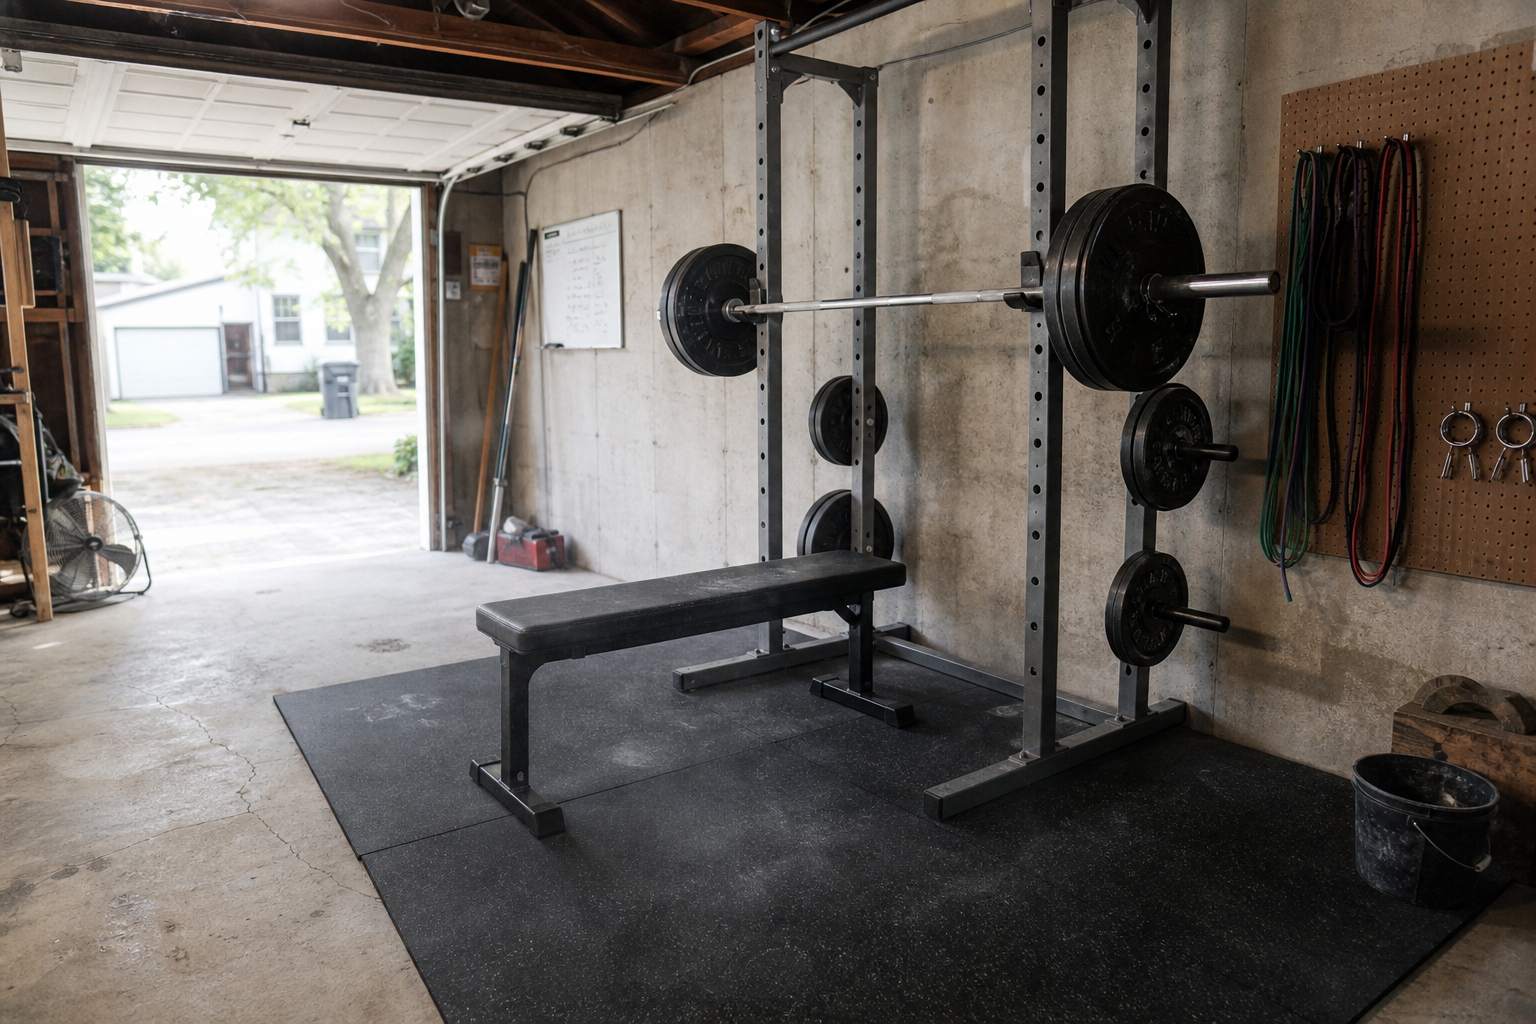
Phase 1 — Essential Starter Kit ($300–$500): Flooring First, Then Equipment
Phase 1 is not a temporary setup or a stripped-down version of a real gym. It's a complete, functional training system that covers every major movement pattern — push, pull, hinge, squat, and carry — and supports 12 or more months of consistent beginner progress. The equipment is simple. The sequencing matters.
Start With Flooring — Before Anything Else Arrives
Horse stall mats are the mandatory first purchase. They're available at farm supply stores (Tractor Supply Co. is the most widely accessible source in the US) in standard 4×6-foot sheets, typically at $40–$60 per mat. For a basic Phase 1 setup, two to three mats — covering a 4×12 or 6×8 area — is sufficient.
Concrete floors are unforgiving on joints, damaging to equipment, and genuinely dangerous when a dumbbell or plate is dropped. Rubber mats protect the floor, protect the equipment, reduce noise transmission, and give you a stable, non-slip surface. They're not an optional upgrade — they're infrastructure. Buy them before your first equipment delivery.
Phase 1 Equipment List
| Item | Estimated Cost (New) | Notes |
|---|---|---|
| Horse stall mats (3 × 4×6 ft) | $120–$180 | Farm supply stores; covers a 6×12 ft zone |
| Flat utility bench | $60–$120 | Flat only for Phase 1; adjustable adds cost and isn't required yet |
| Adjustable dumbbells (pair) | $100–$200 | Selectorized or spinlock; cover a range, not just one weight |
| Resistance bands (set) | $25–$50 | Loop and tube styles; add pull and mobility work |
| Phase 1 Total | $305–$550 | Stay toward the lower end by buying a basic bench and mid-range dumbbells |
This combination covers dumbbell pressing, rows, Romanian deadlifts, lunges, goblet squats, lateral raises, curls, tricep work, and a full range of band-assisted movements including pull-aparts, face pulls, and mobility drills. There is no major movement pattern missing from this setup.
A beginner following a structured program — three days per week, consistent progressive overload — can make meaningful strength gains for at least a year on Phase 1 equipment alone. The constraint is not the equipment; it's consistency and programming.
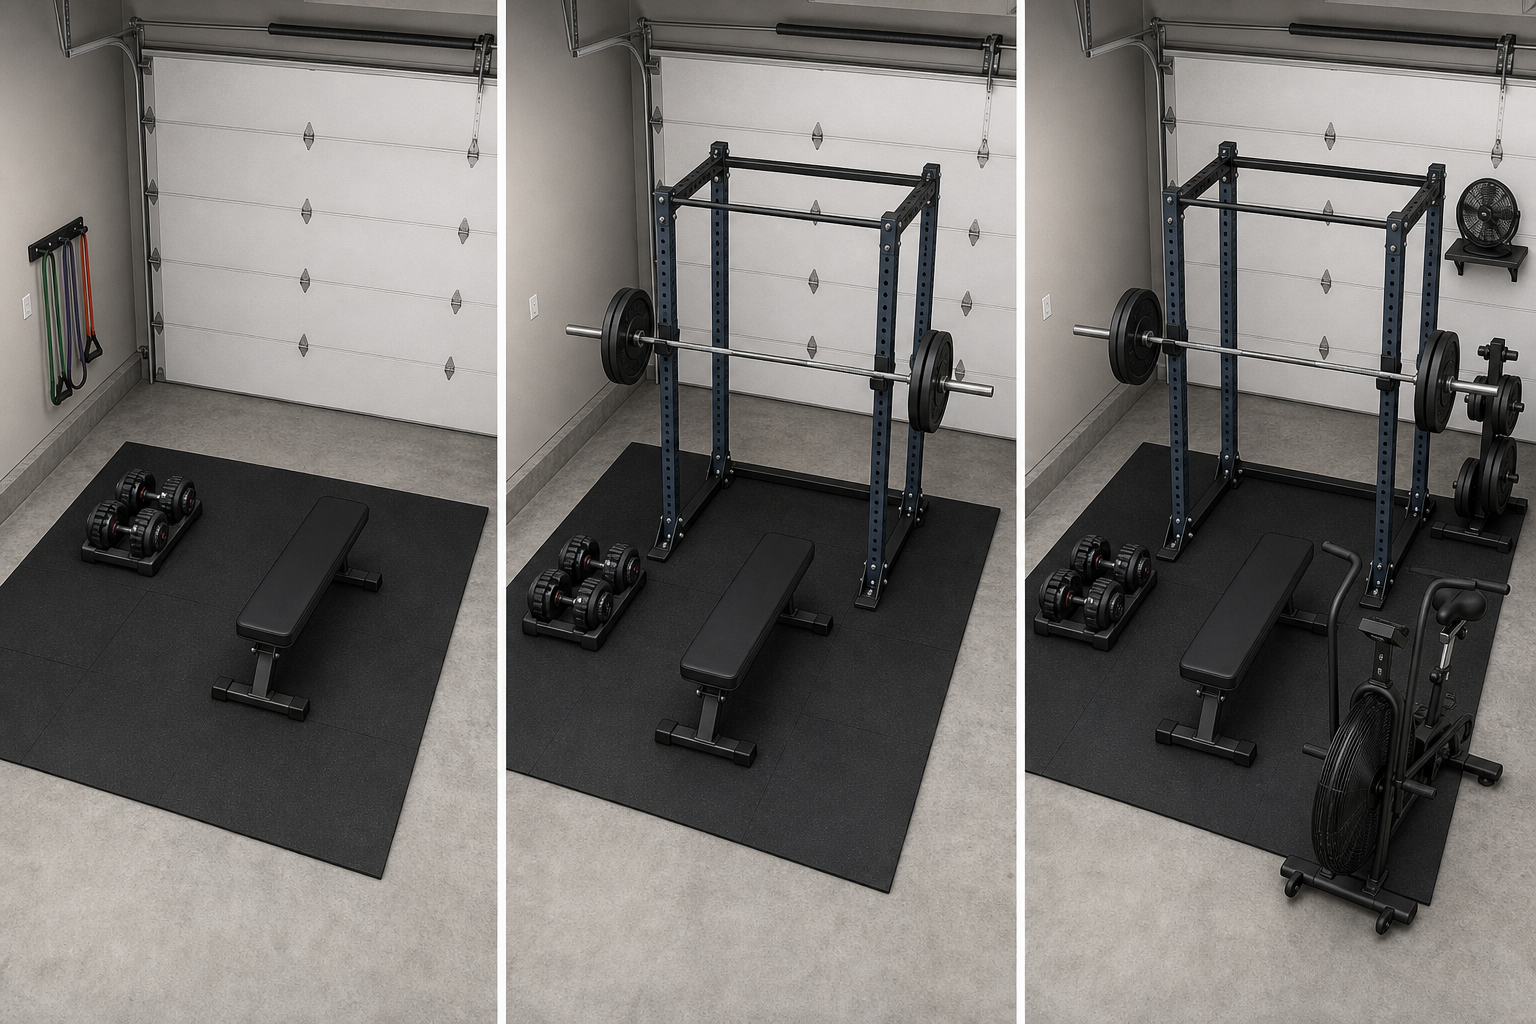
Phase 2 — Core Free Weight Setup ($500–$1,000): Rack, Barbell, and Plates
Phase 2 is where a garage gym separates from what a commercial gym offers at the same price point. A budget squat rack, an Olympic barbell, and iron plates — purchased together for $500 to $700 new, or significantly less used — give you more training versatility than any all-in-one machine in the same price range. The combination supports barbell squats, deadlifts, bench press, overhead press, barbell rows, and rack pulls. No all-in-one machine at this price tier matches that range.
The Barbell Is the One Item Where Quality Matters
Budget racks are fine. Budget plates are fine. A budget barbell is a mistake that will cost you more in the long run.
A $45–$50 barbell will show visible wear — bent sleeves, degraded knurling, seized spin — within months of regular use under moderate load. A mid-range barbell in the $150–$250 range, from an established but non-premium brand, will last years of heavy use and retain resale value. The difference in daily training feel is also significant: a well-made barbell with smooth sleeve rotation protects your wrists on Olympic lifts and makes pressing movements more comfortable.
Phase 2 Equipment List
| Item | Estimated Cost (New) | Notes |
|---|---|---|
| Budget squat/power rack | $200–$400 | Four-post with safety bars; avoid two-post squat stands for solo training |
| Olympic barbell (7 ft, 45 lb) | $150–$250 | Mid-range quality; this is not where to cut costs |
| Iron plates (starter set, ~200 lb) | $150–$250 | Iron over bumper plates at this budget; used iron plates are ideal |
| Barbell collars (pair) | $15–$30 | Spring collars are fine; lockjaw collars are more secure |
| Phase 2 Total (new) | $515–$930 | Used equipment can reduce this by 40–60%; see the used equipment section |
Iron plates are the best-value plate choice at this phase. Bumper plates — the rubber-coated variety designed for Olympic lifting drops — cost two to three times more per pound and aren't necessary for standard strength training movements. If you're not doing clean-and-jerk or snatch, iron plates are the correct choice.
Phase 3 — Comfort and Conditioning ($1,000–$1,500): Cardio, Storage, and Climate
Phase 3 is not about adding more weight capacity or more free weight variety. It's about making the training environment more sustainable and adding conditioning work that the rack-and-barbell setup doesn't cover. You do not need Phase 3 to have a fully functional gym — Phases 1 and 2 handle that. Phase 3 makes the gym more comfortable and more complete.
One Conditioning Piece
Pick one conditioning tool based on your space and preference. An air bike (also called an assault bike or fan bike) is the most versatile option — it provides full-body cardiovascular work, requires no running clearance, and fits in a roughly 4×4 foot footprint. A rowing machine requires more floor length (about 9 feet when in use) but is low-impact and covers a different movement pattern than barbell training. A jump rope costs under $15, requires no floor space, and is the most efficient conditioning option if ceiling height allows.
- Air bike: ~$300–$600 new; best all-around conditioning tool for a garage gym; ~4×4 ft footprint
- Rowing machine: ~$400–$800 new; low-impact, full-body; requires ~9 ft of clear floor length when in use
- Jump rope: $10–$20; zero footprint; requires 10+ ft ceiling clearance and enough overhead space to clear the rope
Plate Storage and Climate Control
A plate storage tree ($40–$80) keeps plates off the floor and prevents the trip-and-stub hazard of loose iron scattered around the mat zone. Wall-mounted storage systems are more space-efficient but require drilling into the garage wall.
Climate control is the most commonly underestimated Phase 3 investment. An uninsulated garage in summer can reach 95–105°F in most of the US South and Midwest. A box fan ($30–$50) is the minimum viable solution and should be considered a Phase 2 purchase in warmer climates. For winter training in cold-weather regions, a portable propane or electric space heater ($60–$150) makes early morning sessions viable. A mini-split system ($800–$1,500 installed) is the permanent solution if budget allows and you own the property.
New vs. Used Equipment: How to Buy Smart on Facebook Marketplace and Craigslist
Used gym equipment is one of the most reliable secondhand markets in the US. Iron plates and racks are heavy, difficult to ship, and consistently available locally — which keeps prices low and inventory high in most metropolitan areas. Typical savings on used iron plates and racks run 40–70% compared to new retail prices.
Facebook Marketplace is currently the most active platform for gym equipment in most US markets. Craigslist remains useful in some cities. OfferUp is a viable third option. Search for "weight plates," "squat rack," "barbell," and "home gym" — and set up saved searches with notifications if you're not in a rush.
What to Inspect Before You Buy
- Iron plates: Check for cracks, verify weight accuracy if you can (a postal scale works for smaller plates), and inspect the center hole for deformation. Surface rust is cosmetic and normal — it doesn't affect function. Used iron plates are almost always a safe buy.
- Power rack: Inspect welds at the base and uprights for cracks or separation. Check that the uprights are plumb (not bent). Verify all hardware is present — J-hooks, safety bars, and bolts. Test that the J-hooks seat securely in the upright holes without wobble.
- Barbell: This is the item that requires the most careful inspection. Roll the bar on a flat surface to check for bends — a bent bar is unusable and unsafe. Spin the sleeves (the end sections where plates load) — they should rotate freely with minimal resistance. Check the knurling for wear and the shaft for deep rust pitting. A used barbell in good condition is a fine purchase; a used barbell with a bent shaft or seized sleeves is not.
- Flat bench: Check that all four legs are stable on a flat surface with no wobble. Inspect the pad for tears or compression that has flattened it completely. Test the leg bolts for tightness.
Smith Machine vs. Power Rack: The Budget Buyer's Decision
Within the $500–$1,000 Phase 2 budget, this is a real decision — not a clear-cut winner. Both options are available at this price tier. The right choice depends on how you want to train, not on which piece of equipment is objectively superior.
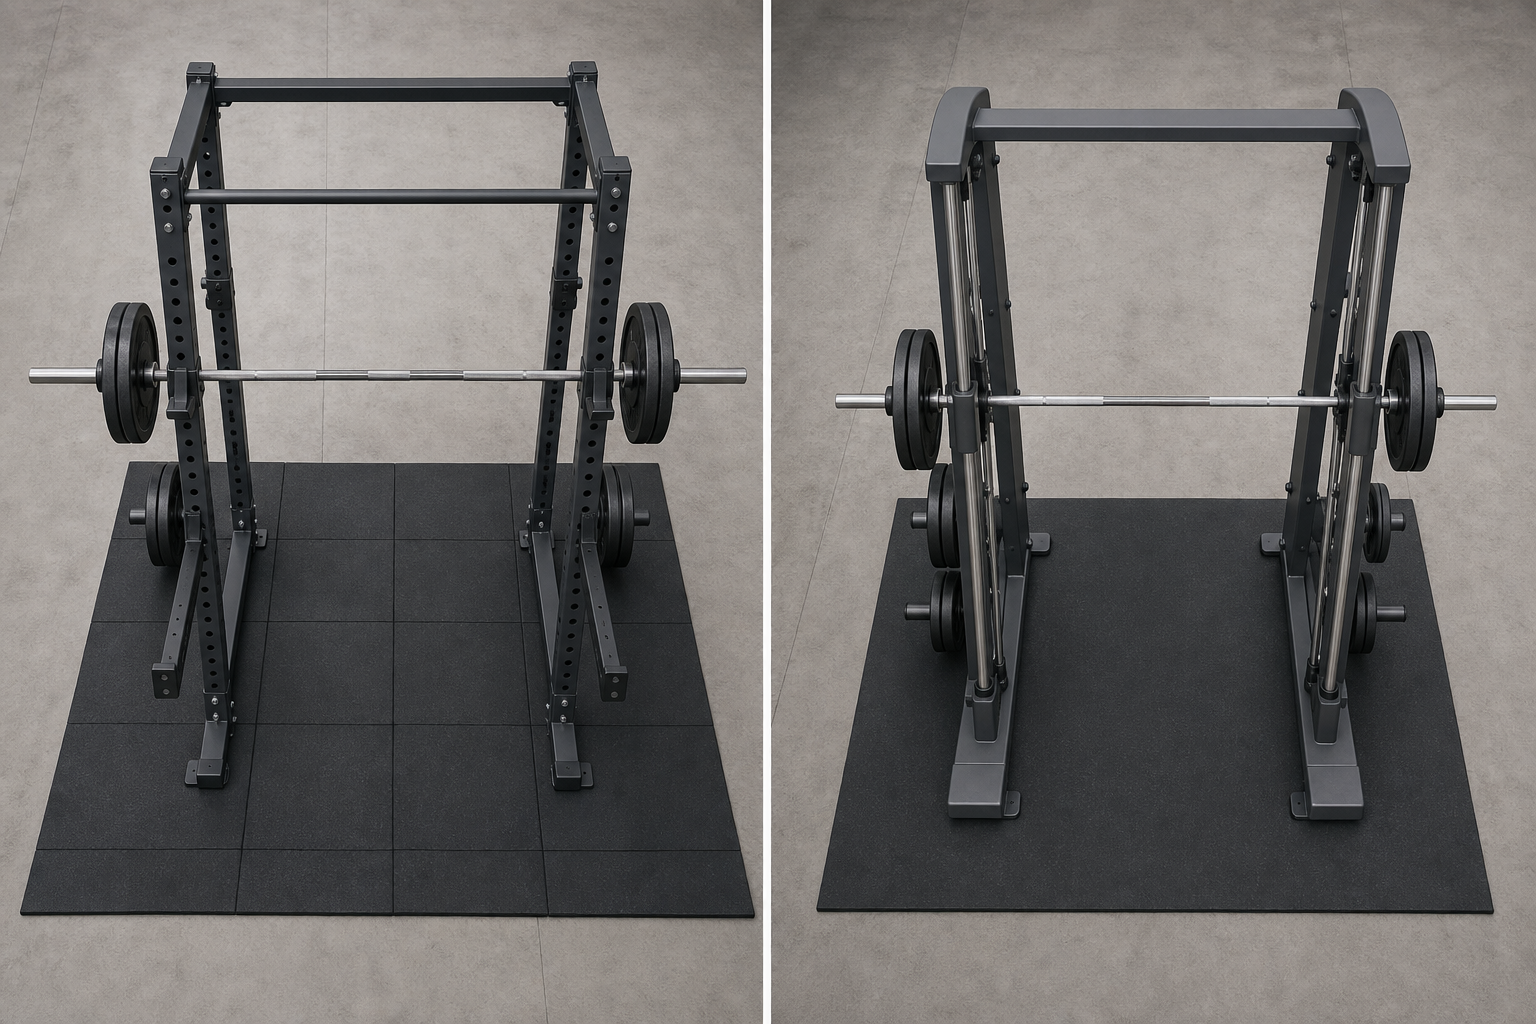
| Factor | Power Rack | Smith Machine |
|---|---|---|
| Bar path | Free — you control the movement | Guided — fixed vertical or slight-angle rail |
| Solo safety | Requires safety bars set correctly | Built-in catches at any height |
| Exercise variety | Squats, bench, OHP, deadlifts, rows, pull-ups (with attachment) | Squats, bench, OHP, rows, cable movements (on combo units) |
| Footprint | 8×8 ft minimum working zone required | More compact; typically 4×6 ft working zone |
| Long-term versatility | Higher — free barbell transfers to more movement patterns | Lower — fixed bar path limits some strength development |
| Best for | Solo lifters who want free barbell progression | Lifters who prefer guided movement or want cable variety in one unit |
For most people building this phased garage gym, a power rack is the better Phase 2 choice. It's more versatile over time, works with the barbell and plates you're already buying, and doesn't lock you into a fixed movement pattern. The free barbell squat and bench press, done consistently with correct form, produce more functional strength development than guided-rail equivalents.
The Smith machine is the right choice if: you consistently train alone and want the additional security of built-in catches without relying on correctly set safety bars, your ceiling height or floor plan makes a full power rack footprint impractical, or you specifically want cable-based movements and prefer a combo unit over buying a separate cable attachment later.
Hidden Costs and Budget Mistakes to Avoid
Most garage gym budget guides focus on the headline equipment costs and ignore the $150–$300 in accessory and infrastructure spending that every setup eventually requires. These aren't optional extras — they're inevitable additions. Budget for them from the start rather than discovering them after you've already spent your Phase 2 allocation.
- Barbell collars: $15–$30. Required for safe barbell training. Spring collars are adequate; lockjaw collars are more secure for heavier loads.
- Lighting: $30–$80. Many garages have a single overhead fixture that creates shadows in exactly the wrong places. A clip-on LED work light or a second ceiling fixture resolves this.
- Fan: $30–$50. In most US climates, a box or floor fan is necessary for summer training. Budget this into Phase 2 if you're building in warm months.
- Cable ties and wall anchors: $10–$20. For organizing resistance bands, jump ropes, and cables off the floor.
- Wall storage (hooks, pegboard, or basic rack): $30–$80. Keeps the mat zone clear and equipment accessible.
- Chalk: $10–$20. Not strictly necessary but significantly improves grip on deadlifts and rows. Liquid chalk is less messy for a shared garage.
The Two Most Costly Early Mistakes
Skipping flooring is the single most common and most expensive early error in a garage gym build. Concrete damages equipment, is punishing on joints during standing exercises, and creates a noise and vibration problem when plates or dumbbells are set down. Horse stall mats cost $120–$180 for a basic Phase 1 coverage area. Replacing a damaged concrete floor or a warped equipment base costs far more. Buy the mats before anything else arrives.
Buying accessories before your main station is in place is the second common mistake. Resistance band sets, foam rollers, kettlebells, and cable attachments are all useful — but buying them before you have a rack and barbell means you've spent Phase 2 money on Phase 3 items. Follow the phase sequence. The accessories will still be there when you're ready for them.
The Upgrade Path Beyond $1,500
Once you've completed all three phases, the gym is genuinely complete for general strength and conditioning training. Further additions are about variety and specialization, not about filling functional gaps.
- Cable tower or lat pulldown attachment ($200–$600): Adds vertical pulling movements that a standard rack doesn't cover without a pull-up bar.
- Dedicated leg machine ($300–$800): A leg press or leg curl machine adds isolation volume for quads and hamstrings. Not essential, but useful for lifters who want more leg specialization.
- Additional dumbbell pairs ($50–$150): Filling in weight gaps in your adjustable dumbbell range, or adding fixed-weight dumbbells for specific movements.
- Mirrors ($100–$300): Useful for form checking on pressing and squatting movements. Not a training tool, but a practical addition for solo training.
- Flooring expansion: Extending rubber mat coverage to the full garage floor if you've only covered the primary training zone.
None of these additions are necessary for a functional training environment. They're enhancements for lifters who have been training consistently in their Phase 1–3 setup and want to expand specific capabilities.
Frequently Asked Questions
Can I still park a car in the garage?
Yes, in most cases — with planning. A standard single-car garage bay is 10–12 feet wide and 20–24 feet deep. If you position your equipment along one wall or in one corner, you can typically maintain a functional parking spot. The Phase 1 setup (bench and dumbbells on a 6×8 mat zone) takes up roughly one-third of a standard single-car bay. A Phase 2 rack adds footprint, but a compact four-post rack in the 48–52 inch width range still leaves room for a vehicle in most single-car garages. Use painter's tape to confirm before buying.
What ceiling height do I actually need?
For a rack, barbell, and bench setup without overhead pressing: 7 to 8 feet is workable. For overhead press and pull-ups: 9 feet is the practical minimum for most lifters. For a fully unrestricted setup including plyometrics: 10 feet or more. If your ceiling is under 8 feet, focus on Phase 1 and Phase 2 movements that don't require vertical clearance — squats, deadlifts, bench press, and rows all work at lower ceiling heights. Always measure to the door track mechanism, not just the ceiling.
Is used equipment safe?
Used iron plates and racks are generally low-risk purchases when inspected properly. Iron doesn't degrade under normal use — a plate that held 300 pounds for the previous owner will hold 300 pounds for you. The items that require more careful inspection are barbells (check for bends and sleeve spin) and benches (check for stability and pad integrity). Follow the inspection checklist in the used equipment section above. If you can't inspect something in person before buying, the risk increases — this applies especially to barbells.
How long until my garage gym pays for itself?
At the US average gym membership cost of $58/month, a $1,000 Phase 1–2 build reaches break-even in roughly 17 to 18 months. A $400 Phase 1 build breaks even in under 7 months. These calculations assume you cancel your membership when the garage gym is functional — which, for Phase 1, is the day the mats and equipment arrive. After break-even, every month of training in your garage gym is money you're no longer spending on membership fees.
Some links on this page are affiliate links — they may earn us a commission at no extra cost to you. Our tier and tests are decided before we ever check which links pay; see our full affiliate disclosure.
Spot something off?
Noise and floor-damage claims carry real deposit-risk consequences if we get them wrong — tell us if your experience with this build didn't match what's above.