
Hamstring Strain Recovery Exercises You Can Do at Home
A criteria-gated home rehab plan for a grade 1–2 hamstring strain, from first-48-hour care through eccentric loading to a return-to-activity check. Follow the ≤4/10 pain rule, advance only when pain-free gates are met, and know the red flags that mean you should see a clinician instead.
- Equipment tier required
- none
- Duration
- 15 min
- Difficulty
- beginner
- Target area
- hamstrings
- Space footprint needed
- small
- Noise level
- low
First decide whether this belongs at home
Hamstring strain recovery exercises at home make sense for a mild-to-moderate strain: you can walk, the pain is manageable, and symptoms are not getting worse as the day goes on. They do not make sense when the injury behaves like something bigger than a simple grade 1–2 strain.
Do not self-manage this plan if you felt or heard a pop and then could not walk normally, cannot bear weight, have marked weakness, numbness, major swelling or bruising, a visible deformity, severe pain, or symptoms that keep worsening instead of settling. Mayo Clinic’s guidance for hamstring injury care is clear that severe pain, major bruising or swelling, and difficulty bearing weight are reasons to seek medical care rather than simply pushing on with home treatment.[1]
The working rule for the rest of this article is simple but not casual: exercise discomfort may be acceptable up to 4 out of 10, as used in pain-threshold hamstring rehabilitation research, but it should not be sharp, should not make you limp more afterward, and should not leave the hamstring more painful the next day.[2] If an exercise crosses that line, shorten the range, reduce the effort, or return to the previous gate.

The whole route, before the exercises
A calendar can help you remember when the injury happened, but it should not decide when you advance. The useful question is what your hamstring can do today without sharp pain or a symptom flare. This is the home version of a criteria-based progression: calm the injury, restore normal walking, earn a double-leg bridge, earn a single-leg bridge, then add eccentric and lengthened work before returning to faster activity.
| Stage | Main job | Home exercises | Gate before moving on |
|---|---|---|---|
| First 48 hours | Protect the strain while keeping easy movement | Short walks as tolerated, gentle heel digs, comfortable range-of-motion | Walking around the home without a growing limp or sharp pain |
| Early loading | Let the hamstring contract without being stretched hard | Heel-dig isometrics, short-lever bridge holds, double-leg bridges | Pain-free double-leg bridge |
| Bridge progression | Build useful strength for stairs, sitting, walking, and training | Double-leg bridge, bridge march, single-leg bridge | Pain-free single-leg bridge |
| Eccentric and lengthened loading | Prepare the hamstring for the part of movement where many strains complain | Towel sliders, long-lever bridge, kickstand hip hinge, optional assisted Nordic lowering | Exercises stay at ≤4/10, no sharp pain, no next-day flare |
| Return to activity | Test whether the leg tolerates impact and speed again | Brisk walking, walk-jog intervals, gradual sport or workout re-entry | No limp, no sharp pain, no pain increase during or after |
The first 48 hours: protect it without disappearing into bed
The first two days are not a test of toughness. NHS advice for sprains and strains emphasizes protection, rest, ice, compression, and elevation early on, and avoiding heat, alcohol, running, and massage in the first 48 hours because these can worsen swelling or bleeding in the injured tissue.[3] For a hamstring, that usually means shortening your stride, avoiding hills and stairs when you can, and not stretching aggressively just because the back of the thigh feels tight.
Ice can be used for comfort during this window. NHS guidance suggests wrapping an ice pack or frozen peas in a towel and applying it for up to 20 minutes every 2 to 3 hours in the first 48 hours after a sprain or strain.[3] That is symptom management, not a rehab plan by itself. If all you do is wait for the thigh to feel quiet while walking around the kitchen, you still have not shown that the hamstring can produce force safely.
Keep ordinary movement small and honest. Walk only as far as you can without limping more. Sit with the knee slightly bent if a straight-leg position pulls on the injury. When getting up from a chair, use both legs and your hands if needed. The goal is to reduce unnecessary irritation while preserving the basic rhythm of daily life.
Gentle heel-dig isometric
Lie on your back or sit on the floor with the injured knee bent. Press the heel lightly into the floor as if you were trying to drag it toward your body, but do not actually move it. Hold 5 to 10 seconds, then relax. Do 5 to 10 holds. Start at about one-third effort. If that stays calm, work toward moderate effort over later sessions.
This should feel like a controlled contraction in the back of the thigh, not a jab. If the hamstring grabs sharply, reduce the effort or stop for the day. Early loading is useful only when it is bounded.
Gate 1: normal walking before real loading
Before you start bridge work, check the boring thing first: walking. You should be able to walk across a room and around the block at an easy pace without a limp that builds, without sharp pain, and without paying for it later that day. Princeton University’s hamstring strain rehabilitation material uses functional progressions and pain-free advancement rather than simply clearing people by time alone, including pain-free walking and bridge-based checkpoints before running progression.[4]
If walking is still altered, keep the first-48-hour approach a little longer and stay with light heel digs. You can also train around the injury: upper-body work, gentle cycling only if it is pain-free, core exercises that do not pull on the hamstring, and short, flat walks. The injured tissue does not need drama; it needs repeatable inputs it can tolerate.
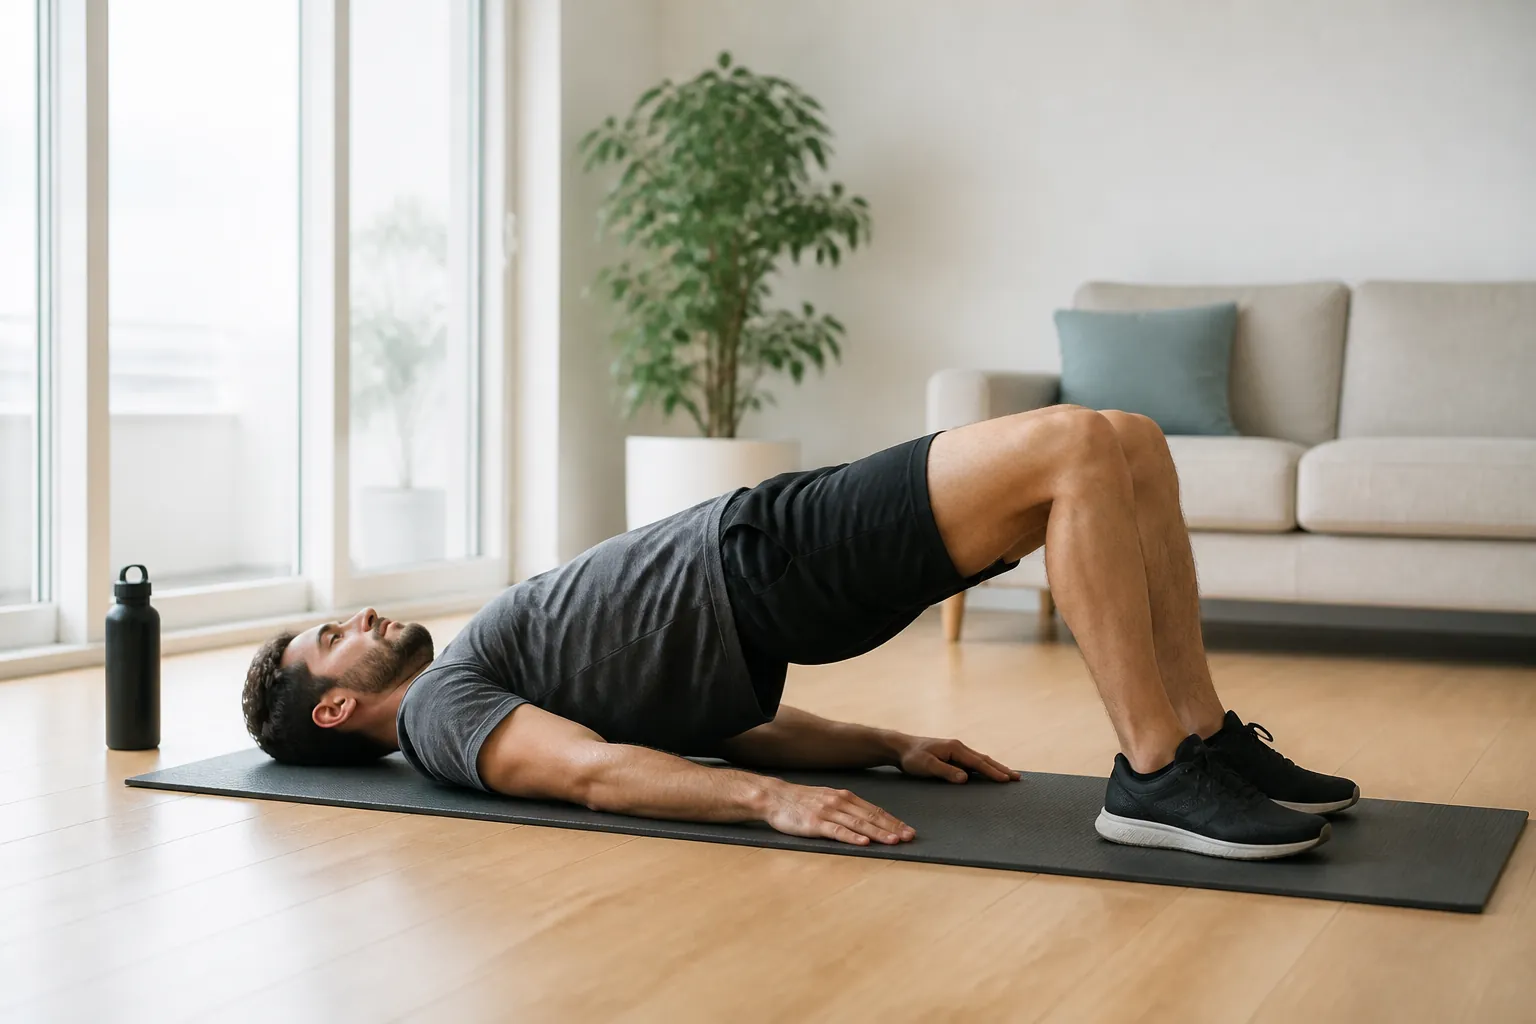
Bridge loading: earn the right to use one leg
Bridge exercises are useful at home because they ask the hamstring and glutes to produce force without needing machines. Alberta Health’s hamstring strain exercise guidance includes progressive home movements such as hamstring sets, bridges, curls, and strengthening work as symptoms allow.[5] The bridge sequence below uses the same idea but makes the gates explicit.
Short-lever bridge hold
Lie on your back with both knees bent and feet flat, close enough that your shins are roughly vertical. Gently brace your trunk, press through both heels, and lift the hips until your body forms a straight line from shoulders to knees. Hold 5 to 10 seconds. Lower slowly. Do 2 sets of 6 to 10 holds.
Keep the work evenly shared between legs. If the injured side makes you twist away from it, the version is too hard. Bring the feet closer, lift lower, or return to heel digs.
Double-leg bridge reps
Use the same setup, but move continuously: lift for 1 to 2 seconds, pause briefly, lower for 2 to 3 seconds. Do 2 to 3 sets of 8 to 12 reps. Stop the set if the back of the thigh changes from effort to sharp pain, or if you start pushing mostly through the uninjured leg.
Your next gate is a pain-free double-leg bridge. That means the movement itself is comfortable, you are not guarding, and the hamstring does not tighten or ache more afterward. Passing that gate matters more than whether it has been three days, seven days, or longer.
Bridge march
Lift into a double-leg bridge. Without letting the pelvis drop or rotate, lift one foot an inch or two, set it down, then lift the other foot. Do 2 sets of 6 to 10 total marches. This is a small movement. If you turn it into a high-knee march, you will probably make it harder than it needs to be.
Single-leg bridge
Start in the bridge position. Extend the uninjured leg or hold it slightly off the floor, then lift the hips using the injured side. Begin with 2 sets of 4 to 6 reps. If that is clean, build toward 2 to 3 sets of 8 to 10 reps. The pelvis should stay level; the hamstring should feel like it is working, not threatening to cramp or tear.
The single-leg bridge is the gate most people are tempted to fake. Do not count a rep if you shove off the floor with the other leg, shorten the top position, or twist away from the sore side. A pain-free single-leg bridge tells you more than a vague sense that the leg feels better while walking.
Eccentric loading: the towel slider is where guessing gets expensive
Hamstring rehab cannot stop at easy bridges. Reviews of hamstring strain rehabilitation emphasize progressive loading, especially eccentric work and exercises performed at longer muscle lengths, because return to sport and recurrence risk are tied to whether the muscle can handle demanding positions again.[2][6] Hamstring strain recurrence has often been described as a major problem, with roughly one-third of injuries recurring in some athletic populations.[6] That does not mean every home exerciser is doomed to reinjury; it means a pain-free stroll is not a complete test.
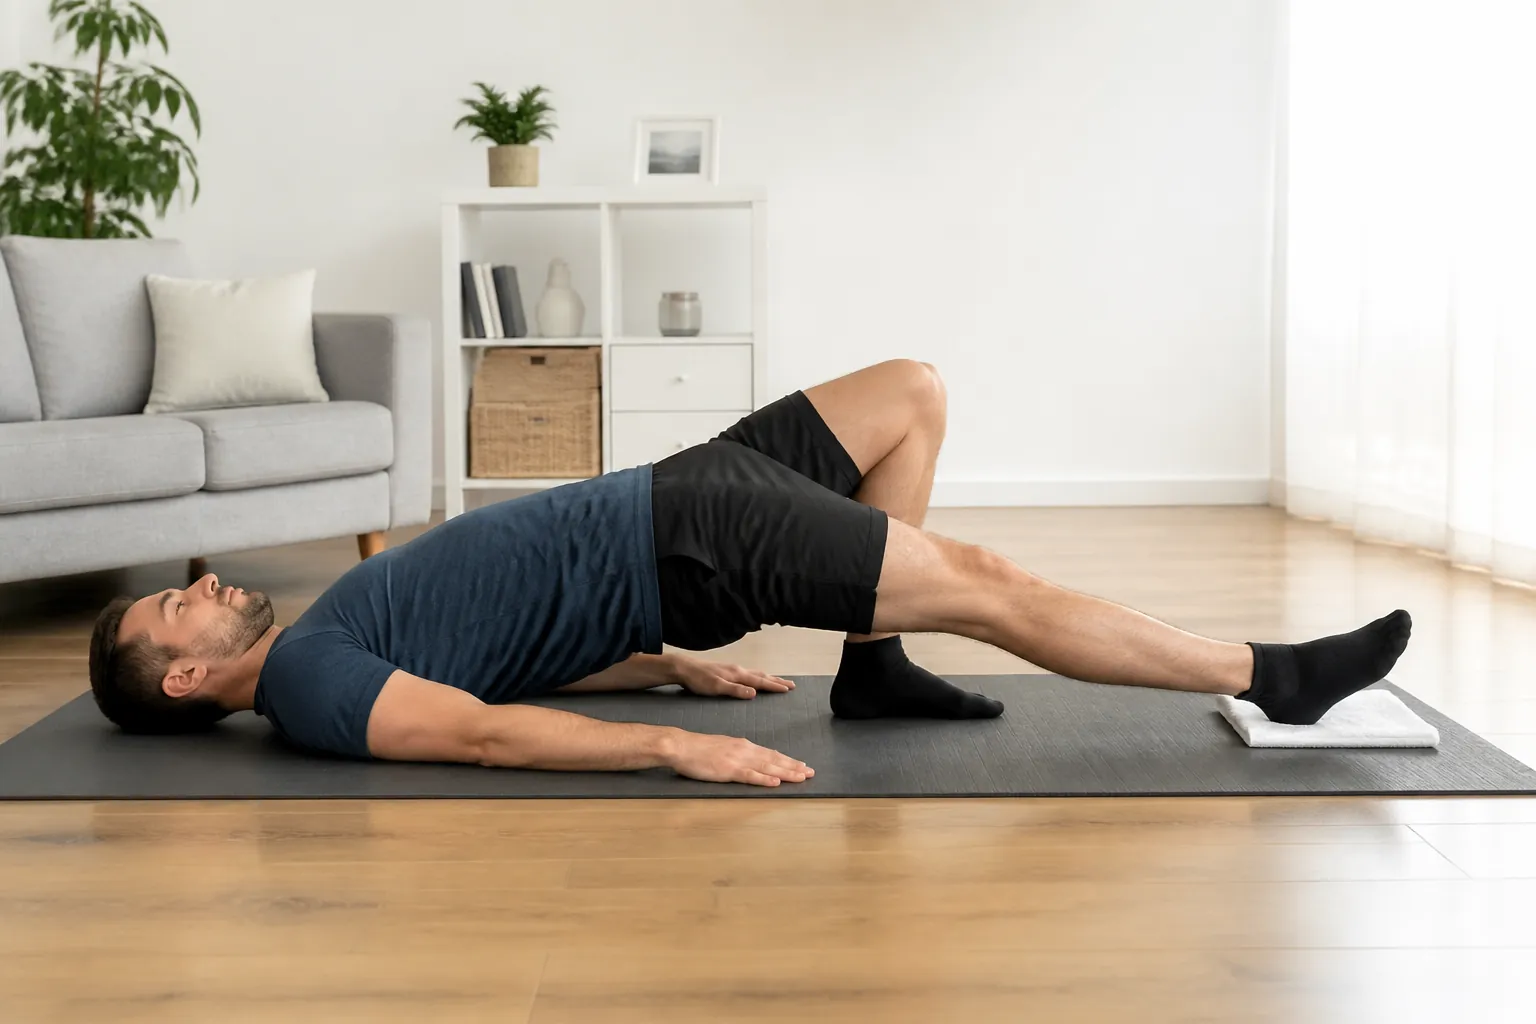
Double-leg towel slider
Use a smooth floor and a towel under both heels. Start lying on your back with knees bent and hips lifted in a bridge. Slowly slide both heels away until the knees are almost straight, taking 3 to 5 seconds. Drop the hips, bring the heels back in, and reset. Do 2 sets of 4 to 6 reps at first.
The important part is the slow slide out. That is the eccentric portion: the hamstring is working while lengthening. Keep this within the ≤4/10 discomfort rule, and stop for sharp pain. If the first rep feels suspicious, make the slide shorter rather than bargaining with it.
Single-leg assisted towel slider
When double-leg sliders are controlled, place more weight through the injured heel during the slide out while the other leg helps. You can keep both heels on towels and make the uninjured side do less work, or slide out with the injured leg and use both legs to return. Start with 2 sets of 3 to 5 reps.
Do not rush to a full single-leg slider just because the exercise looks simple on video. A true single-leg slider asks a lot from the hamstring near a lengthened position. If you cannot keep the hips level and the movement slow, you have not lost progress; you have found the current edge.
Long-lever bridge
Move both feet farther from your hips than in a normal bridge. Lift the hips and hold 5 seconds, then lower. Do 2 to 3 sets of 6 to 10 holds. The farther the heels are from the body, the more the hamstrings have to contribute. Begin conservatively; a few inches changes the exercise more than it seems.
Kickstand hip hinge
Stand tall with the injured leg slightly forward and the other foot back like a kickstand. Keep a soft bend in the front knee. Hinge at the hips, send the hips backward, and reach your hands toward your thigh, shin, or a chair in front of you. Return by squeezing the glutes and pressing the front heel into the floor. Do 2 to 3 sets of 6 to 10 reps.
This is not a toe-touch stretch. The spine stays long, the hips move back, and the range stops before the hamstring gives a warning tug. If bodyweight is easy and symptom-free, hold a light backpack close to your chest. If load changes your control, remove it.
Optional: assisted Nordic lowering
Only use this if you have a secure anchor for your ankles, such as a stable sofa base or a safe door-frame setup that cannot slip. Kneel on a folded towel. Keep the body straight from knees to head, then slowly lean forward a short distance and catch yourself with your hands. Push back up with your hands rather than forcing the hamstrings to pull you upright. Start with 2 sets of 3 reps.
Research-informed hamstring protocols often progress from lower-load eccentric work such as sliders toward higher-load options such as Nordic hamstring variations, but the jump is large.[2] At home, an unsafe anchor or a sudden full-range Nordic is not a badge of seriousness. It is a good way to turn rehab into another injury.
How often to do the work
Early isometrics can often be done daily if they settle symptoms and stay well below sharp pain. Bridge work usually fits every other day or three times per week. Eccentric sliders and longer-lever hinge work deserve more recovery, especially when you first add them. If the hamstring feels heavier, tighter, or more painful the next morning, reduce the volume before blaming the exercise itself.
A practical home session might look like this once you have passed the walking gate: heel-dig isometric warm-up, double-leg bridges, bridge marches, and then one harder item such as sliders or kickstand hinges. You do not need to perform every exercise in this article in one session. The point is to choose the hardest version you can repeat cleanly inside the pain rule.
Return-to-activity checks
Before jogging, sprinting, cutting, or returning to a lower-body workout, your hamstring should have cleared more than everyday walking. At minimum, look for these home checks:
- You can walk briskly on flat ground without limping, sharp pain, or symptoms building afterward.
- A double-leg bridge is pain-free and symmetrical.
- A single-leg bridge on the injured side is pain-free and controlled.
- Towel sliders or long-lever bridge work stay at or below 4/10 discomfort and do not cause a next-day flare.
- Daily tasks that used to expose the strain — stairs, getting out of a chair, walking the dog, sitting and standing after work — no longer make you guard the leg.
For running, start with a walk-jog rather than a continuous run. Keep the first attempt deliberately easy: short jogging bouts separated by walking, flat ground, no hills, no speed work. If discomfort rises above 4/10, becomes sharp, changes your stride, or shows up worse later that day or the next morning, return to the previous loading level for a few more sessions.
The same logic applies to gym training. Reintroduce lower-body work by range and load, not pride. A bodyweight hinge comes before a loaded Romanian deadlift. Controlled step-ups come before explosive lunges. Easy cycling comes before intervals. The hamstring should get chances to prove itself before it is surprised.
When the plan is not working
See a clinician if you cannot progress past normal walking, cannot perform a pain-free double-leg bridge after symptoms should reasonably be settling, repeatedly flare after very light loading, or feel pain high near the sitting bone that does not behave like a simple muscle strain. Also get checked if bruising spreads, weakness is obvious, numbness appears, or you are unsure whether the injury was a tear rather than a strain.
Home rehab is useful when it gives you better information: what hurts, what tolerates load, what improves, and what fails. Rest alone cannot answer those questions. A controlled progression can.
References
- Hamstring injury - Diagnosis and treatment, Mayo Clinic.
- Hamstring Strain Injury Rehabilitation, Journal of Athletic Training, 2022.
- Sprains and strains, NHS.
- Hamstring Strain, Princeton University Health Services.
- Hamstring Strain: Rehab Exercises, MyHealth.Alberta.ca.
- Rehabilitation and return to sport after hamstring strain injury, Journal of Sport and Health Science, 2017.
What a small equipment investment adds
We don't have a build tagged to this exact tier yet. Browse all builds.
How often should you repeat this?
See our recovery and rest reference for citation-anchored rest-interval guidance.
Spot something off?
Tell us if a movement, tier assumption, or duration didn't match your experience.