
Use Your Skateboard as a Core Workout at Home — 6 Moves That Work
Learn how to repurpose your skateboard into a zero-cost ab slider for a quiet, apartment-friendly core workout. This guide covers 6 trainer-backed moves, floor protection tips, and how to adapt for any surface — all without stepping outside.
- Equipment tier required
- none
- Duration
- 10 min
- Difficulty
- beginner
- Target area
- core
- Space footprint needed
- 3x4 ft
- Noise level
- low
Yes, skateboarding as a home workout can work inside an apartment, but only if you stop treating the board like something to ride. Indoors, the useful part is simpler: a skateboard can behave like an oversized ab slider. The wheels lower friction, the deck adds a little instability, and your core has to keep your ribs, pelvis, and shoulders from drifting all over the place.
The catch is the floor. The same board that feels controlled on low-pile carpet can shoot away on hardwood, drag uselessly on thick carpet, or chew up a cheap rug if the grip tape is facing the wrong material. Set it up for the surface first; the workout comes after.
Set the skateboard up for your floor before you do a single rep
You need only a small patch of floor, roughly 3 by 4 feet for these slider-style moves, which is one reason this works better in a small apartment than most “creative equipment” ideas. Men’s Health featured trainer Jay Maryniak using a skateboard for an at-home ab workout built around this same slider mechanism, with the board standing in for dedicated core equipment rather than outdoor riding gear [1].
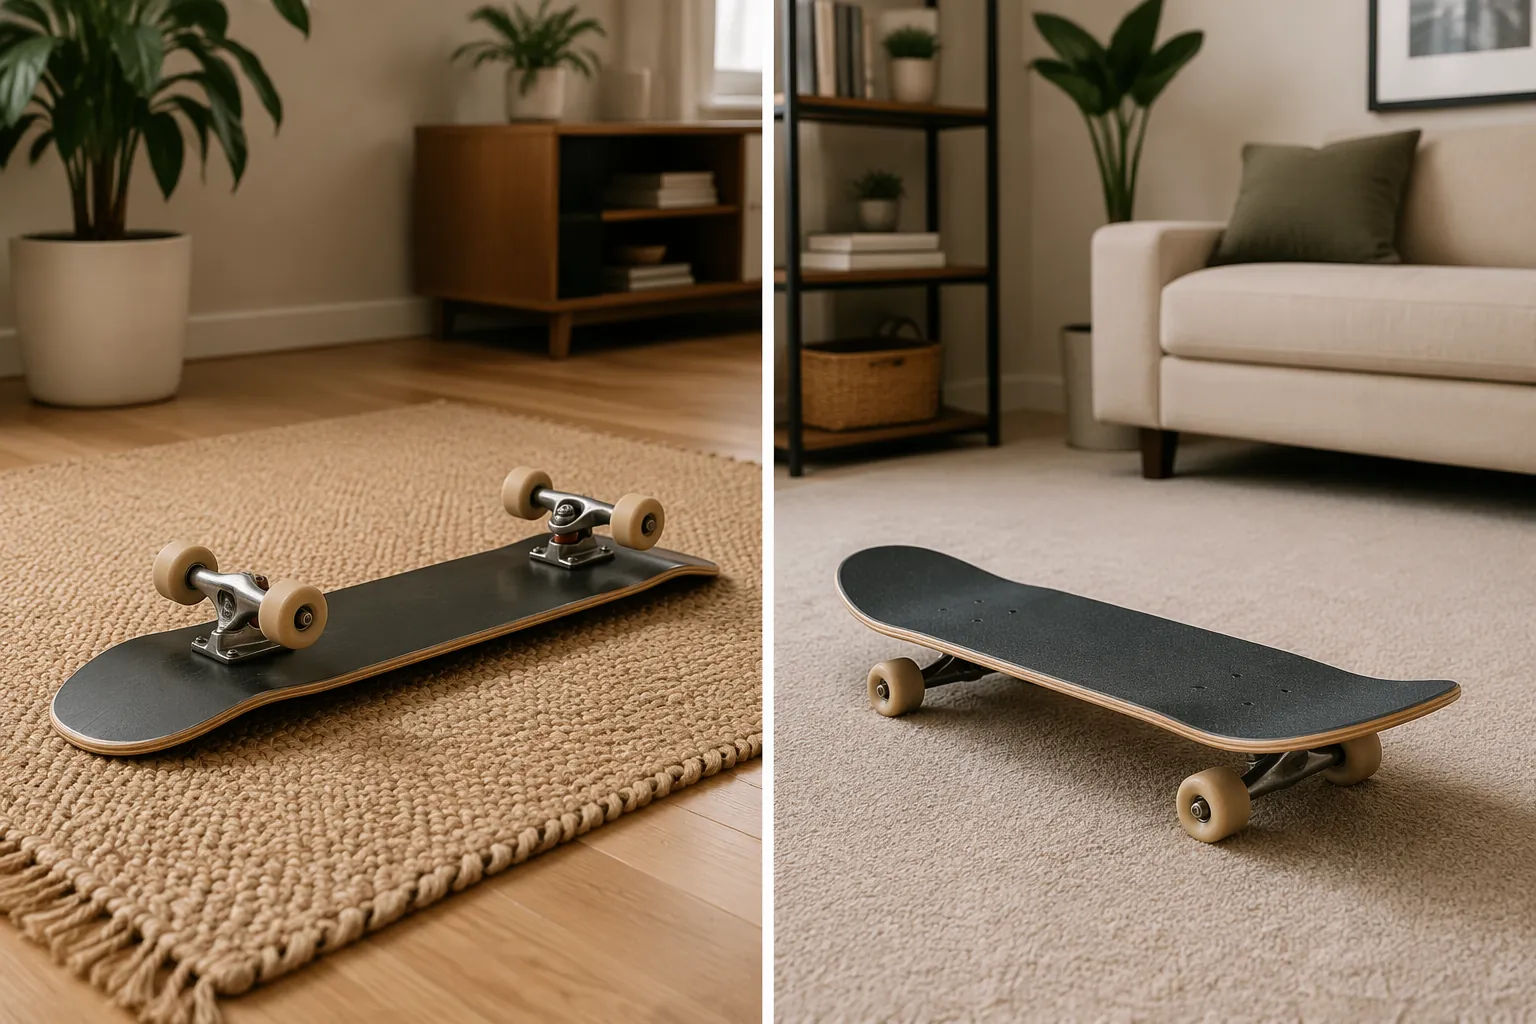
| Floor type | Best setup | What to test before training |
|---|---|---|
| Grippy rug over hardwood | Place the skateboard upside-down so the deck slides against the rug and the wheels face up. | Make sure the rug does not bunch, the grip tape is not shredding fibers, and the board moves with resistance instead of jerking. |
| Low-pile carpet | Use the board right-side-up with the wheels on the carpet. | Roll it a few inches forward and back. You want a slow glide, not a stuck wheel or a runaway board. |
| Bare hardwood or tile | Do not roll directly on the floor. Put a rug or towel underneath, then test the board on top of that layer. | Check for scuffs, wheel marks, and sudden sliding. If it feels slick, skip the dynamic moves. |
| Thick carpet | Try right-side-up first, but expect the board to drag or stop. | If it barely moves, use the skateboard only for static instability work or remove the trucks and use the deck separately. |
| Loose area rug | Avoid fast sliding. Use a heavier rug, a nonslip pad, or a carpeted spot instead. | If the rug wrinkles under the board, it is not stable enough for plank slides. |
The two setups that usually make the most sense are upside-down on a rug or right-side-up on low-pile carpet. On a rug, the deck itself becomes the sliding surface. On low-pile carpet, the wheels can roll with enough resistance that the board does not feel like it is trying to escape the room.
Hardwood is where people get in trouble. A skateboard on bare wood may slide too freely, and the consequences are annoying even when nobody gets hurt: scuffs, wheel marks, or a board tapping the baseboard at 9 p.m. Put a rug or towel under it, do two slow test slides, then check the floor before you commit to a set.
Noise is also surface-dependent. On carpet or a stable rug, expect something closer to a muted slide or soft wheel movement, roughly 30–40 dB in practical terms, not the hard clatter you get from rolling across bare flooring. Carpet boarding is already used as an indoor skateboard practice method, which supports the basic idea that a carpeted surface can make board movement more controlled and room-friendly [3]. Still, treat any quietness claim as a floor-by-floor test, not a guarantee.
Why the skateboard changes a plank
A static plank asks you to hold position. A skateboard plank asks you to hold position while something under your hands or feet is trying to move. That difference matters. SELF’s slider-exercise reporting, with exercise physiologist Pete McCall, explains that slider plank variations such as plank walkouts and body saws challenge the transverse abdominis and core stabilizers in ways that go beyond simply staying still [2].
The skateboard adds two layers at once. First, it reduces friction, so your limbs can travel forward, backward, or sideways. Second, the deck is less settled than the floor, so your shoulders, hips, and trunk have to keep correcting. That is useful. It is also why this should start slow, especially if your wrists, shoulders, or low back already complain during regular planks.
Do this quick safety scan
- Check the board: bearings should move smoothly, wheels should not wobble, and the deck should not flex in a way that feels cracked or unstable.
- Check hand and foot placement: if the trucks or wheels crowd your hands on an upside-down setup, switch to feet-on-board moves or use a different setup.
- Start with short range: move the board only a few inches before you try longer slides.
- Keep the plank honest: ribs down, glutes lightly squeezed, neck long, and shoulders pushing the floor away.
- Stop if your low back dips, your shoulders collapse toward your ears, or the board starts moving faster than you can control.
If you have a seized-up board, very soft wheels, thick carpet, or a slick floor, the workout changes. That does not mean the idea fails; it means you choose the slower variations and skip the ones that rely on a smooth slide.
The 6-move skateboard core finisher
Use this as a 10-minute core finisher after a walk, strength session, or short mobility warmup. It is not a complete strength plan and it is not cardio unless you rush it, which is exactly how the form gets ugly.
| Move | Best for | Start with |
|---|---|---|
| Sliding plank walkout | Anti-extension core strength and shoulder control | 3 to 5 slow reps |
| Body saw | Deep plank control with a small range of motion | 15 to 25 seconds |
| Pike-to-knee-tuck | Dynamic abs and hip flexor control | 4 to 6 controlled reps |
| Skateboard mountain climbers | Faster core bracing, only after the board feels stable | 15 to 20 seconds |
| Single-leg slides | Lower-body stability with core control | 5 to 8 reps per side |
| Lateral skaters | Side-to-side hip control and balance | 5 to 8 reps per side |
1. Sliding plank walkout
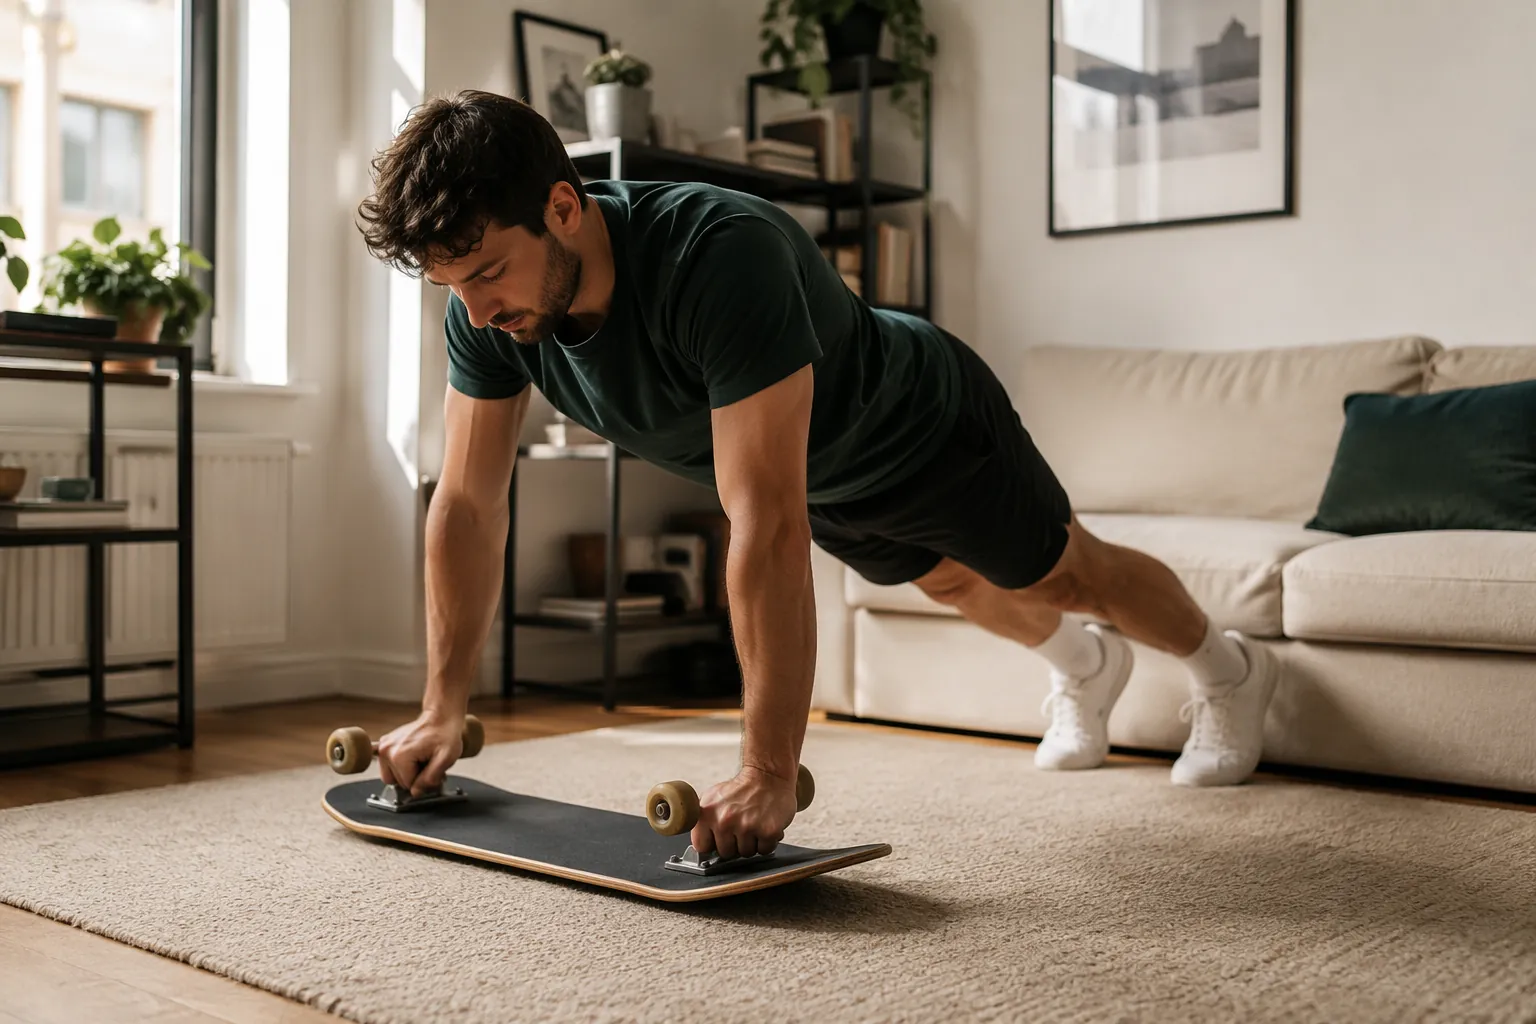
Start standing or in a high plank setup with your feet on the skateboard and your hands on the floor. Walk your hands forward a few inches at a time, letting the board slide behind you. Pause before your low back starts to sag, then walk your hands back under your shoulders.
This is the move that makes the skateboard feel least like a gimmick. Your feet are not just resting on something slippery; they are attached to a moving base while your upper body travels away from your hips. Keep the range embarrassingly short at first. If your plank turns into a banana shape, the rep is already over.
Make it easier by starting from your knees with your shins on the board, or by moving only one hand-length forward. Make it harder by slowing the return instead of adding speed.
2. Body saw
Set up in a forearm plank with your toes or the tops of your shoes on the skateboard. Press your forearms into the floor, squeeze your glutes, then slide your whole body backward a few inches. Pull yourself forward until your shoulders return over your elbows.
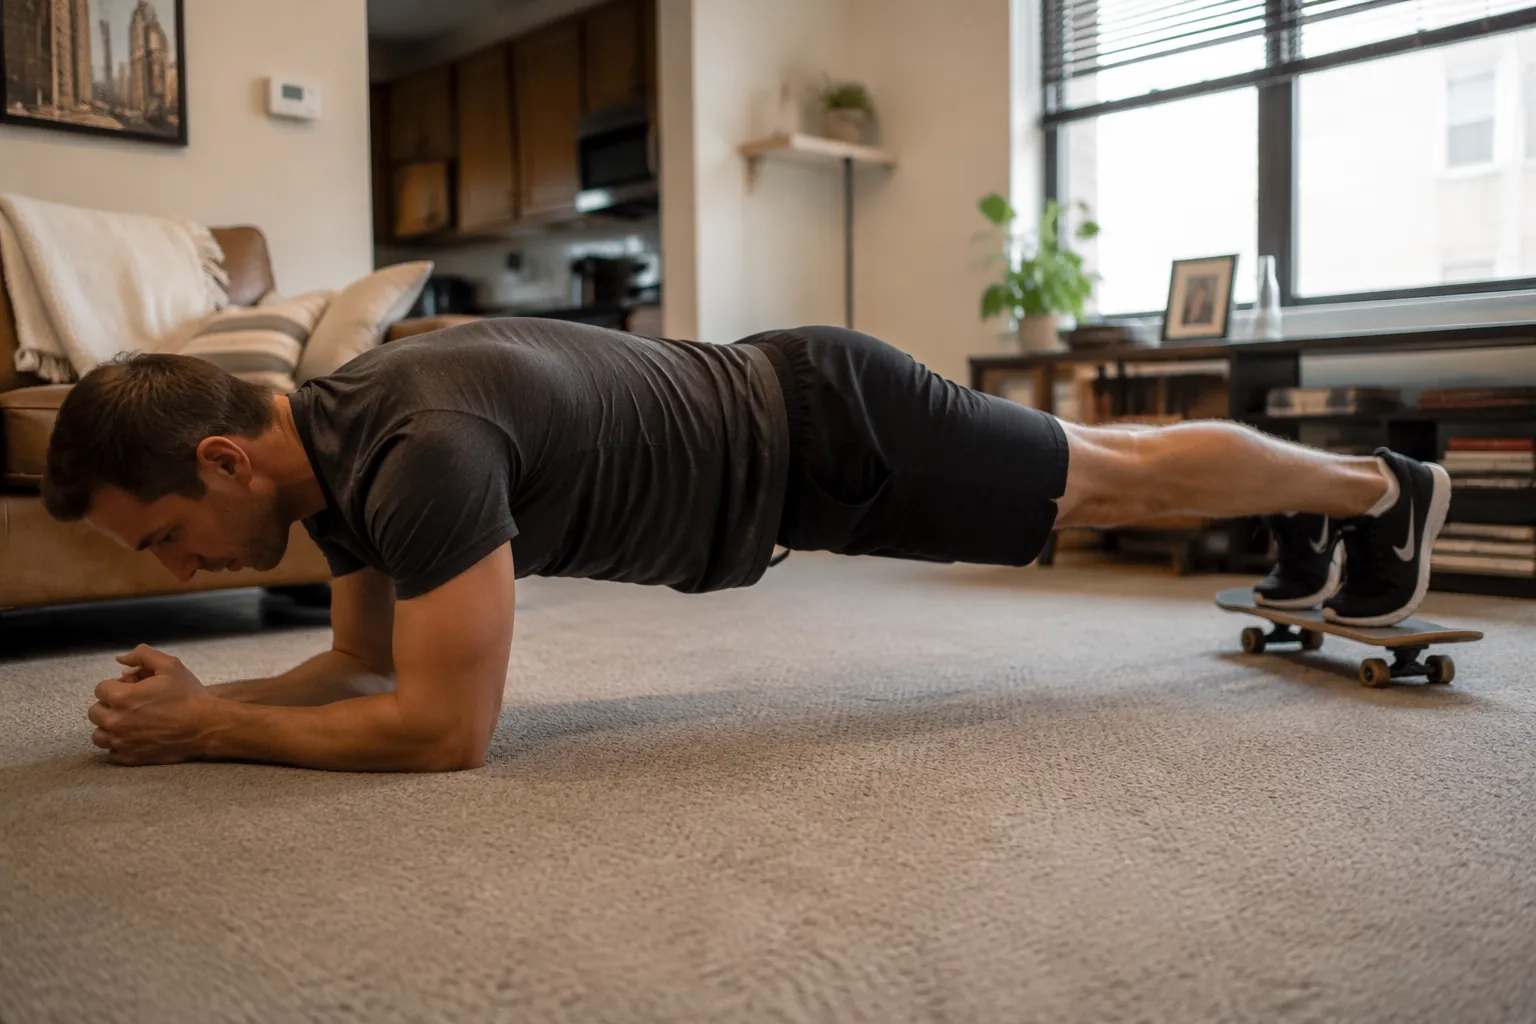
The mistake is turning this into a shoulder shrug. Your shoulder blades should stay active, your neck should stay long, and your hips should move with your ribs instead of lagging behind. A two-inch slide done well beats a dramatic slide followed by a low-back arch.
If the board feels too fast, put it on a thicker rug or shorten the motion. If it does not move at all, hold the forearm plank with your feet on the board and gently shift your weight forward and back without forcing the slide.
3. Pike-to-knee-tuck
Place your hands on the floor and both feet on the skateboard. From a high plank, lift your hips toward the ceiling for a small pike, return to plank, then bend your knees toward your chest for a tuck. Move slowly enough that the board does not slam into your hands.
This one asks more from your shoulders than it looks like it should. Keep pressing the floor away as your hips rise. If your wrists are sensitive, skip the pike and practice only the knee tuck, or place your hands on sturdy yoga blocks to reduce the wrist angle.
4. Skateboard mountain climbers
Use this only after the first three moves feel controlled. Put your hands on the skateboard deck and your feet on the floor in a high plank. Keeping the board as still as possible, drive one knee toward your chest, step it back, then switch sides.
The goal is not to rattle off fast reps. The goal is to keep the deck from twisting while your legs move. If the board wobbles under your hands or your shoulders feel jammed, move your hands back to the floor and do regular slow mountain climbers instead.
5. Single-leg slides
Stand with one foot on the floor and the other foot on the skateboard. Slide the board backward into a small reverse lunge, then pull it back underneath you. Keep most of your weight in the standing leg so the board does not run away.
This is more of a stability add-on than a pure ab move. You should feel the standing hip and glute working while your trunk stays stacked. If your knee caves inward or the board moves faster than your balance can handle, shorten the slide.
6. Lateral skaters
Stand with one foot planted and the other foot on the skateboard. Slide the board out to the side as you bend the standing knee, then pull the board back in. Keep your chest facing forward and your hips level.
Think of this as a quiet side-lunge pattern, not a jumping skater drill. It gives you useful lateral hip work without the downstairs-neighbor problem. Use a small range until you know the rug is not shifting under you.
A simple way to run it
For a short finisher, pick three or four moves instead of forcing all six every time. A sensible first version is sliding plank walkout, body saw, single-leg slides, and lateral skaters. Do one controlled round, rest when form slips, then repeat if your shoulders and low back still feel good.
If you already plank comfortably, add pike-to-knee-tucks. If the board feels steady under your hands, add the slower mountain climbers. The progression should be based on control, not boredom.
What the skateboard can replace, and what it cannot
A skateboard can replace ab sliders for a narrow, useful job: core and shoulder stability work in a small space. It can make plank variations more demanding, add controlled sliding to lower-body moves, and give you a cheap way to train anti-extension and anti-rotation without buying another gadget.
It cannot replace a complete home gym. It will not cover pulling strength, progressive lower-body loading, or a full cardio session. It is also the wrong tool on a floor where the board either sticks completely or slides so freely that you spend the set bracing for impact.
Used inside that boundary, the skateboard earns its spot. Put it on the right surface, keep the range small, and treat it as a quiet 10-minute core finisher rather than a whole workout pretending to be one.
References
- This At-Home Ab Workout Uses a Skateboard to Crush Your Core — Men's Health
- 11 Slider Exercises That Will Challenge Your Core in New Ways — SELF
- Carpet Boarding for Freestyle Skateboarders — Flatlandia, April 30, 2025
What a small equipment investment adds
We don't have a build tagged to this exact tier yet. Browse all builds.
How often should you repeat this?
See our recovery and rest reference for citation-anchored rest-interval guidance.
Spot something off?
Tell us if a movement, tier assumption, or duration didn't match your experience.