The hardest part of a home workout routine without equipment is rarely finding exercises. It is knowing what to do next Monday after the first workout is no longer new, but still not easy. A useful beginner plan has to answer that before you start: which version of each move you should use, how many rounds to do, how long to rest, and what changes next week.
This four-week plan uses three to four full-body sessions per week, five movement patterns, and a simple progression ladder. You will train a squat, hinge, push, pull, and core movement each session. You will choose the level that lets you work hard without turning the set into a form contest. After week 4, you keep improving with three dials: more reps, slower tempo, and harder leverage.
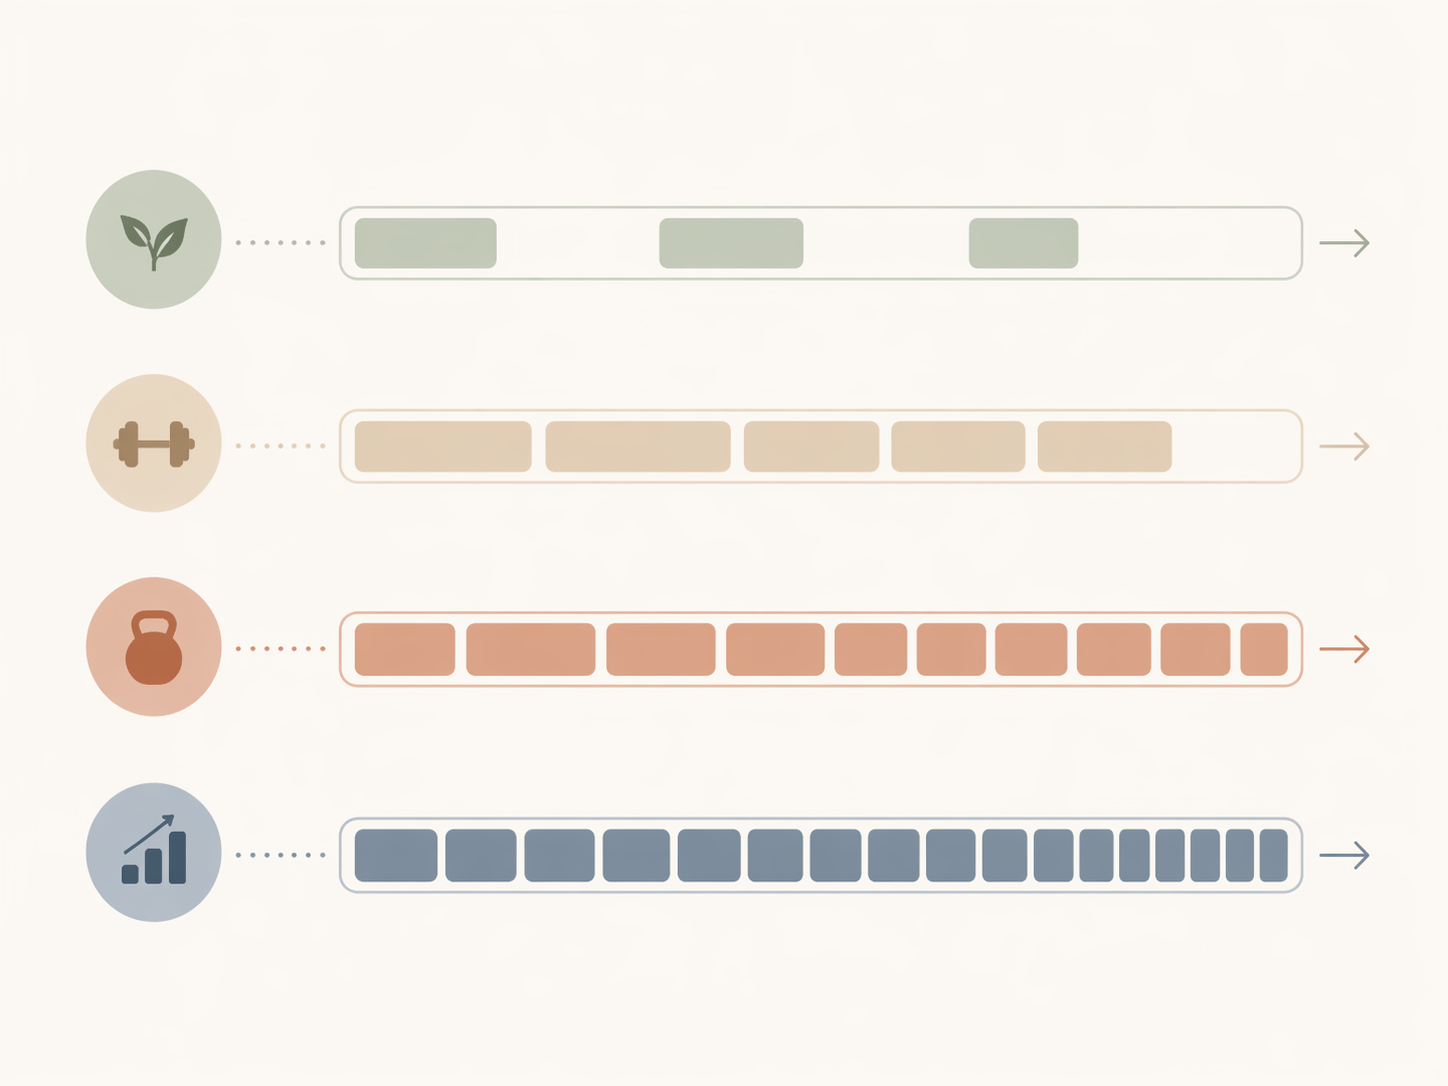
The Four-Week Plan at a Glance
| Weeks | Sessions | Circuit Volume | Reps | Rest | Main Goal |
|---|---|---|---|---|---|
| Weeks 1–2 | 3 days per week, or 4 if you recover well | 2 circuits | 10–12 reps per movement | 90 seconds between circuits | Find the right regression and finish cleanly |
| Weeks 3–4 | 3–4 days per week | 3 circuits | 12–15 reps per movement | 60 seconds between circuits | Add volume, use harder variations, and introduce tempo |
| After week 4 | 3–4 days per week | Keep 2–4 circuits depending on recovery | Build toward higher reps before changing level | Rest enough to keep form stable | Progress with reps, tempo, and leverage |
Use Monday, Wednesday, Friday if you want three sessions. Use Monday, Wednesday, Friday, Saturday if you want four. Leave about 48 hours between the harder sessions. Each workout should take about 15–25 minutes, plus a short warm-up and cool-down.
Do not treat the fourth day as a badge of seriousness. If your knees, wrists, shoulders, or low back feel worse each session, stay with three days. The plan only works if the next workout is something you can actually return to.
Your Workout Template
Each session follows the same order. Repetition is useful here. It lets you notice whether a movement is getting smoother, whether your breathing settles faster, and whether a version that felt impossible last week is now merely challenging.
- Warm up for 3–5 minutes.
- Squat pattern: choose level 1, 2, 3, or 4.
- Hinge pattern: choose level 1, 2, 3, or 4.
- Push pattern: choose level 1, 2, 3, or 4.
- Pull pattern: choose level 1, 2, 3, or 4.
- Core pattern: choose level 1, 2, 3, or 4.
- Cool down for 3–5 minutes.
For weeks 1–2, do two circuits. That means you perform one set of each movement, rest, then repeat the same five movements one more time. For weeks 3–4, do three circuits. If you add a fourth weekly session, keep that extra day easier: choose one level lower on the movements that usually feel rough.
How to Choose the Right Level
Start each movement at the hardest level you can perform for the prescribed reps while keeping the last two reps slow, controlled, and recognizable. If you have to hold your breath, shorten the range of motion, twist away from the working side, or rush through the last reps, drop down one level.
A beginner set should feel like you could do two or three more good reps if you absolutely had to. That is close enough to hard work to build capacity, but not so close to failure that every workout becomes a recovery problem. Later, when the movement is familiar, you can push some sets closer to near-failure.
One practical proxy used in bodyweight hypertrophy guidance is that if you can do roughly 30–40 clean reps of a movement, that version may be too easy to keep driving strength or muscle growth efficiently, because it may represent a relatively low load for you.[1] Beginners do not need to chase that number immediately. Use it as a later signal: if a version becomes a long endurance set, change the leverage or tempo instead of adding reps forever.
The Five Movement Ladders
The level numbers are not grades. They are positions on a ladder. You may be level 2 for pushups, level 3 for squats, and level 1 for pulling on the same day. That is normal, especially if you have spent years sitting, carrying kids, walking a lot, avoiding floor work, or recovering from long gaps in exercise.
| Pattern | Level 1 | Level 2 | Level 3 | Level 4 |
|---|---|---|---|---|
| Push | Wall pushup | Incline pushup | Knee pushup | Full pushup |
| Squat | Assisted squat holding a doorframe | Box squat to a chair | Bodyweight squat | Pulse squat or single-leg squat variation |
| Hinge | Glute bridge | Single-leg glute bridge | Hip thrust | Floor slide hamstring curl |
| Pull | Prone scapular retractions | Table rows | Towel rows | Doorframe rows or commando-style pullup option |
| Core | Dead bug | Bird dog | Plank | Side plank or plank with reach |
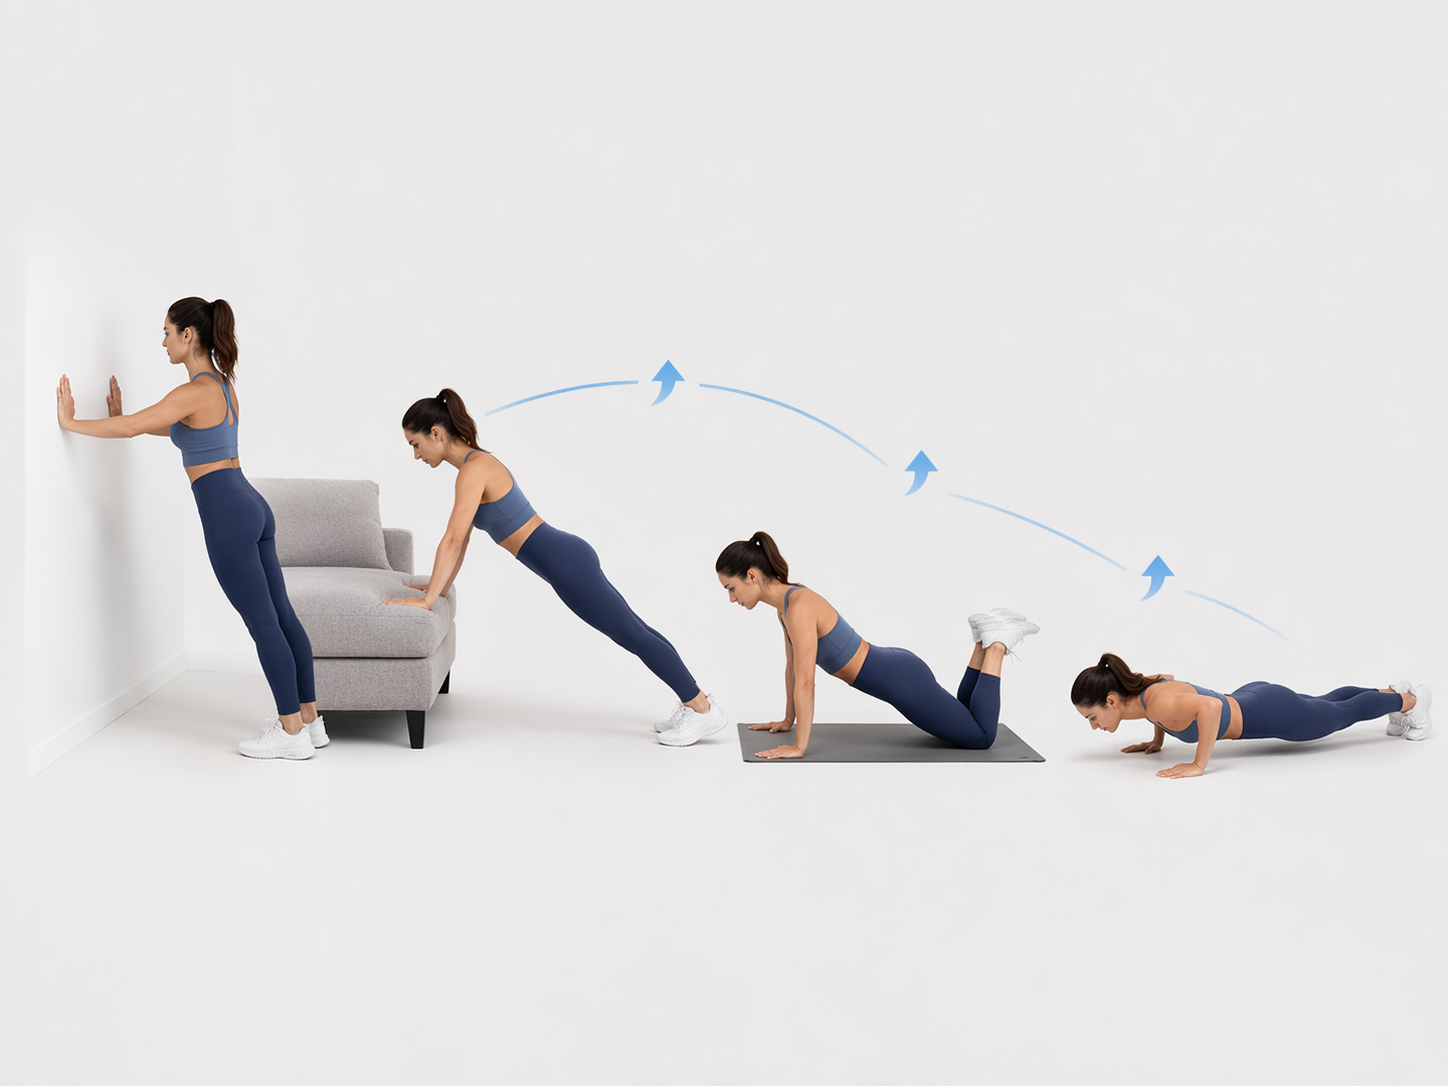
Push: Make the Floor Optional at First
A wall pushup is not a fake pushup. It is a way to train the same basic action while reducing how much bodyweight your arms and trunk have to manage. Incline pushups make the angle harder. Knee pushups move you closer to the floor. Full pushups ask your shoulders, trunk, hips, and legs to hold one long line.
Advance when you can complete all assigned reps without your hips sagging, your shoulders shrugging toward your ears, or your neck reaching for the floor. If your wrists object, use the wall or an incline longer before going to the floor.
Squat: Use Support Without Apologizing for It
The assisted squat lets you hold a doorframe or stable surface so balance is not the limiting factor. A box squat to a chair gives you a clear target and removes the guesswork about depth. A bodyweight squat removes the support. Pulse squats and single-leg variations make the same pattern harder by increasing time under tension or shifting more work to one leg.
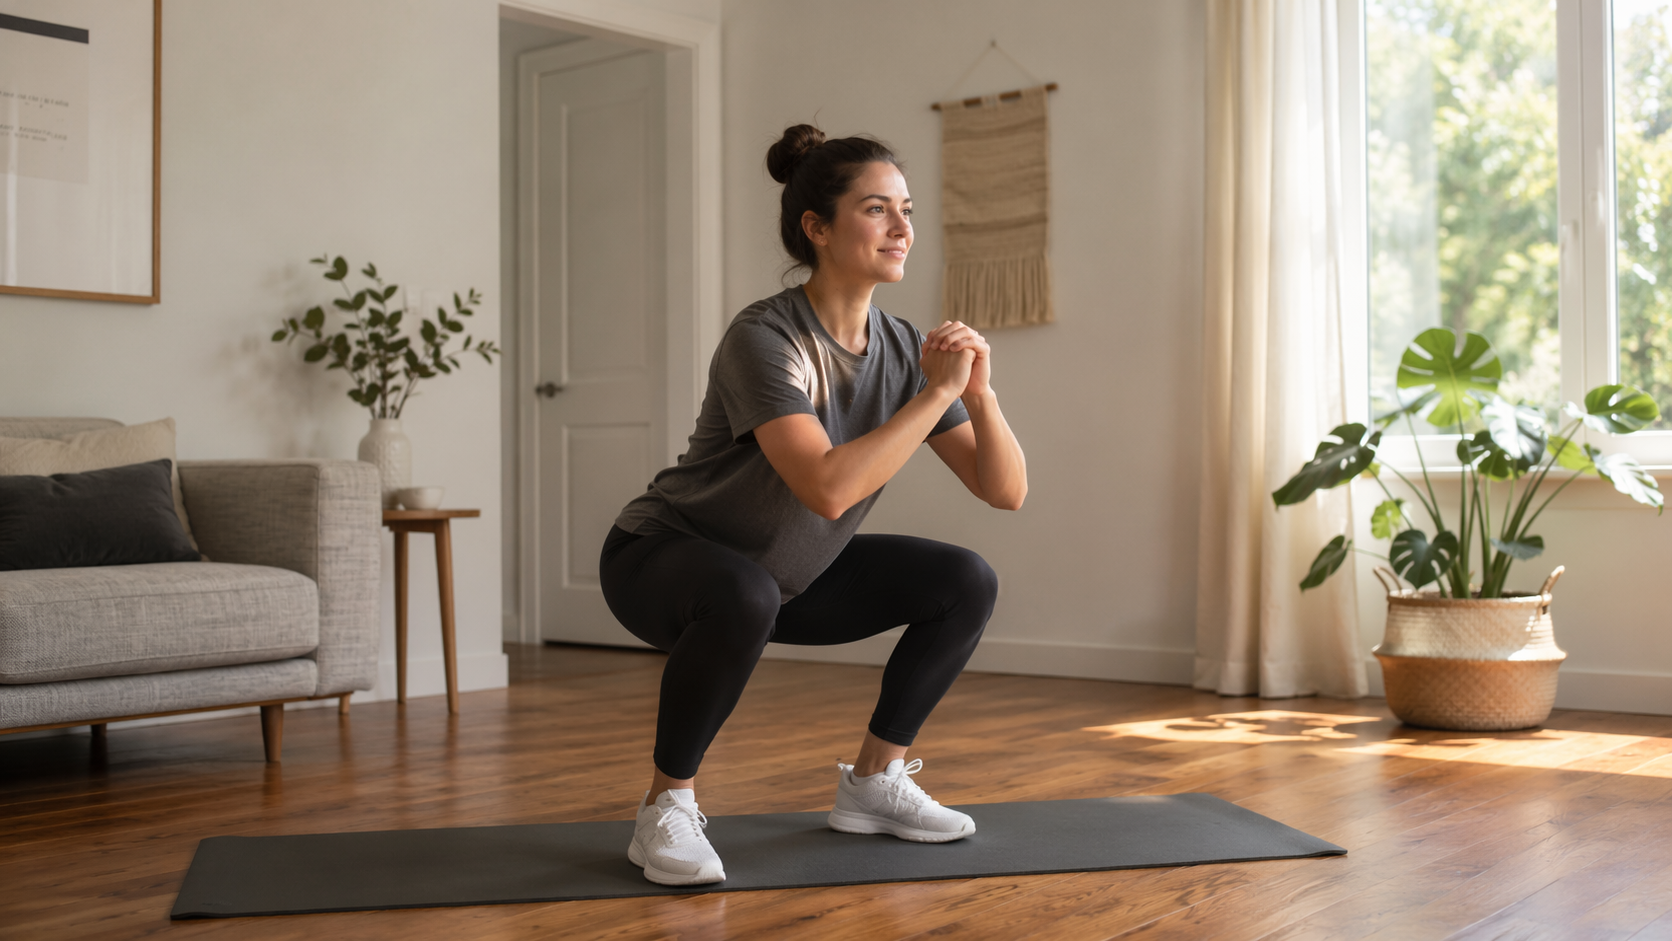
Good effort in a squat feels like your legs are working and your breathing has picked up. It should not feel like your knees are being shoved into a position you cannot control. If you can only hit depth by collapsing your chest or rolling onto your toes, use the chair or doorframe version.
Hinge: Teach the Back Side to Work
A hinge pattern trains the glutes and hamstrings more than the front of the thighs. In this no-equipment plan, the glute bridge is the cleanest starting point. The single-leg glute bridge increases demand without adding load. Hip thrusts increase range of motion if you have a stable couch or low surface. Floor slide hamstring curls are much harder and should wait until bridges feel steady.
You should feel bridges mainly in the glutes and hamstrings, not as a pinch in the low back. Keep the ribs from flaring, press through the whole foot, and stop the set if the movement turns into arching instead of lifting.
Pull: Useful, but Not Magic
Pulling is the least tidy part of any true no-equipment home plan. Prone scapular retractions teach your shoulder blades to move. Table rows, towel rows, doorframe rows, and commando-style options can make the pattern more demanding, but they are not perfect substitutes for loaded rows or pullups. Your setup, grip, doorway, table stability, and body angle all change the exercise.
For safety, never row from furniture that can slide, tip, or crack. If your home setup does not allow a stable row, stay with prone retractions, slow the tempo, and add a pause with the shoulder blades pulled gently back. That is less exciting than pretending a towel solves everything, but it is better than making pulling the movement that injures you.
Core: Control Before Duration
Dead bugs and bird dogs teach your trunk to resist movement while your arms or legs move. Planks add more bodyweight. Side planks and plank reaches make the position less symmetrical and more demanding. The goal is not to shake through the longest hold possible. The goal is to keep the ribs, pelvis, and breath organized while the set gets hard.
For dead bugs and bird dogs, count reps per side. For planks, use time instead of reps: 15–30 seconds in weeks 1–2, then 25–45 seconds in weeks 3–4 if your form holds.
Weeks 1–2: Build the Floor You Can Stand On
In the first two weeks, the job is not to prove you picked the hardest version. The job is to learn what controlled effort feels like. Most beginners should live around levels 1–2, with a few level 3 choices if a pattern already feels natural.
| Movement | Recommended Starting Point | Weeks 1–2 Target |
|---|---|---|
| Squat | Assisted squat or box squat | 2 sets of 10–12 reps |
| Hinge | Glute bridge | 2 sets of 10–12 reps |
| Push | Wall pushup or incline pushup | 2 sets of 10–12 reps |
| Pull | Prone scapular retractions or stable table rows | 2 sets of 10–12 reps |
| Core | Dead bug or bird dog | 2 sets of 8–12 reps per side, or 15–30 seconds for planks |
Rest about 90 seconds between circuits. If you need a little more rest to keep the next round clean, take it. Cutting rest too early often turns a strength circuit into a messy cardio test, especially for people who are still learning the movements.
At the end of week 2, review each movement separately. If you completed both circuits at the top of the rep range with steady form in both sessions, move that movement up one level or keep the same level and prepare to add a third circuit. If a movement still feels uncertain, keep it where it is. Progress does not have to happen evenly across the body.
Weeks 3–4: Add Work Without Losing the Shape
Weeks 3–4 raise the workload in three ways: one more circuit, slightly higher reps, and shorter rest. This is also where you introduce tempo. On the lowering part of a movement, count three slow seconds. For a pushup, that means lowering toward the wall, incline, knees, or floor for three seconds. For a squat, it means taking three seconds to sit toward the chair or descend into the squat.
| Movement | Likely Progression | Weeks 3–4 Target |
|---|---|---|
| Squat | Box squat to bodyweight squat, or bodyweight squat with 3-second lowering | 3 sets of 12–15 reps |
| Hinge | Glute bridge to single-leg glute bridge, or slower bridges | 3 sets of 12–15 reps |
| Push | Wall to incline, incline to knee, or same level with slower lowering | 3 sets of 12–15 reps |
| Pull | Retractions to rows if setup is safe, or retractions with a pause | 3 sets of 12–15 reps |
| Core | Dead bug to bird dog, bird dog to plank, or plank duration increase | 3 sets or holds |
Rest about 60 seconds between circuits. If the third circuit falls apart, do not force all five movements at the harder level. Keep the harder level for the movements that stayed clean, and step back on the ones that got sloppy.
A good week 4 workout should feel more demanding than week 1, but not chaotic. You should be able to name what changed: one more circuit, a harder pushup angle, slower squats, longer plank holds, or shorter rest. If the only change is that you feel more exhausted, the plan is not giving you enough information.
Warm Up and Cool Down
Keep the warm-up short and specific. You are not trying to complete a second workout before the workout starts.
- Warm-up, 3–5 minutes: arm circles, leg swings, cat-cow, a supported deep squat hold, and inchworms.
- Cool-down, 3–5 minutes: child’s pose, standing hamstring stretch, cat-cow, supine twist, and slow breathing.
The warm-up should make the first circuit feel less abrupt. The cool-down should help you leave the session instead of stumbling out of it. Neither one needs to become elaborate.
Why This Can Work Without Equipment
No-equipment training works best when it is structured, not when it is a random pile of burpees, squats, and mountain climbers. The evidence is not that bodyweight training is unlimited. The evidence is that simple bodyweight work can improve fitness when the dose, effort, and progression are clear.
Harvard Health reported a study in which young women doing bodyweight training improved aerobic capacity by 33% and core muscle endurance by 11% over 10 weeks.[2] That is useful, but it should be read with the population in mind: a single small study of young women does not prove that every beginner will get the same result.
Human Kinetics summarizes peer-reviewed research indicating that progressive bodyweight training produced muscle strength and hypertrophy outcomes comparable to barbell back squats in previously sedentary women.[3] The important word is progressive. The plan has to become meaningfully harder, whether through reps, tempo, leverage, or volume.
A low time commitment can still matter. A study in inactive adults found that 11 minutes of simple bodyweight training three times per week for six weeks significantly increased VO2 max and maximum power output.[4] That does not make 11 minutes a magic number. It does make the beginner’s entry point less dramatic than many programs pretend.
Exercise regressions are already common in beginner bodyweight coaching, including progressions such as wall pushups, incline pushups, knee pushups, and full pushups.[5] The missing piece is often the calendar. A ladder helps you pick the movement; a four-week progression tells you how to use it more than once.
After Week 4: Use Three Progression Dials
When week 4 ends, do not jump to a completely different routine just because the page is over. First, use the three dials that still work without equipment.
- Reps: Add reps until you can complete the top of the range with steady form, then consider a harder level.
- Tempo: Slow the lowering phase from three seconds to four or five seconds, especially on squats, pushups, bridges, and rows.
- Leverage: Move from wall to incline, incline to knee, knee to full pushup, supported squat to unsupported squat, or two-leg hinge to single-leg hinge.
Change one dial at a time. If you move to a harder pushup level, do not also add a fourth circuit and shorten the rest that day. You need to know which change your body is responding to.
Variety can help at home when it creates a clearer overload path, not when it disguises a lack of progression. AthleanX makes a similar distinction when warning against home workouts that lean too heavily on random HIIT and cardio movements instead of using variation to make exercises harder in a useful way.[6]
When Bodyweight-Only Training Starts to Hit a Ceiling
Many beginners can keep improving for months with slower eccentrics, higher reps, cleaner range of motion, and harder leverage. Still, bodyweight-only training eventually has limits, especially for strength and pulling. At some point, your legs may need more load than another set of squats provides, and your back may need a more reliable pulling option than a doorway or towel setup can give.
That ceiling is not a failure of the plan. It is a sign that the plan did its first job. You built enough consistency and control to know what kind of next step would actually help: bands, dumbbells, a suspension trainer, a pullup bar, or a gym membership. Until then, a no-equipment beginner plan works when it is not just a list. It works when it gives you a way to choose, repeat, and progress.
References
- Build Muscle At Home: The BEST Full Body Home Workout For Growth, Built With Science.
- The advantages of body-weight exercise, Harvard Health Publishing, 2026.
- The science of getting stronger without weights, Human Kinetics.
- Effect of a Brief Bodyweight Training Program on Cardiorespiratory Fitness in Inactive Adults, International Journal of Exercise Science.
- Bodyweight Workout for Beginners, Nerd Fitness.
- NEVER DO HOME WORKOUTS LIKE THIS!, AthleanX.
Comments
Join the discussion with an anonymous comment.