The Complete Guide to Home Gym Flooring for Small Spaces & Apartments
Choosing the right home gym flooring for an apartment or small space means balancing noise reduction, floor protection, and a lease-friendly installation. This guide compares rubber tiles, foam mats, and PVC options with real noise data, thickness recommendations by workout type, and a step-by-step renter-safe install plan.
- Budget tier
- $300–$1,000
- Space type
- apartment
Items included: —
Why Small-Space Gym Flooring Is Different from a Garage Gym
If you are setting up a gym in a garage or a dedicated basement space, your flooring decisions revolve around durability, shock absorption, and protecting a concrete slab from cracking under a dropped barbell. The calculus changes entirely when your gym sits directly above a neighbor's living room or shares a wall with a quiet apartment unit. Three constraints define the small-space flooring problem, and they rarely appear in standard garage-gym guides.
First, noise transmission. In multi-unit buildings, impact noise — the thud of a dumbbell hitting the floor or the rhythmic vibration of a jump rope — travels through the structure and becomes your neighbor's problem. Most apartment floors without any gym flooring have an Impact Insulation Class (IIC) rating between 45 and 50, which is well below the level needed to contain workout noise. Second, floor protection. That security deposit is real money, and a single deep scratch or permanent indentation in hardwood or laminate can cost hundreds at move-out. Third, installation must be fully reversible. You cannot glue, nail, or permanently alter the existing floor. Any flooring solution that requires adhesive or leaves residue is a non-starter for renters.
Material Comparison: Rubber Tiles vs. Foam Mats vs. PVC vs. Rolled Rubber
Four material categories dominate the home gym flooring market, and each one performs differently across the dimensions that matter in a small space: noise reduction, thickness, cost, durability under weights, and ease of installation. The table below summarizes the key specs, drawing on in-apartment testing data and current market pricing.
| Material | Impact Noise Reduction | IIC Improvement | Thickness Range | Cost per Sq Ft | Durability for Weights | Installation Method |
|---|---|---|---|---|---|---|
| Rubber Interlocking Tiles (0.47"/12mm) | 65–75% | 20–25 points | 0.47" (12mm) – 0.75" (19mm) | $2.17 – $2.93 | Excellent — handles drops up to heavy barbells | Floating, no adhesive |
| Foam Puzzle Mats (0.5") | ~50% | 10–12 points | 0.25" – 1.0" | $1.12 | Poor — permanent dents above 20 lbs | Floating, no adhesive |
| PVC Interlocking Tiles (0.25") | ~40% | 8–10 points | 0.25" – 0.5" | $2.50 – $4.00 | Moderate — OK for cardio, not for drops | Floating, no adhesive |
| Rolled Rubber (8mm / 0.31") | Moderate (3/5 rating) | Not specified | 8mm (0.31") – 0.75" | $2.24 – $2.38 | Good — seamless, durable for heavy gear | Requires adhesive or tape |
The standout option for apartment dwellers is the 0.47" (12mm) high-density rubber interlocking tile. According to testing conducted in a third-floor apartment unit with measurements taken from the unit below, these tiles reduce impact noise by 65–75% and improve IIC ratings by 20–25 points. That is enough to bring a typical apartment floor from a problematic 45–50 IIC up into the 65–75 range, which is generally considered acceptable for light-impact activities. Foam mats at 0.5" thickness cut noise by roughly 50% and improve IIC by 10–12 points — a noticeable but less dramatic improvement. PVC tiles, at 0.25" thickness, reduce noise by about 40% and improve IIC by 8–10 points.
Cost is another differentiator. Foam puzzle mats from brands like ProsourceFit run about $1.12 per square foot, making them the cheapest entry point. Rubber interlocking tiles average $2.17 to $2.93 per square foot according to Garage Gym Reviews' 2026 market survey. Rolled rubber falls in a similar range — Living.Fit's 8mm rolls are $2.24 per square foot, and Tractor Supply's 3/4" horse stall mats are about $2.38 per square foot. However, horse stall mats weigh roughly 100 pounds each and are not practical for apartment installation or eventual removal. Premium soundproofing solutions like Second Skin Stomp Mats range from $4.17 to $7.50 per square foot depending on thickness.
How Thick Should Your Flooring Be? Recommendations by Workout Type
Thickness is not a one-size-fits-all decision. The right choice depends on what you actually do in your workout space. Using thicker material than necessary adds cost and weight without benefit; using too little risks damaging the subfloor, losing your security deposit, and annoying your downstairs neighbor. The table below matches thickness recommendations to specific workout profiles.
| Workout Type | Recommended Thickness | Best Material | Why This Matters |
|---|---|---|---|
| Bodyweight only (yoga, Pilates, stretching, calisthenics) | 0.25" – 0.5" (6mm – 12mm) | Foam or thin rubber | No heavy drops; comfort and grip are the priorities |
| Light dumbbells (up to 20 lbs), resistance bands, light cardio | 8mm (0.31") minimum | Rubber rolls or interlocking tiles | Foam will develop permanent indentations from even moderate weights |
| General fitness, moderate dumbbells (20–50 lbs), kettlebells, occasional drops | 0.47" (12mm) recommended | Rubber interlocking tiles | Provides the best balance of noise reduction, durability, and cost for most home gyms |
| Heavy lifting, barbell work, Olympic lifts, frequent drops from overhead | 0.5" minimum; 0.75" (3/4") preferred | Rubber tiles or stall mats | Olympian Caine Wilkes recommends 1/2" minimum for dropped barbells and prefers 3/4" to protect the subfloor |
For the majority of small-space home gym users — those doing general fitness with dumbbells up to 50 pounds, kettlebells, and the occasional dropped weight — 8mm (0.31") is sufficient according to REP Fitness, and 12mm (0.47") provides a meaningful upgrade in noise reduction and impact protection. If you plan to do any Olympic lifting or drop a barbell from overhead, the recommendation from Olympian and coach Caine Wilkes is unambiguous: a minimum of 1/2" thick rubber, with 3/4" preferred. Wilkes notes from experience that he has "cracked enough concrete floors to know that it's always better safe than sorry."
Renter-Friendly Installation: The Floating Floor Method
The single most important rule for apartment gym flooring is this: use zero adhesive. No glue, no double-sided tape, no permanent modification to the existing floor. The floating floor method — where tiles or mats interlock with each other and sit freely on top of the subfloor — is the only approach that guarantees you can reverse the installation at move-out and pass a lease inspection.
Here is the step-by-step process for a renter-safe installation, based on protocols tested in real apartment settings:
- Document the existing floor. Before laying anything down, take clear, well-lit photographs of the entire floor area. Focus on any existing scratches, stains, or imperfections. This creates a baseline record in case your landlord claims damage at move-out.
- Lay a protective underlayment. A thin, non-slip underlayment (often called a "floor shield" or "vapor barrier") goes between your gym flooring and the existing floor. This prevents any abrasive backing on the tiles from scratching the subfloor and provides an additional layer of sound dampening.
- Use interlocking tiles only. Choose tiles with a tongue-and-groove or puzzle-piece connection system. These hold together under workout movement without adhesive. Avoid any product that requires glue, tape, or permanent fasteners.
- Cut tiles with a utility knife. For perimeter cuts around walls, door frames, or irregular corners, score the tile along a straightedge and snap it. A sharp utility knife and a straightedge are the only tools you need.
- Leave a 1/4" perimeter gap. Do not push tiles flush against the wall. A small gap around the edges allows the flooring to expand and contract with temperature changes and prevents buckling. This gap will be covered by baseboards or trim and is invisible in normal use.
- Perform a quarterly lift-and-check. Every three months, lift a corner of the flooring to inspect the subfloor underneath for any moisture, scratches, or marks. Catching problems early prevents them from becoming deposit deductions.
Soundproofing Deep Dive: IIC Ratings, Decibels, and a Layered Approach
Understanding how sound travels through building structures is the key to choosing flooring that keeps the peace with your neighbors. There are two types of noise to consider: impact noise (footsteps, dropped weights, the thud of a dumbbell) and airborne noise (music, shouting, the clank of equipment). Gym flooring primarily addresses impact noise, which is the more common source of neighbor complaints in multi-unit buildings.
The standard measure for impact noise is the Impact Insulation Class (IIC) rating. Building codes in most jurisdictions require a minimum IIC of 45–50 for floor-ceiling assemblies in multi-family housing. A bare concrete or wood-framed floor typically falls right in that range — meaning any workout activity will push the noise level above the acceptable threshold for the unit below. Improving your IIC by even 10–15 points can make the difference between a quiet neighbor relationship and a formal noise complaint.
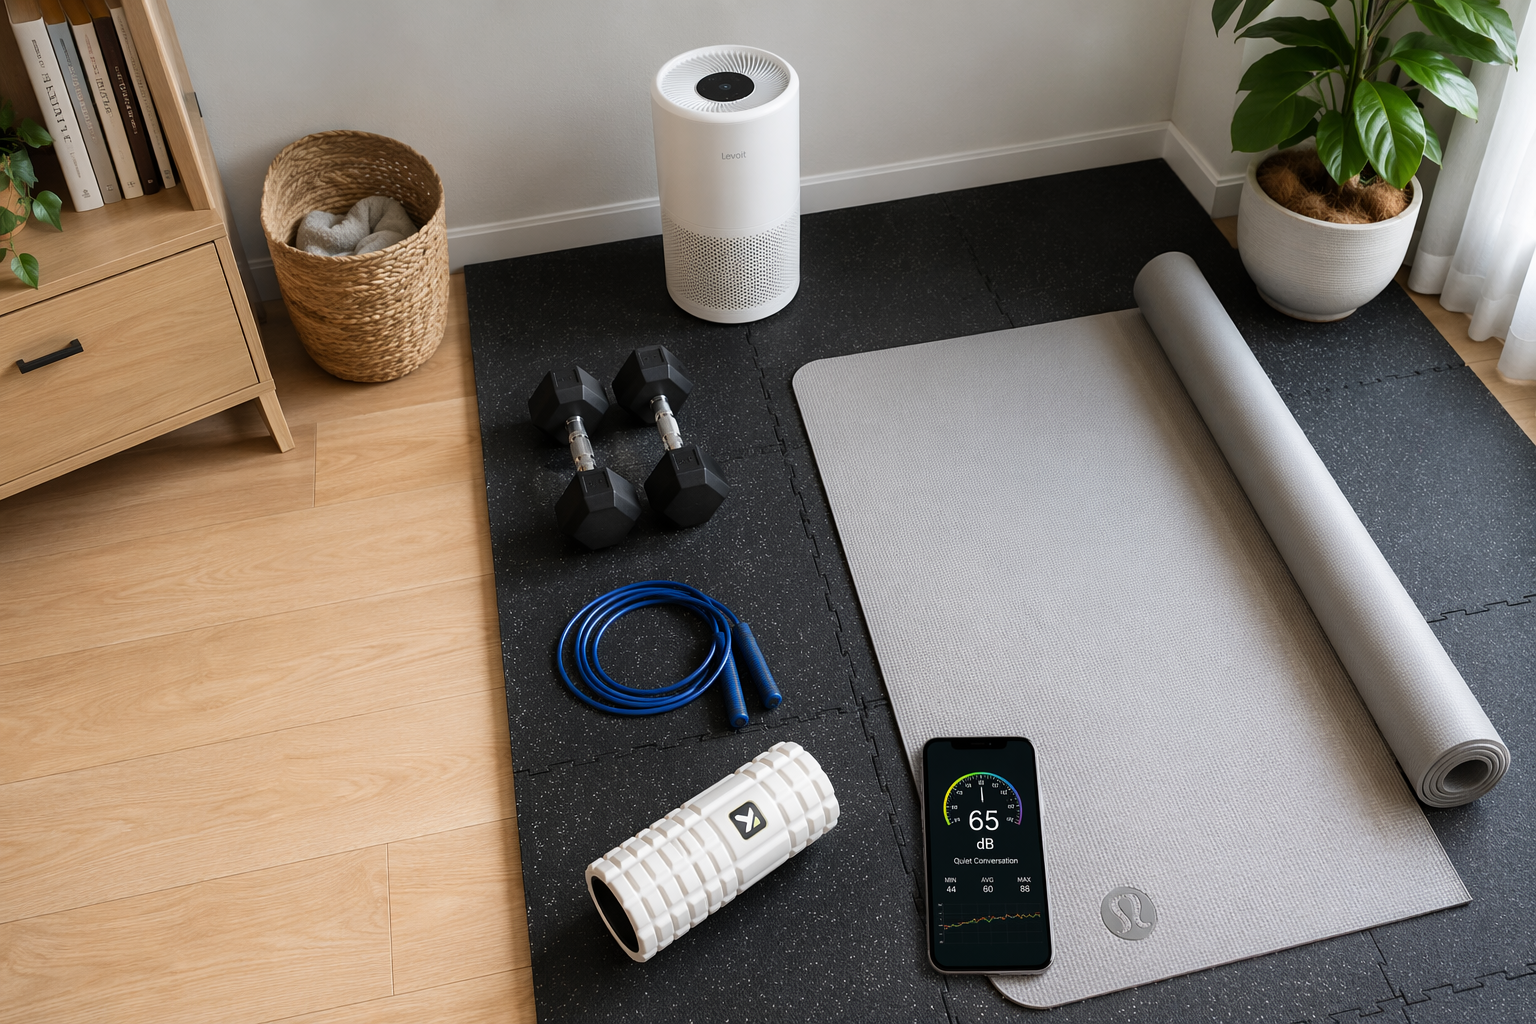
The decibel comparison is even more concrete. According to Norsk Store's testing, dropping a 20-pound dumbbell on a bare apartment floor produces a peak reading of 80–85 decibels. That is roughly as loud as a garbage disposal or a vacuum cleaner — and it happens suddenly, which makes it more disruptive than continuous noise. Placing the same dumbbell on proper gym flooring (0.47" rubber tiles) drops the peak reading to 60–65 decibels, which is closer to normal conversation level.
| Scenario | Peak Decibel Level | Comparable Everyday Sound |
|---|---|---|
| 20 lb dumbbell dropped on bare floor | 80–85 dB | Garbage disposal, vacuum cleaner |
| 20 lb dumbbell dropped on 0.47" rubber tiles | 60–65 dB | Normal conversation |
| Jump rope on bare floor | 75–80 dB | Busy street traffic |
| Jump rope on rubber tiles + underlayment | 55–60 dB | Quiet office or library |
For the best results in a small space, use a layered approach. The primary layer is your gym flooring (rubber tiles or rolled rubber). Beneath that, a sound-dampening underlayment adds another 5–10 points of IIC improvement. For heavy drops, place a dedicated crash pad or deadlift platform insert in the specific area where you drop weights. For cardio machines like treadmills or exercise bikes, use equipment isolator pads under the feet to decouple the machine's vibration from the floor structure. Each layer addresses a different noise path, and together they create a system that is far more effective than any single material alone.
Cost Comparison: Budget, Mid-Range, and Premium Options
Flooring a small-space gym of 100 to 200 square feet does not have to be expensive, but the price range is wide enough that it pays to understand what you are getting at each tier. The table below breaks down total costs for a typical 120-square-foot apartment gym area (roughly 10 feet by 12 feet).
| Tier | Material | Per Sq Ft Cost | Total Cost (120 sq ft) | Best For |
|---|---|---|---|---|
| Budget | Foam puzzle mats (0.5") | $1.12 | $134 | Bodyweight workouts, yoga, light stretching only |
| Mid-Range | Rubber interlocking tiles (0.47") | $2.17 – $2.93 | $260 – $352 | General fitness, moderate dumbbells, kettlebells |
| Mid-Range Alternative | Horse stall mats (3/4") | $2.38 | $286 | Heavy lifting (but heavy and impractical for apartments) |
| Premium Soundproofing | Second Skin Stomp Mats (0.25" – 0.5") | $4.17 – $7.50 | $500 – $900 | Maximum noise reduction, second-floor apartments |
The mid-range rubber tile option — at roughly $260 to $352 for a 120-square-foot space — represents the best value for most apartment users. It provides the durability to handle moderate weights, the noise reduction to keep neighbors happy, and the floating installation that protects your security deposit. The premium tier, while significantly more expensive, is worth considering if you live on a second floor or have an especially noise-sensitive neighbor below. Second Skin Stomp Mats earned a 4 out of 5 rating for noise dampening in Garage Gym Reviews testing, with tester Paige Barrett noting that dropping weight was "a lot quieter" compared to standard rubber.
Lease-Friendly Installation and Security Deposit Protection
Your security deposit is on the line every time you work out. A single deep scratch in hardwood, a permanent stain on carpet, or a moisture problem caused by trapped sweat can cost hundreds of dollars at move-out. The good news is that a properly installed floating gym floor can actually protect your deposit by creating a barrier between your equipment and the original floor.
The key to passing a move-out inspection is documentation and reversibility. Before you install anything, photograph every square inch of the floor area. Note any existing damage in writing and share it with your landlord or property manager. This establishes that any marks found at move-out were pre-existing.
- Use a protective underlayment. A thin, non-abrasive layer between your gym flooring and the subfloor prevents scratches, scuffs, and moisture transfer. This is especially important over hardwood, laminate, or vinyl.
- Choose interlocking tiles only. Materials that require adhesive — including rolled rubber that needs tape or glue at the seams — will leave residue or damage the subfloor when removed. Interlocking tiles lift out cleanly with no trace.
- Leave a 1/4" perimeter gap. This is not just for expansion — it also ensures the flooring does not press against baseboards or walls, which could cause damage over time.
- Perform a quarterly lift-and-check. Every three months, lift a corner of the flooring and inspect the subfloor. Look for moisture, scratches, or any signs that the underlayment is failing. Catching issues early prevents them from becoming deposit deductions.
- Check your lease and HOA rules before buying equipment. Some leases explicitly prohibit heavy gym equipment or require written approval. Some HOAs have noise clauses that restrict workout hours. Knowing these rules upfront saves you from having to dismantle your setup later.
Zone Planning for 100–200 Sq Ft Spaces
You do not need to use the same flooring material across your entire workout area. In fact, zone planning — using different materials for different activities — is the smartest way to balance performance and cost in a small space. You put your budget where it matters most (under heavy weights) and save money where it matters less (under a yoga mat).
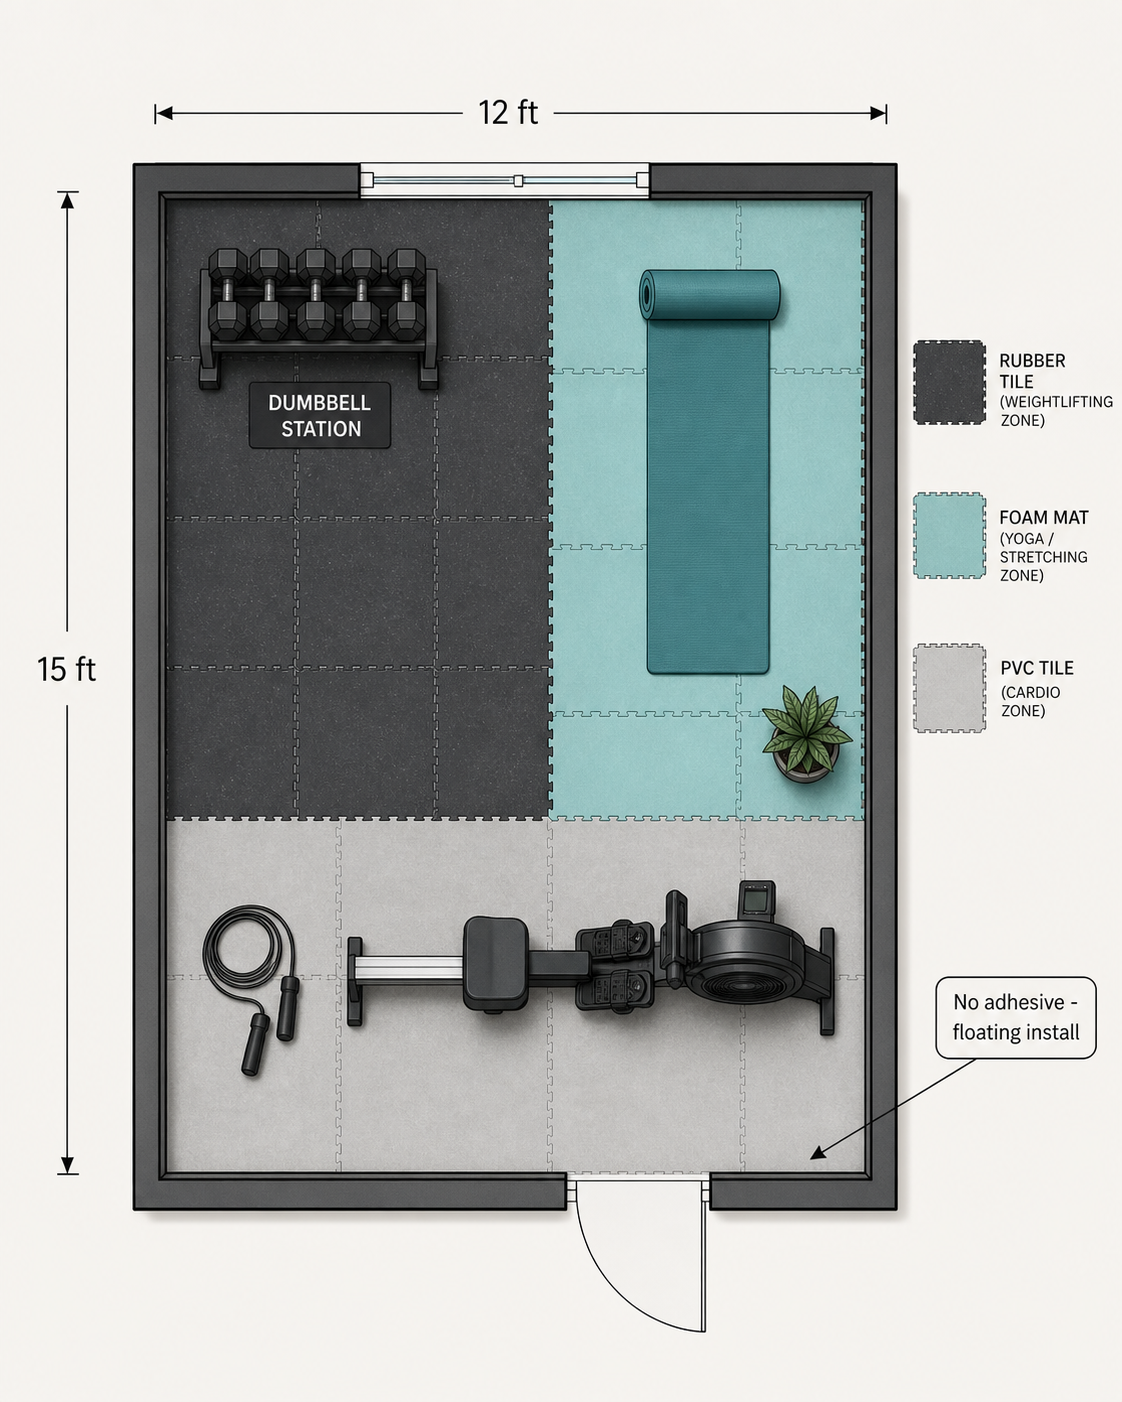
Here is how to think about zone planning in a typical 100–200 square foot space:
- Dumbbell and strength zone (rubber tiles, 0.47" or thicker). This is where you will drop weights, set down kettlebells, and perform standing exercises. This zone needs the highest impact protection and noise reduction. Allocate roughly 40–50% of your floor space here.
- Yoga and stretching zone (foam mat or thin rubber). If you do bodyweight-only work like yoga, Pilates, or mobility drills, a foam mat or thin rubber surface provides comfort and grip without the cost of heavy-duty rubber. This zone can share space with the strength zone if you roll out a separate mat each session.
- Cardio zone (PVC or rubber). For a treadmill, exercise bike, or rowing machine, you need a surface that handles vibration and protects the floor from sweat and moisture. PVC tiles are a good option here because they are waterproof and easy to clean. Equipment isolator pads under the machine feet add an extra layer of vibration dampening.
Zone planning also makes installation easier. You can start with the strength zone — the most critical area — and add other zones over time as your budget allows. The interlocking nature of most tile systems means you can expand or reconfigure the layout without starting from scratch.
Frequently Asked Questions
- Can I put gym flooring over carpet? Yes, but with a modification. For low-pile or Berber carpet, you can lay interlocking tiles directly on top. For plush or high-pile carpet, you need a 1/2" plywood base first to prevent the tiles from shifting. PVC plastic modular flooring is specifically noted by Lowe's as a material that installs well over carpet.
- Is rubber flooring safe for second-floor apartments?Yes, if you choose the right thickness. Norsk Store recommends a minimum of 0.47" (12mm) rubber for second-floor apartments. Combined with a sound-dampening underlayment, this thickness is sufficient to reduce impact noise to acceptable levels for the unit below.
- How do I clean gym flooring?For rubber tiles, sweep or vacuum regularly to remove dust and debris, then mop with a mild soap and water solution. Avoid harsh chemicals, bleach, or oil-based cleaners, which can degrade the rubber. For foam mats, spot-clean with a damp cloth and mild detergent. Allow the flooring to dry completely before using it again to prevent mold or mildew.
- Will my HOA allow a home gym?It depends on your specific HOA covenants and lease agreement. Some HOAs have noise clauses that restrict workout hours or prohibit certain types of equipment. Review your governing documents and, if in doubt, ask for written permission before purchasing flooring or equipment. Many HOAs are fine with quiet, low-impact setups that use proper soundproofing.
- How long does the rubber smell last, and how do I reduce it?New rubber flooring off-gassing peaks in the first 48–72 hours and typically fades within 3–7 days with good ventilation, according to GrytFit. In tighter spaces or cold weather, it can take a couple of weeks. To speed up the process: air out the tiles in a well-ventilated area for 24–48 hours before installing, wipe surfaces after installation with mild soap and water, maximize cross-ventilation, and use an air purifier with a HEPA and activated carbon filter placed near the floor. If strong odors persist beyond 3–4 weeks or cause headaches or irritation, consider replacing suspect sections with certified low-VOC materials.
- Is recycled rubber flooring safe for indoor use?This is a consideration worth understanding. Building biologist Corinne Segura's analysis notes that recycled rubber (crumb rubber from tires) can contain PAHs, lead, phthalates, and other contaminants. A California Public Health Institute study found off-gassing of xylene, benzene, toluene, and formaldehyde from some recycled rubber samples. Virgin vulcanized rubber with GreenGuard Gold certification (such as Mondo) has much lower VOCs. If indoor air quality is a priority, choose virgin rubber or EPDM rubber products with third-party low-VOC certification.
Some links on this page are affiliate links — they may earn us a commission at no extra cost to you. Our tier and tests are decided before we ever check which links pay; see our full affiliate disclosure.
Spot something off?
Noise and floor-damage claims carry real deposit-risk consequences if we get them wrong — tell us if your experience with this build didn't match what's above.