Why Your Power Rack Is the Safety Centerpiece of Your Home Gym
Before you compare steel gauges or debate hole spacing, it is worth asking a more fundamental question: what is a power rack actually for? A barbell and a bench let you lift. A power rack lets you lift alone. Its primary job is not to hold plates or look impressive in a garage — it is to catch a loaded barbell when your legs give out on a squat or your shoulders fail on a bench press. That safety function is the reason you buy a rack instead of a squat stand, and it is the reason the rack should be the first piece of equipment you plan around.
A true power rack uses enclosed safety bars or straps that can withstand a heavy drop. According to Titan Fitness, home-model power racks average an 800 lb capacity, while commercial models reach 1,200 lbs. Squat stands, by contrast, lack that enclosed cage structure and are designed primarily for squats and bench presses — not for catching a failed rep. If you train alone, which most home gym users do, the rack is your spotter. That makes the purchase decision a safety decision first, a space decision second, and a budget decision third.
This guide is organized around three real-world constraints — space, budget, and lifting goals — because those are the factors that actually determine which rack fits your situation. Brand popularity and influencer endorsements are noise. Your floor plan, your wallet, and your training objectives are the signal. Work through these three axes in order, and you will arrive at a shortlist of rack types and price tiers that match your reality before you ever compare a specific model.
If you are completely new to home gym planning and need a broader orientation before diving into rack specifics, our beginner's guide to starting a home workout practice covers the full setup process from goal-setting to equipment selection.
Decision Axis 1: What Space Do You Have?
Space is the most unforgiving constraint because you cannot negotiate with it. A rack that is six inches too tall for your basement ceiling or two feet too deep for your spare room is simply not an option, regardless of how well it fits your budget or goals. Measure your available space before you look at any product page.
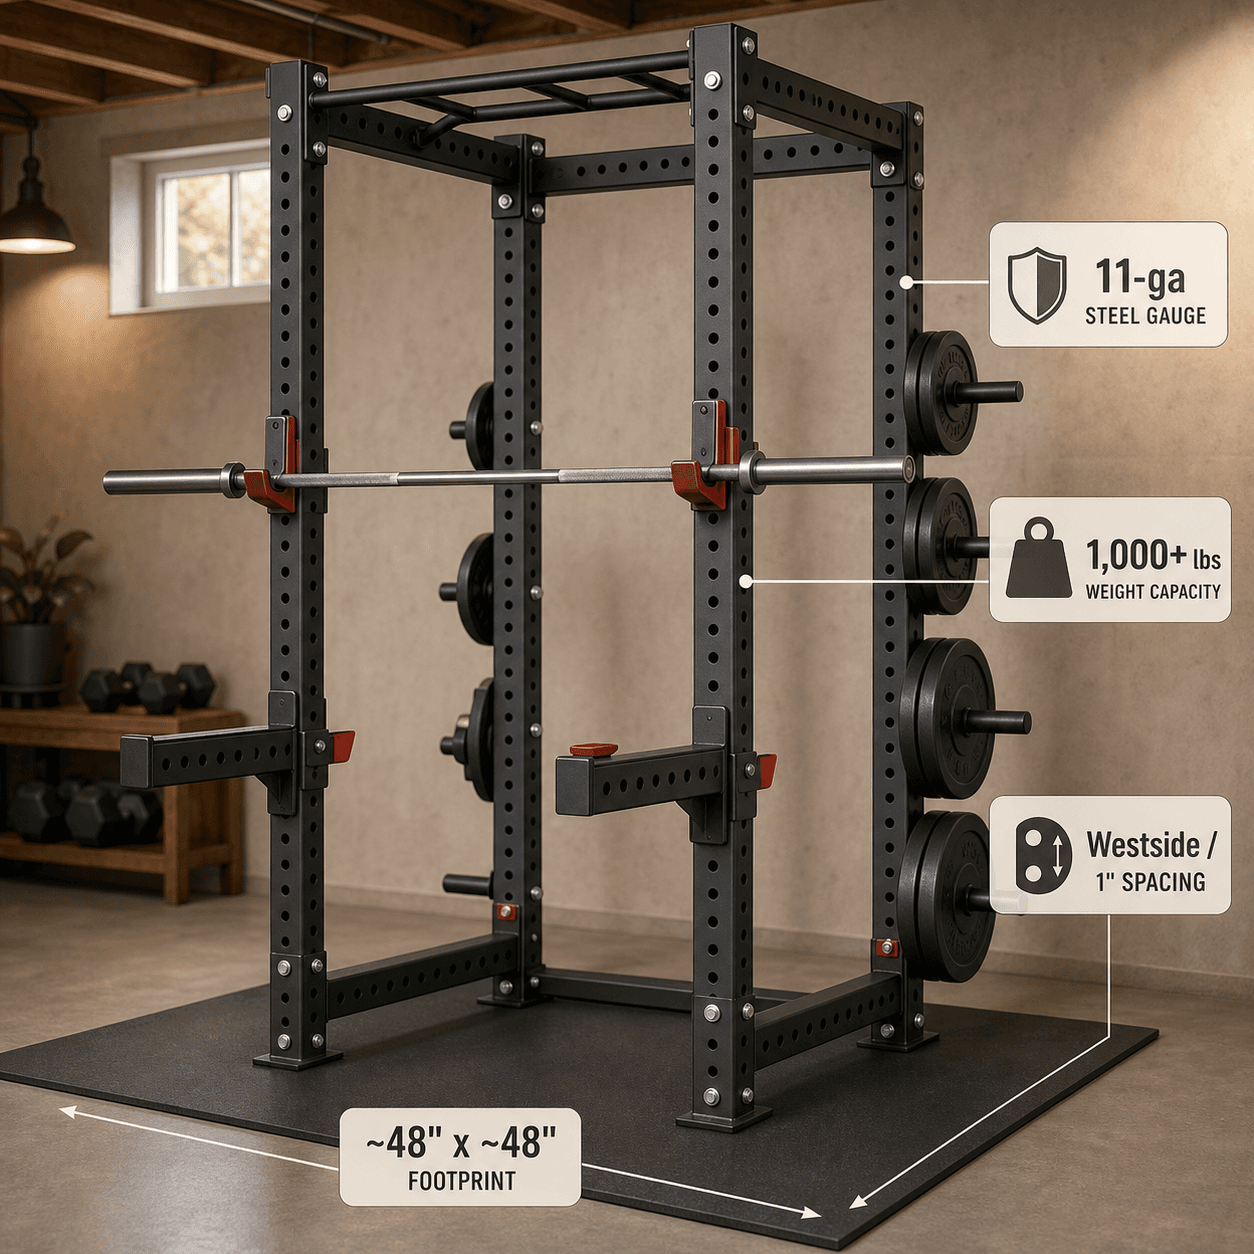
A typical full 4-post power cage requires about 4 feet of width and up to 4 feet of depth, with an 8-foot minimum on the width end for loading plates onto the barbell. For ceiling height, you need at least 7 feet for most racks, and preferably 9 feet if you plan to do overhead pressing or pull-ups inside the cage. The rack configurations available to you depend on how much of that space you can dedicate permanently.
| Rack Type | Typical Footprint | Ceiling Height Needed | Key Tradeoff |
|---|---|---|---|
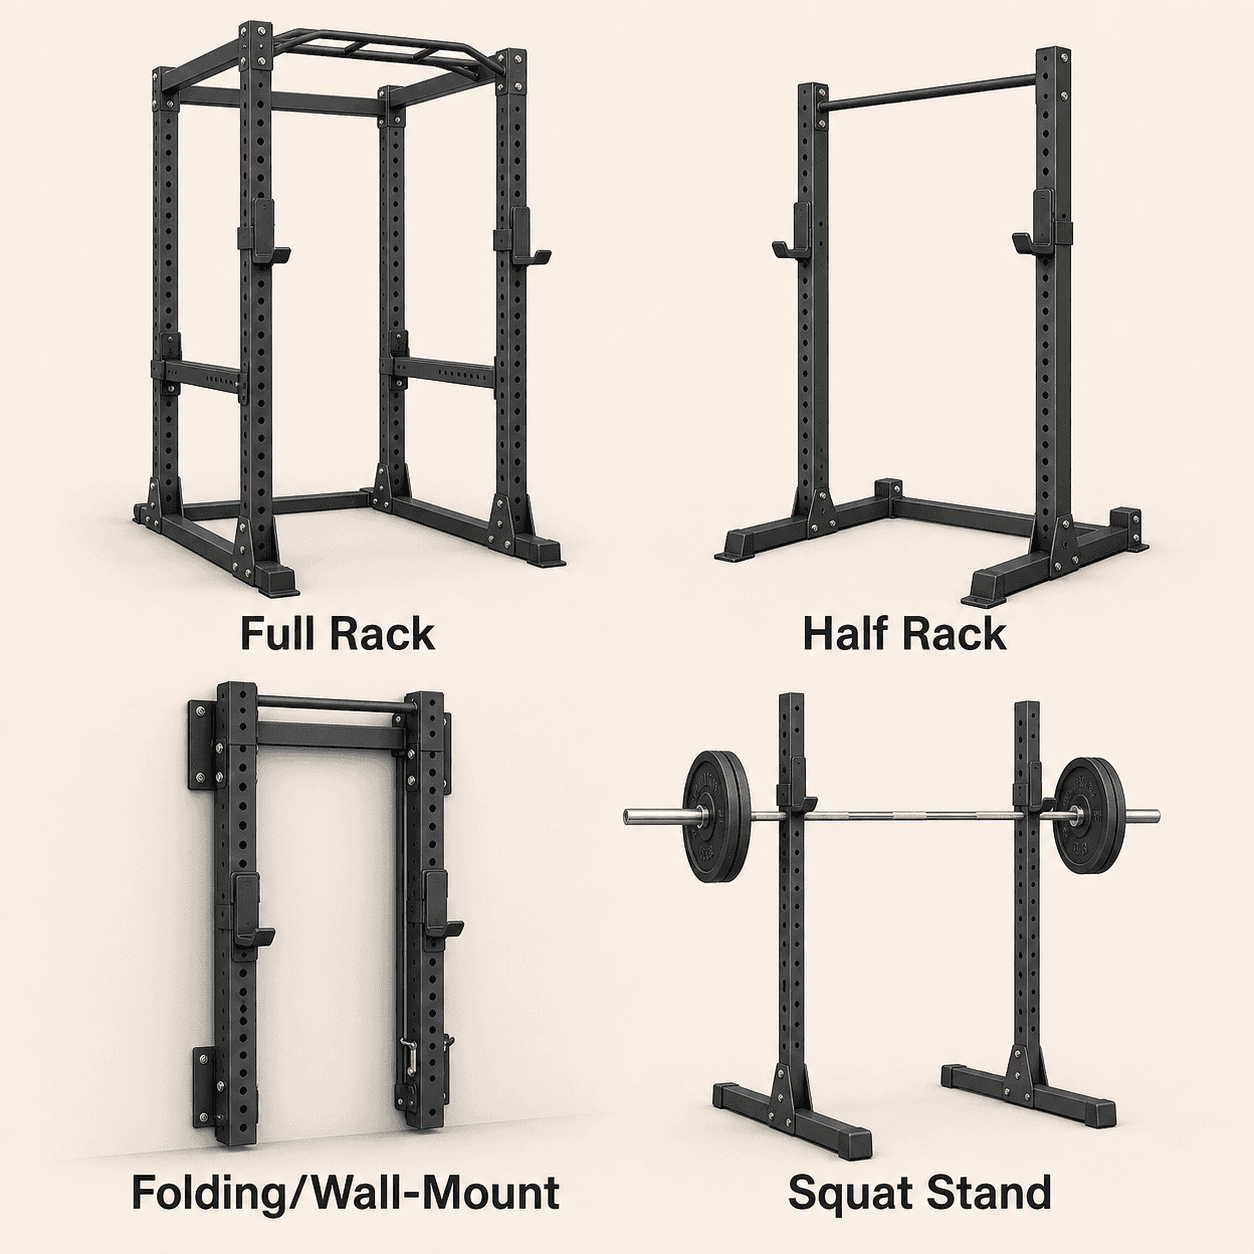
| Full 4-post cage | 48"W x 48"D | 84"–93" | Maximum safety and attachment compatibility; requires permanent floor space |
| Half rack | 48"W x 36"D | 84"–90" | Saves depth but requires lifting out front; less enclosed safety |
| Folding / wall-mounted | 48"W x 4"D (stored) | 90"–108" | Premium space savings; folds flat against wall; higher cost per lb of capacity |
| Squat stand | 48"W x 48"D | 73"–84" | Most compact and cheapest; no safety bars for failed reps |
Full 4-post cages are the safest and most versatile option. They enclose the lifter on all four sides, with dual-anchored safety bars that can catch a dropped barbell from either direction. They also offer the widest attachment ecosystem — cable pulldowns, dip bars, landmine mounts, and monolifts all bolt onto a 4-post frame. The tradeoff is permanent floor space. A rack like the REP PR-4000, which measures 41"L x 51"W x 93"H at its maximum configuration, will dominate a corner of any room.
Half racks reduce depth by removing the rear uprights and crossmembers. The lifter steps out front to squat and bench, which means the safety catches are only anchored on one side. Under the heaviest loads, those catches may bend more easily than a full cage's dual-anchored bars. Half racks are a reasonable compromise for users who need to reclaim a foot or two of floor space but still want a bolted-down, stable structure.
Folding or wall-mounted racks, such as the PRx Profile PRO, are the premium space-saving solution. They mount directly to wall studs and fold flat against the wall when not in use — the PRx Profile PRO folds to between 9 and 22.5 inches off the wall. The 90-inch model requires 108 inches of ceiling height, which limits installation to rooms with at least 9-foot ceilings. These racks are ideal for shared spaces like garages where the rack needs to disappear between sessions.
Squat stands are the most compact and least expensive option, but they are not power racks. They lack the enclosed cage structure and, in most cases, any form of safety catch that can withstand a heavy drop. If your space is truly limited and your budget is under $400, a squat stand like the Titan T-3 Squat Stand (73.5" height, 1,000 lb capacity) can get you lifting — but you should plan to upgrade to a full cage as soon as space and budget allow.
Decision Axis 2: What Is Your Realistic Budget?
Once you know what rack type fits your space, the next question is what you can afford to spend. Power rack prices span from under $400 to well over $7,000, and the differences between tiers are not just about brand markup — they reflect real differences in steel gauge, weight capacity, attachment compatibility, and warranty coverage.
The single most important thing to understand about rack pricing is that the rack itself is not the most important piece of equipment in your gym. As Gym Crafter notes, "good racks never wear out," and budget is best spent on the barbell and bench before the rack. A $400 rack with a high-quality barbell will serve you better than a $1,200 rack with a cheap barbell. Keep that in mind as you evaluate the tiers below.
| Price Tier | Steel Gauge | Typical Capacity | Attachment Compatibility | Example Models |
|---|---|---|---|---|
| Under $500 | 14-gauge 2x2 or 12-gauge 2x3 | 600–1,000 lbs | Limited; proprietary or no ecosystem | REP PR-1100 ($380), Titan T-3 ($380–$490), Fringe Sport ($349) |
| $500–$1,000 | 11-gauge 3x3 | 1,000–1,650 lbs | Good; 5/8" or 1" holes open wider market | Titan X-3 ($565–$900), REP PR-4000 ($621–$1,700), Major Fitness PLM03 ($930) |
| $1,000–$2,000 | 11-gauge 3x3 | 1,000+ lbs | Excellent; full ecosystem access | REP PR-5000 v2 (~$900+), PRx Profile PRO (~$1,100), Rogue HR-2 ($765+) |
| $2,000+ | 11-gauge 3x3 or heavier | 1,500+ lbs | Full ecosystem; often includes cable stacks | Force USA all-in-one systems, Rogue Monster series |
Under $500: Entry-Level Safety
At this price point, you are buying a rack that will keep you safe at moderate loads but will limit your long-term upgrade options. The REP PR-1100, priced around $380, uses 2x2 14-gauge steel with 1-inch holes and 3-inch hole spacing, and has a 700 lb rack capacity. The Titan T-3 Squat Stand starts at $380 and uses 2x3 11-gauge steel with a 1,000 lb capacity. Both are flat-foot designs that do not require bolting to the floor.
What you sacrifice at this tier: attachment compatibility. The 2x2 or 2x3 uprights and non-standard hole sizes mean most aftermarket attachments — cable systems, monolifts, dip bars — will not fit without adapters or modification. You also get wider hole spacing (3 inches on the PR-1100 versus 2 inches or Westside spacing on higher-tier racks), which makes fine-tuning J-hook height for bench press more difficult.
$500–$1,000: The Sweet Spot
This is where the market's best value lives. The Titan X-3 Flat Foot rack costs $565 to $900 depending on configuration, uses 3x3 11-gauge steel, has a rackable weight capacity of 1,650 lbs and a total rack capacity of 6,170 lbs, and includes Westside hole spacing through the bench area. The REP PR-4000 starts around $621 and goes up to $1,700 depending on configuration, uses 3x3 11-gauge steel with 5/8-inch holes and 1-inch Westside spacing, and has a 1,000 lb capacity.
At this tier, you get 3x3 uprights, which are the current industry standard for attachment compatibility. The 5/8-inch or 1-inch hole sizes open up the widest aftermarket ecosystem. You also get tighter hole spacing (Westside spacing of 1 inch through the bench zone), which lets you set J-hooks at the exact height you need for bench press without being forced into a position that is either too high or too low.
$1,000–$2,000: Premium Build and Future-Proofing
At this level, you are paying for refinement, warranty coverage, and attachment ecosystem access. The REP PR-5000 v2 starts around $900 and goes up from there, using 3x3 11-gauge steel with 1-inch holes and 2-inch spacing, available in 80-inch or 93-inch heights, and configurable as a 4-post or 6-post rack. The PRx Profile PRO, at roughly $1,100, offers the same 3x3 11-gauge build in a folding wall-mounted format with a 1,000 lb capacity and a 10-year warranty.
The main advantage of this tier is that you will likely never need to replace the rack. The steel gauge, hole spacing, and attachment compatibility are all at the level that serious lifters use for decades. If your budget allows, this is the tier where "buy once, cry once" actually applies.
$2,000+: All-in-One Systems
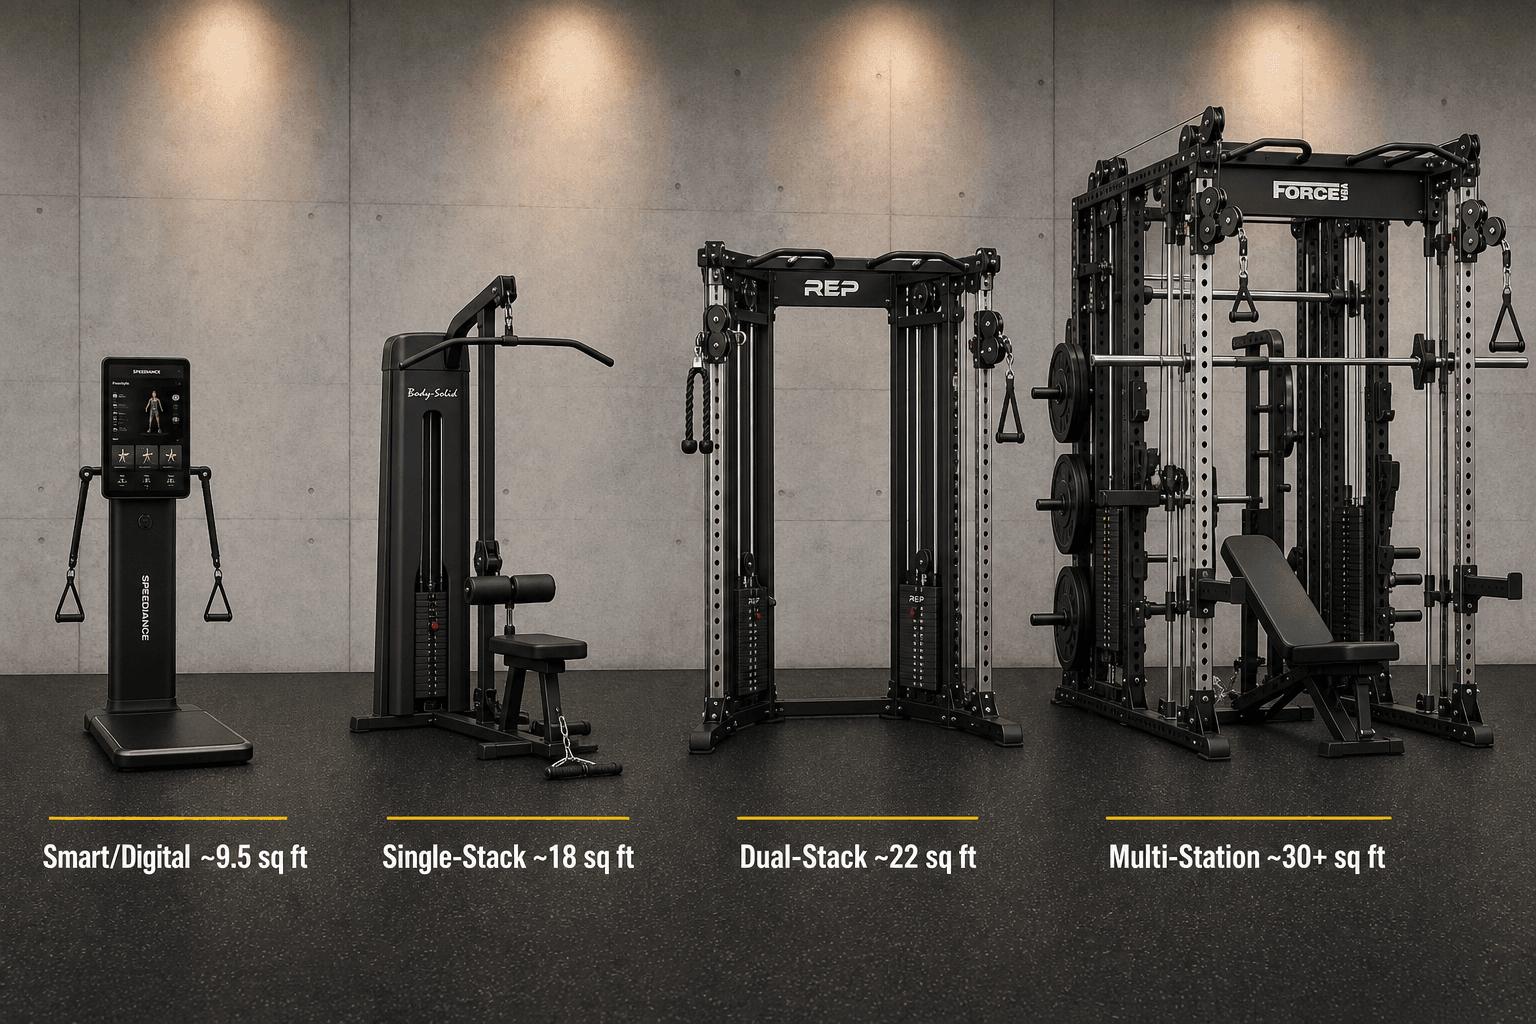
Above $2,000, you are typically looking at all-in-one systems that combine a power rack with cable pulleys, weight stacks, Smith machines, and multiple attachments in a single footprint. The Force USA G6, for example, includes dual 220 lb weight stacks with a 2:1 ratio (110 lb effective resistance), a Smith machine, and 17 included attachments in a 63"L x 72"W x 91"H frame. These systems trade pure rack strength for space efficiency and exercise variety.
If your primary goal is heavy powerlifting (500+ lb squats and deadlifts), an all-in-one system is probably not the right choice — the cable components and Smith machine add cost and complexity without improving the rack's ability to handle heavy loads. But if your goal is general fitness with maximum exercise variety in a single piece of equipment, these systems can replace multiple machines.
Decision Axis 3: What Are Your Lifting Goals?
Your training goals determine how much weight the rack needs to handle, what attachments you will eventually want, and whether you need specialized features like Westside hole spacing or a wide attachment ecosystem. Three common goal profiles cover the majority of home gym builders.
Heavy Powerlifting (500+ lb Squats and Deadlifts)
If your training revolves around the big three lifts — squat, bench press, and deadlift — and you plan to push into intermediate or advanced territory, your rack needs to be built for heavy loads. Gray Matter Lifting recommends a 3x3 rack with 1-inch or 5/8-inch hardware for lifters exceeding 500 lbs, to ensure sufficient weight ratings. You also want Westside hole spacing (1-inch spacing through the bench zone) so you can set J-hooks at the precise height needed for competition-style bench press setup.
For this profile, the rack's weight capacity should exceed your heaviest planned lift by at least 200 lbs for safety and longevity. The Titan X-3's 1,650 lb rackable capacity or the REP PR-5000 v2's 1,000 lb capacity provide ample headroom. You will also want pin/pipe safeties or heavy-duty strap safeties rated for drop loads in this range.
General Strength and Hypertrophy (Moderate Loads, Varied Exercises)
Most home gym users fall into this category. You are not chasing a 600 lb squat, but you want to build muscle, improve strength, and have the flexibility to do a wide range of exercises. A rack in the $500–$1,000 range with 3x3 11-gauge steel and 5/8-inch or 1-inch holes will serve you well for years. The REP PR-4000 or Titan X-3 both fit this profile.
For this goal profile, attachment compatibility matters more than raw weight capacity. You will likely want to add a lat pulldown/low row cable attachment, a landmine for rotational work, and possibly dip bars. A 3x3 rack with standard hole sizes gives you access to the widest range of aftermarket attachments.
All-in-One Versatility (Cables, Pulldowns, and Space Efficiency)
If your goal is maximum exercise variety from a single piece of equipment — and you are willing to trade some raw rack strength for that versatility — an all-in-one system or a rack with a comprehensive cable attachment may be the right choice. The Major Fitness PLM03, at $930, includes a cable system in a 2x3 14-gauge frame with a 1,200 lb J-hook capacity and 700 lb safety bar capacity.
The tradeoff is that all-in-one systems typically use lighter-gauge steel and have lower weight capacities than dedicated power racks. If your training evolves toward heavier loads, you may outgrow the rack's structural limits before you outgrow its attachment features.
- Heavy powerlifting: Prioritize 3x3 11-gauge steel, 1" or 5/8" holes, Westside spacing, and a capacity 200+ lbs above your max lift.
- General strength: Focus on 3x3 11-gauge steel with standard hole sizes for attachment compatibility. Capacity of 1,000 lbs is sufficient.
- All-in-one versatility: Accept lighter steel gauge and lower capacity in exchange for built-in cables, pulldowns, and multiple attachment points.
Power Rack Spec Decoder: Steel Gauge, Hole Size, and Weight Capacity
Once you have narrowed your options by space, budget, and goals, you need to understand the three specification dimensions that determine a rack's quality and longevity. These specs are not marketing jargon — they directly affect safety, attachment compatibility, and resale value.
| Spec | Budget Tier | Standard Tier | Premium Tier |
|---|---|---|---|
| Steel gauge | 14-gauge (2x2 or 2x3) | 11-gauge (3x3) | 11-gauge (3x3) or heavier |
| Upright dimensions | 2"x2" or 2"x3" | 3"x3" | 3"x3" or 3"x4" |
| Hole size | 1" or 11/16" | 5/8" or 1" | 1" (metric ~0.98") |
| Hole spacing | 2"–3" | 2" with Westside (1") in bench zone | 2" with Westside (1") in bench zone |
| Typical capacity | 600–1,000 lbs | 1,000–1,650 lbs | 1,000+ lbs |
Steel Gauge and Upright Dimensions
Steel gauge refers to the thickness of the steel used in the uprights. A lower gauge number means thicker steel. Eleven-gauge steel (0.120 inches thick) is the current industry standard for durable home gym racks. Fourteen-gauge steel (0.075 inches thick) is thinner and used in budget racks. The difference in material thickness is significant — 11-gauge is roughly 60% thicker than 14-gauge, which translates directly into greater rigidity and load capacity.
Upright dimensions (2x2, 2x3, or 3x3) refer to the cross-section of the steel tube. A 3x3 upright is not just thicker — it is also wider, which provides more surface area for J-hooks and attachments to grip. Most aftermarket attachments are designed for 3x3 uprights, making this the most future-proof choice.
Hole Size and Spacing
Hole size determines which attachments fit your rack. The two common standards are 5/8-inch and 1-inch. Gray Matter Lifting notes that 1-inch hardware racks are considered the "gold standard" because they give access to more premium attachments and allow 5/8-inch attachments to be used via spacers. A 5/8-inch rack cannot accept 1-inch attachments without modification.
Hole spacing determines how precisely you can adjust J-hook and safety height. Standard spacing is 2 inches between holes. Westside spacing (also called "competition spacing") uses 1-inch spacing through the bench press zone, typically from the bottom of the upright up to about 30 inches. This allows you to set J-hooks at the exact height needed for bench press — a critical feature for serious lifters who need consistent bar placement session to session.
Weight Capacity
Weight capacity is the most misunderstood spec. Manufacturers often list a "total rack capacity" that includes the weight of the rack itself plus all stored plates, which can be misleading. The number that matters is the "rackable capacity" — the maximum load the J-hooks and safety bars can support during a lift. The average rack capacity across tested models is approximately 1,000 lbs, according to Garage Gym Reviews. For most home gym users, a rackable capacity of 1,000 lbs provides ample headroom.
Attachment Ecosystems and Future-Proofing Your Rack
One of the most common regrets among home gym builders is choosing a rack with a limited attachment ecosystem. Six months after buying a budget rack, you may want to add a lat pulldown, a landmine, or a set of dip bars — only to discover that no aftermarket attachments fit your 2x2 uprights or non-standard hole size.
The attachment ecosystem is determined by three factors: upright dimensions (2x2, 2x3, or 3x3), hole size (5/8-inch or 1-inch), and hole spacing. A 3x3 rack with 1-inch holes gives you access to the widest range of attachments from brands like REP, Rogue, Titan, and countless third-party manufacturers. A 3x3 rack with 5/8-inch holes is slightly more limited but still has a large ecosystem. A 2x2 or 2x3 rack with non-standard hole sizes is essentially locked into the manufacturer's own attachments, which may be limited or discontinued over time.
- 3x3 uprights with 1" holes: Widest ecosystem. Accepts attachments from REP, Rogue, Titan, Bells of Steel, and most third-party brands. Can use 5/8" attachments with spacers.
- 3x3 uprights with 5/8" holes: Large ecosystem. Compatible with most Rogue Monster Lite and REP PR-4000 attachments. Cannot accept 1" attachments without modification.
- 2x3 uprights with 11/16" holes: Limited ecosystem. Primarily compatible with Titan T-3 series attachments and a small number of third-party options.
- 2x2 uprights with 1" holes: Very limited ecosystem. Mostly limited to the manufacturer's own attachments. Upgrade path is essentially a new rack.
If you are unsure whether you will want attachments in the future, choose a 3x3 rack with standard hole sizes. The price difference between a budget 2x2 rack and an entry-level 3x3 rack is often less than the cost of replacing the entire rack later.
Safety Feature Comparison: Pin/Pipe, Straps, and Spotter Arms
The safety system is the most important functional feature of your rack. It is what catches the barbell when you fail a rep, and it needs to do that job reliably under load without damaging your barbell or your floor. Three common safety types exist, each with distinct tradeoffs.
| Safety Type | Load Capacity | Barbell Protection | Ease of Adjustment | Noise |
|---|---|---|---|---|
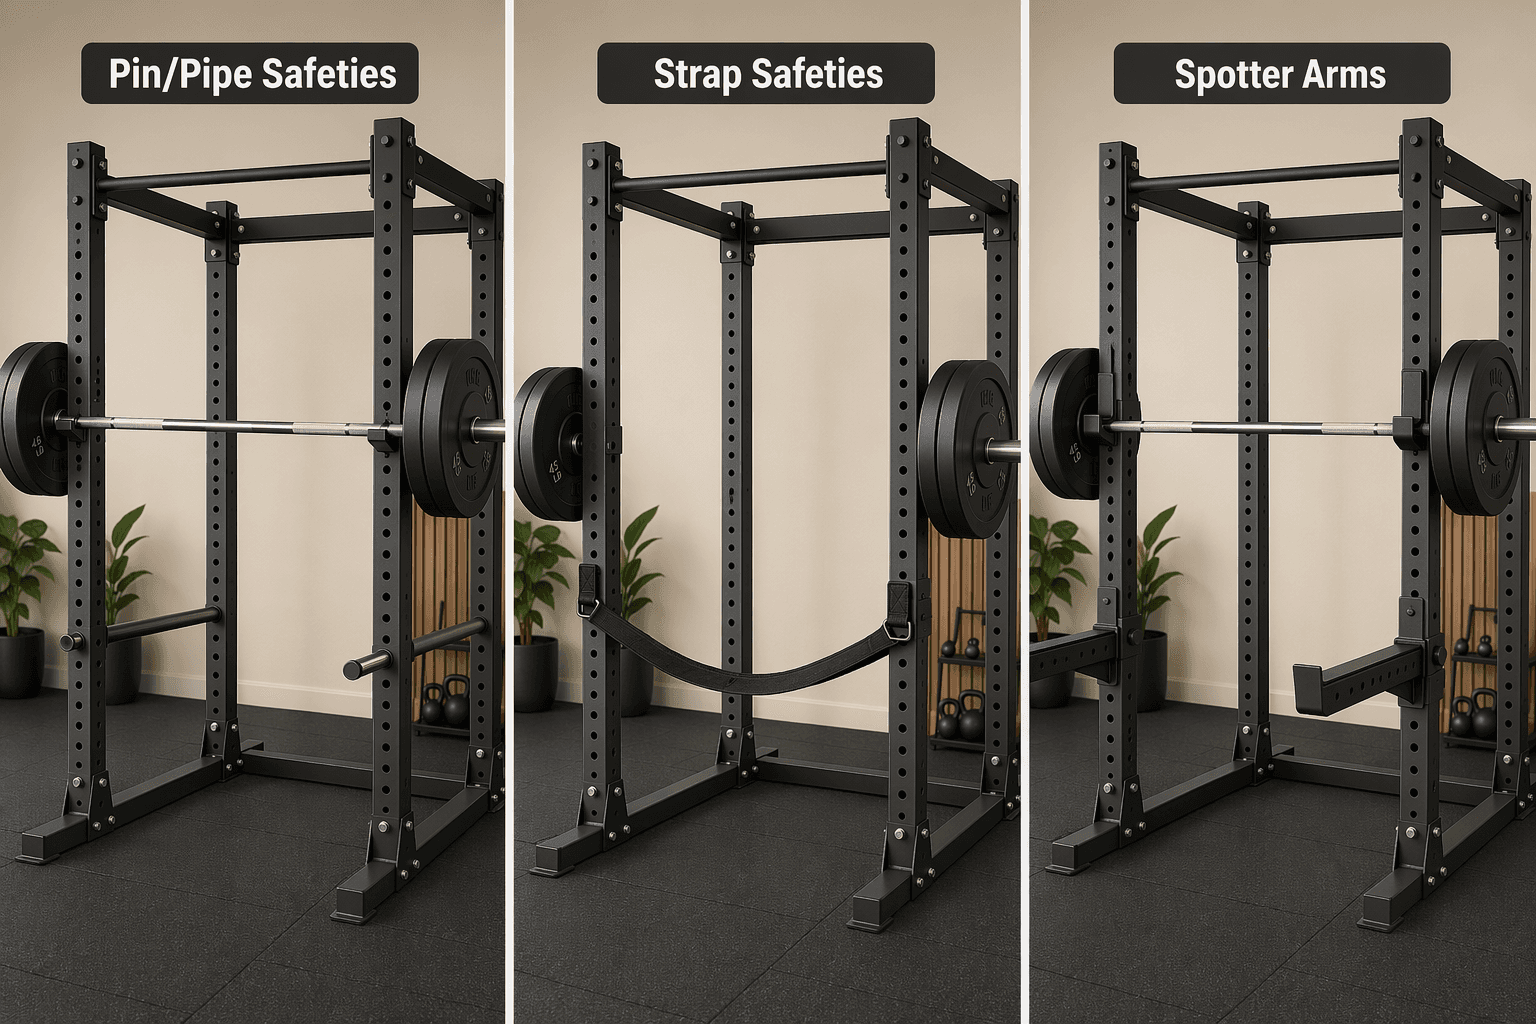
| Steel pin/pipe safeties | Highest (rated to rack capacity) | Low — steel-on-steel contact can damage knurling | Moderate — pins must be lifted out and reinserted | Loud — metal-on-metal contact |
| Fabric strap safeties | High (rated to rack capacity) | High — nylon straps do not damage bar knurling | Easy — straps loop over pegs, no heavy pins to lift | Quiet — no metal-on-metal contact |
| Flip-down spotter arms | Moderate to high | Moderate — rubber-coated contact points | Very easy — flip up/down without removing | Quiet — rubber-coated contact |
Steel pin/pipe safeties are the traditional choice and are included with most budget and mid-range racks. They consist of steel pins that slide through the uprights with a steel pipe resting across them. They can handle the highest loads — the Major Fitness PLM03's safety bars are rated at 700 lbs — but the steel-on-steel contact can damage barbell knurling over time, and they are noisy when a barbell drops onto them.
Fabric strap safeties are a modern upgrade that addresses the main drawbacks of steel pins. Nylon straps loop over pegs in the uprights and cradle the barbell without metal-on-metal contact. They protect the barbell's knurling, are quieter during drops, and are easier to adjust because the straps are lightweight. Most premium racks offer strap safeties as an option or upgrade.
Flip-down spotter arms are common on half racks and folding racks where traditional pin safeties would interfere with the rack's compact design. They attach to the front uprights and flip down when needed, then flip up and out of the way. They are the easiest to adjust but may have lower load ratings than pin or strap safeties, especially on lighter-gauge racks.
Decision Tree: Which Rack Should You Buy?
The three decision axes — space, budget, and goals — converge into a shortlist of rack types and specific models. Use the table below to find the combination that matches your situation, then compare the recommended models within that tier.
| Your Space | Your Budget | Your Goal | Recommended Rack Type | Example Model |
|---|---|---|---|---|
| Permanent floor space (4x4 ft+) | Under $500 | General strength | Full 4-post cage | REP PR-1100 ($380) |
| Permanent floor space (4x4 ft+) | $500–$1,000 | General strength | Full 4-post cage | Titan X-3 ($565–$900) or REP PR-4000 ($621+) |
| Permanent floor space (4x4 ft+) | $1,000–$2,000 | Heavy powerlifting | Full 4-post cage | REP PR-5000 v2 (~$900+) |
| Limited depth (3 ft) | $500–$1,000 | General strength | Half rack | Rogue HR-2 ($765+) |
| Shared space (folds flat) | $1,000–$2,000 | General strength | Folding wall-mounted | PRx Profile PRO (~$1,100) |
| Limited space, want cables | $500–$1,000 | All-in-one versatility | All-in-one rack | Major Fitness PLM03 ($930) |
| Limited space, want cables | $2,000+ | All-in-one versatility | All-in-one system | Force USA G6 |
| Very limited space/ budget | Under $500 | Getting started | Squat stand | Titan T-3 Squat Stand ($380) |
Frequently Asked Questions
Can I put a power rack in a basement with low ceilings?
Yes, but you need to measure carefully. Most racks require at least 84 inches (7 feet) of ceiling height, and 90 inches is preferable if you want to do pull-ups inside the cage. If your basement ceiling is 80 inches or less, look for "short" rack models — the Titan T-3 is available in an 82-inch height, and the REP PR-5000 v2 comes in an 80-inch version. You will likely need to do pull-ups outside the rack or skip them entirely.
Do I need to bolt my rack to the floor?
It depends on the rack design. Flat-foot racks like the REP PR-1100, Titan X-3, and Titan T-3 are designed to be freestanding and do not require bolting. They use a wide base and weight storage pegs to stay stable under load. Bolt-down racks require anchoring to a concrete floor for stability. If you are renting or cannot drill into your floor, a flat-foot rack is the safer choice. Vulcan Strength specifically markets its flat-foot power rack as an option for apartments where bolting is not allowed.
Can I upgrade a budget rack later?
Partially. You can add weight storage pegs, plate holders, and some accessories to most racks. But the fundamental limitations — steel gauge, upright dimensions, and hole size — are permanent. A 2x2 14-gauge rack cannot be upgraded to a 3x3 11-gauge rack. If you think you will eventually want heavier capacity or a wider attachment ecosystem, it is cheaper to buy a 3x3 rack now than to replace a 2x2 rack later.
How much weight can a 14-gauge rack really hold?
A 14-gauge rack like the REP PR-1100 has a rated rack capacity of 700 lbs. That is sufficient for most beginner and intermediate lifters. The rack will hold that weight safely — the steel will not fail at 700 lbs. However, the rack may feel less rigid under heavy loads compared to an 11-gauge rack, and the J-hooks and safeties may have lower individual ratings. If you plan to exceed 500 lbs on squats or deadlifts, an 11-gauge rack is the safer long-term choice.


Comments
Join the discussion with an anonymous comment.