
A Phased Home Exercise Plan for Ankle Sprain Recovery
- Guideline topic
- optimal loading
- Source
- ACSM guideline
- Last reviewed
If you sprained your ankle in the last few days, the problem is usually not finding a heroic workout. It is figuring out what you can safely do today without turning a small injury into a six-week annoyance. Too little movement for too long can leave the ankle stiff, weak, and touchy on stairs. Too much too soon can bring the swelling right back.
The useful middle ground is a phased plan for ankle sprain recovery exercises at home: protect the ankle, load it early but gently, and move forward only when the ankle earns the next step. That is the practical meaning of the POLICE approach: Protection, Optimal Loading, Ice, Compression, and Elevation. In a 2023 randomized trial of 109 people with ankle sprains, the POLICE group improved more on AOFAS function by day 14 than the PRICE group, with median improvement of 34.5 versus 24, and had better FADI improvement as well, 42 versus 31. The rest-based PRICE group also had a 5.47-times higher recurrent sprain risk, while POLICE did not increase pain scores compared with PRICE.[1]
That does not mean every sprain belongs in a home program. Get clinical evaluation before following this plan if you cannot bear weight after 72 hours, see visible deformity, have numbness or tingling, suspect a fracture or tendon rupture, or think the injury may be a severe Grade 3 sprain. Grade 1 sprains often recover in about 1–2 weeks, Grade 2 sprains may take 3–6 weeks, and Grade 3 injuries can take several months, so the calendar is only a rough guide, not a diagnosis.[2]
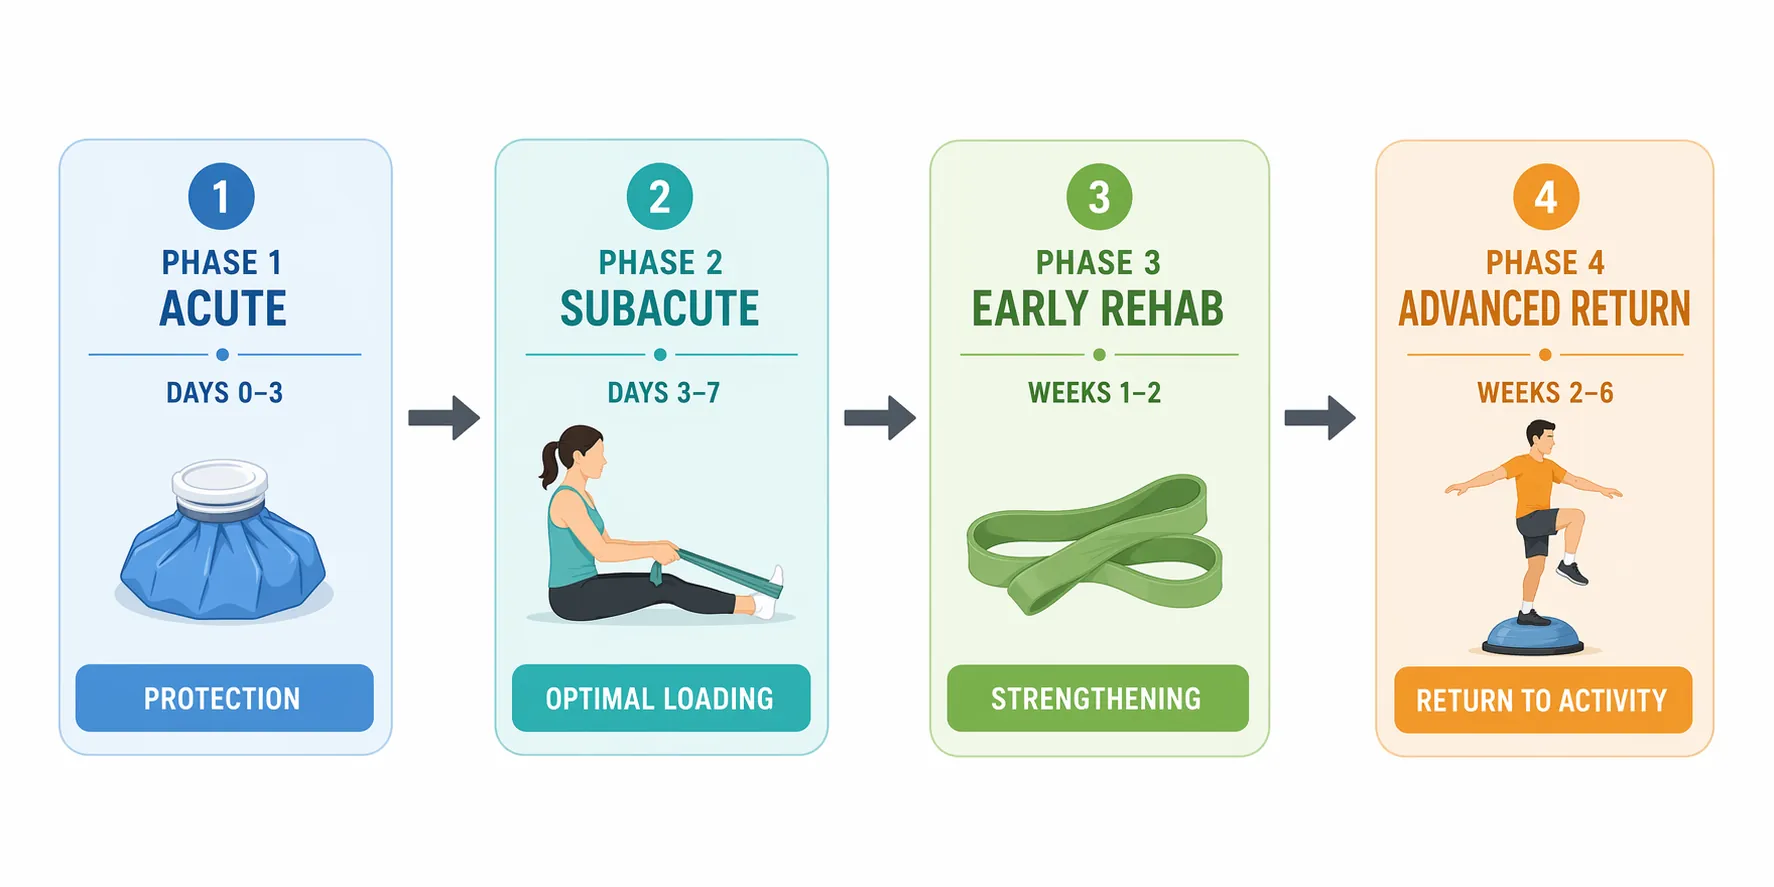
The Four-Phase Home Plan
Here is the whole map before the details. The days and weeks help you orient yourself, but the gate criteria matter more than the date on the calendar.
| Phase | Usual window | Main goal | Home exercises | Move on only if |
|---|---|---|---|---|
| Phase 1: Acute | Days 0–3 | Calm swelling, keep gentle motion | Ankle pumps, ankle alphabet, side-to-side movement | Pain does not increase, swelling is stable or decreasing, gentle movement is tolerated |
| Phase 2: Subacute | Days 3–7 | Restore pain-free range and begin low-load muscle work | Towel stretch, seated calf stretch, isometric inversion and eversion | You can stand without increased pain and do the exercises without a swelling flare |
| Phase 3: Early rehab | Weeks 1–2 | Build controlled strength in all directions | Four-way resistance-band work: up, down, inward, outward | Range of motion is pain-free and band work does not increase pain or swelling |
| Phase 4: Advanced return | Weeks 2–6 | Rebuild balance, calf strength, and activity tolerance | Single-leg balance, heel raises, controlled stepping and return-to-activity drills | Single-leg balance is controlled and activity does not cause next-day swelling |
The equipment list is deliberately boring: a chair, a towel, a resistance band, and possibly an elastic wrap or ankle sleeve. A basic band usually costs about $8–15, and a simple home kit with towel, chair, band, and compression support can stay around $28–75, compared with about $75–200 or more for one physical therapy copay and roughly $300–800 or more for a four-week program. Wobble boards, BAPS boards, and electrical stimulation units can be useful in some settings, but they are not required for most Grade 1–2 home rehab.
Phase 1: Days 0–3, Keep Motion Gentle
The first phase is not the time to test toughness. Your job is to protect the ankle while preventing it from turning into a stiff block. Ice, compression, and elevation can help with swelling control, but the exercise part should stay easy enough that you can repeat it several times a day without paying for it later.
- Ankle pumps: Sit or lie down with the foot supported. Point the toes away, then pull them back toward your shin. Move slowly for 10–20 repetitions.
- Ankle alphabet: Use the big toe like a pen and trace A through Z in the air. Keep the letters small if the ankle feels tight.
- Side-to-side movement: With the heel supported, gently move the foot inward and outward without forcing the end range.
- Dose: Do these up to 5 times per day if pain stays mild and swelling does not increase.
These early movements match common rehabilitation instructions for sprained ankles, including ankle pumps, alphabet motion, and side-to-side movement performed several times per day.[3][4] The point is circulation and range of motion, not stretching the ligament back into submission. If the ankle feels warmer, larger, or sharper afterward, reduce the range and frequency.
Move to Phase 2 only when gentle motion does not increase pain, swelling is stable or decreasing, and you can put the foot down for basic standing without a clear flare. If weight bearing is still not possible after 72 hours, stop treating this like a normal home-rehab problem and get evaluated.
Phase 2: Days 3–7, Add Stretching and Isometrics
This is the hinge phase. A lot of people either keep babying the ankle long after it is ready for work, or they jump straight into balance drills because the bruising looks less dramatic. Neither is helpful. Phase 2 asks for low-load, controlled effort: stretch what is stiff, wake up the muscles around the ankle, and keep checking whether swelling approves.
Towel Stretch
Sit with the injured leg straight. Loop a towel around the ball of the foot, hold both ends, and gently pull the toes toward you until you feel a stretch in the calf and back of the ankle. Keep the knee straight. This should feel like a stretch, not a yank.
- Hold: 15–30 seconds
- Repeat: 2–4 times
- Stop if: The front or side of the ankle pinches sharply
Seated Calf Stretch
Sit toward the front of a chair with the injured foot flat on the floor. Slide the foot slightly back under the chair while keeping the heel down. Lean forward a little until the ankle bends comfortably. This version is useful when the straight-leg towel stretch feels too aggressive.
Isometric Inversion and Eversion
Isometrics let you contract the ankle muscles without moving the joint much. For eversion, place the outside of the injured foot against a wall, heavy chair leg, or your other foot, then press outward without letting the ankle roll. For inversion, press the inside of the foot inward against your other foot or a fixed object.
- Hold: 6 seconds
- Reps: 8–12 each direction
- Effort: Light to moderate, about half strength at first
- Frequency: 1–2 times per day if symptoms stay quiet
Towel stretching and isometric inversion and eversion are standard early ankle rehab choices, with 6-second holds and 8–12 repetitions used for isometric work in family medicine guidance.[4][5] The key detail is that the ankle should not swell more after the session. A little muscular effort is fine; a throbbing joint is a vote to stay here longer.
Move to Phase 3 when you can stand without increased pain, the ankle moves through a comfortable range, and the isometrics do not cause a same-day or next-day swelling increase. If you need a more visual breakdown of these movements, the companion guide to phase-based ankle rehab exercises is a good place to check execution details.
Phase 3: Weeks 1–2, Use the Band in Four Directions
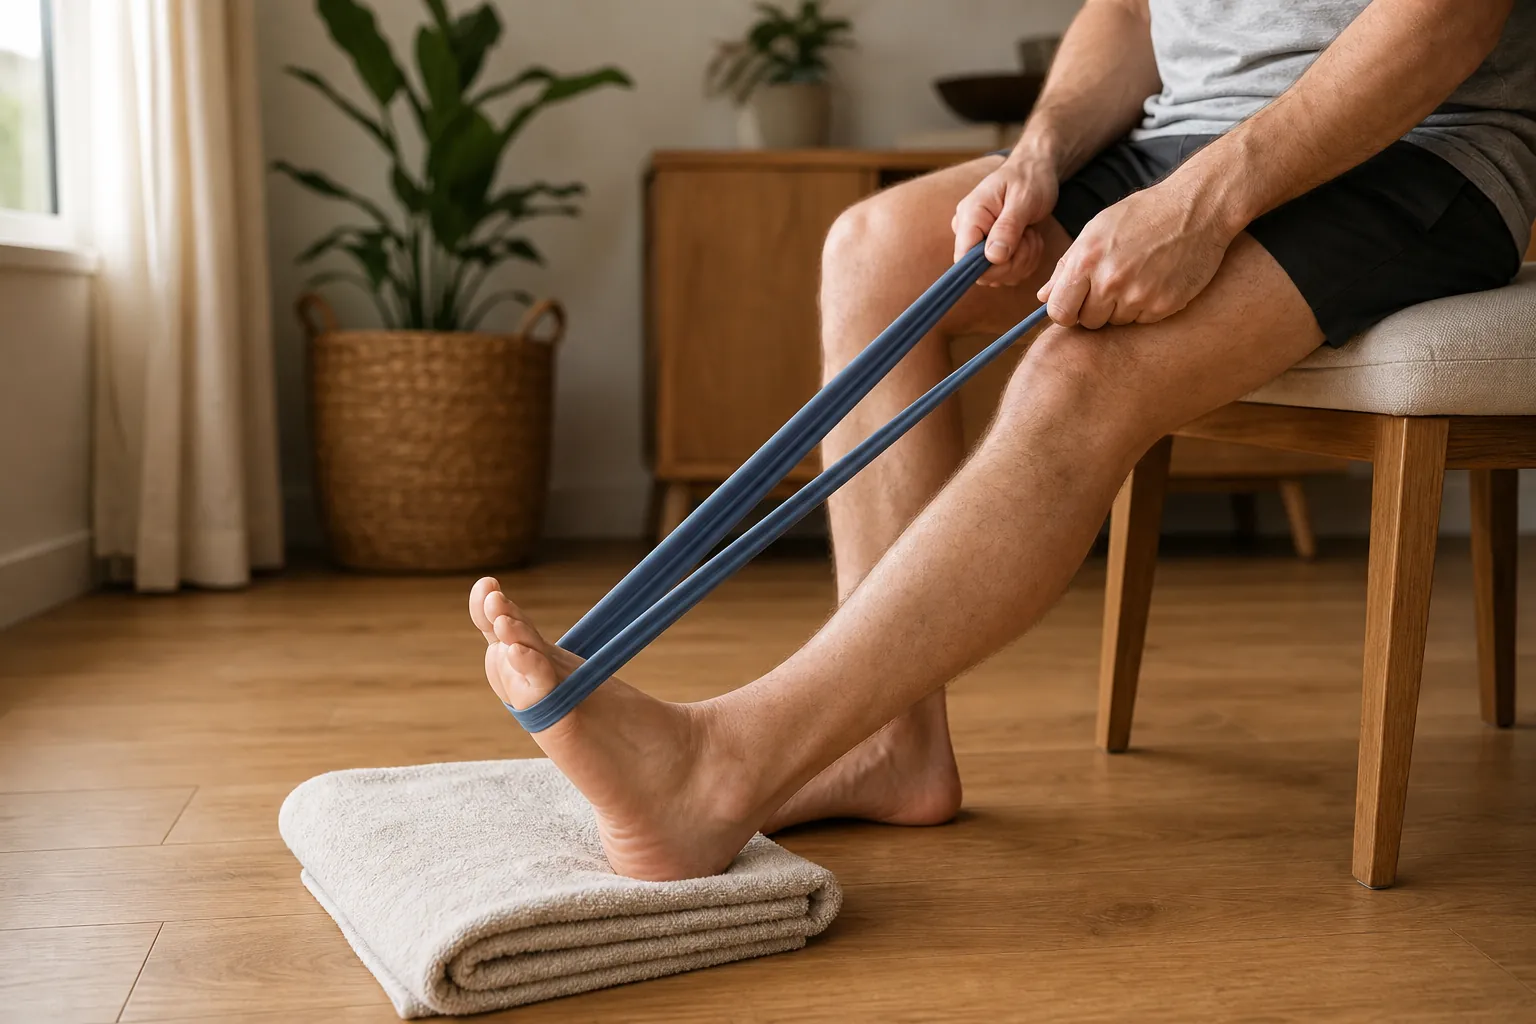
Once standing and basic range of motion are tolerable, the resistance band becomes the main tool. This is where home rehab starts to feel like training again, but it still needs rules. Bands are useful because they add resistance without forcing the ankle into heavy weight bearing too early, and family medicine guidance describes elastic-band exercises as safe for ligaments during this strengthening stage.[4]
| Direction | How to do it | What it trains |
|---|---|---|
| Dorsiflexion | Anchor the band in front of the foot and pull the toes toward the shin. | Front-of-ankle control for walking and stair clearance |
| Plantarflexion | Loop the band around the ball of the foot and press down like a gas pedal. | Calf and push-off strength |
| Inversion | Anchor the band to the outside and turn the sole gently inward. | Inside ankle support |
| Eversion | Anchor the band to the inside and turn the sole gently outward. | Outside ankle support, often important after rolling the ankle |
Use 3 sets of 10 in each direction, 1–2 times per day, for roughly 2–4 weeks if symptoms allow.[4] The first few sessions should feel almost too easy. Sit on the floor or in a chair, keep the knee still, and move from the ankle rather than swinging the whole leg. If the band snaps the foot back at the end of each rep, use a lighter band or shorten the range.
This phase is also where the old “just rest it” advice starts to show its limits. Early optimal loading is not code for ignoring pain; it means the ankle gets small, repeatable work before it loses capacity. In the POLICE trial, that kind of active approach improved function faster than the more rest-centered PRICE protocol, but the trial was still one single-center study, not a license to skip gate criteria.[1]
Move to Phase 4 when range of motion is pain-free, band work does not increase swelling, and you can stand on both feet comfortably. A useful test is a slow double-leg heel raise while holding the back of a chair. If that causes a sharp twinge or obvious compensation, keep building in Phase 3.
Phase 4: Weeks 2–6, Rebuild Balance and Return Capacity
Pain fading is not the finish line. The ankle can feel decent in a kitchen and still be unprepared for a curb, trail root, pickup game, or fast change of direction. Phase 4 adds the pieces that protect you when the floor is not flat and your attention is somewhere else.
Balance Progression
Stand near a counter or chair. Start with both feet on the floor, then shift weight toward the injured side. When that is easy, lift the uninjured foot and balance on the injured leg.
- Single-leg stance with eyes open: Hold 30–60 seconds.
- Single-leg stance with head turns: Keep the arch and knee from collapsing inward.
- Single-leg stance with eyes closed: Use the chair lightly as needed.
- Single-leg stance on a folded towel or pillow: Add only after flat-ground balance is controlled.
A wobble board can make this harder, but a folded towel is enough for most people at home. The point is not to create circus difficulty. The point is to restore the ankle’s ability to sense position and correct small errors before they become another roll. Rehabilitation reviews have long emphasized proprioception and functional progression after ankle sprain, especially when instability is part of the problem.[6]
Heel Raises
Hold a chair or counter. Rise onto both toes, pause, and lower slowly. Start with 2 sets of 10. When that is easy and even, shift more weight onto the injured side. Single-leg heel raises come later, and only if the double-leg version is smooth and pain-free.
Controlled Movement
Before jogging or sport, practice simple controlled movements: slow step-ups, side steps, gentle marching, and short forward-backward weight shifts. Keep the movements small at first. The ankle should feel like it is accepting load, not being surprised by it.
For running, court sports, or field sports, the return should be staged: walk without swelling, then brisk walk, then short easy jog intervals, then changes of direction, then practice intensity. The broader return-to-sport home exercise guide is the better place to build that final ladder if your sport involves cutting, jumping, or sprinting.
Where People Usually Rush
The most common mistake is treating the absence of sharp pain as permission to skip ahead. Swelling is a better truth-teller. If the ankle looks puffier at night after a new exercise, or feels stiffer the next morning, the dose was too high even if the exercise itself was reasonable.
The second mistake is adding balance work before the ankle has enough range and basic strength. Single-leg balance is not magic; it is a test and a training tool. If you are wobbling wildly just standing on the injured foot, close to furniture, on flat ground, eyes open, that is your exercise. You do not need an unstable surface yet.
The third mistake is stopping when normal walking returns. Soccer data cited in ankle rehabilitation literature found a 42% re-injury rate in players with abnormal stabilometry compared with 11% in players with normal values, which is a blunt reminder that balance deficits matter even after basic function improves.[6]
Bracing and Re-Injury Prevention
If you are returning to basketball, soccer, trail running, tennis, or any activity with cutting and uneven ground, an ankle brace is not a moral failure. It is a tool. Family medicine guidance recommends bracing for 12 months during high-risk activities after an ankle sprain.[4]
The case for bracing is not only mechanical. In recurrent-sprain research summarized in a rehabilitation review, braced soccer players using a stirrup orthosis had a five-fold reduction in recurrent sprains, and another study found angle-reproduction error was better in the injured ankle when braced than in the uninjured ankle without a brace, suggesting a proprioceptive benefit as well.[6]
For most home exercisers, the prevention package is simple: finish the balance progression, keep calf strength in the program, use a brace or supportive sleeve for high-risk sessions, and do not count one pain-free walk as proof that the ankle is ready for chaotic movement. If you want the larger framework behind phased home rehab, the guide on structuring home rehabilitation after a sports injury covers how to apply the same progression logic to other injuries.
Your Progression Standard
Advance only when the current phase leaves the ankle quieter, not angrier. Pain should not increase during or after the session. Swelling should be stable or decreasing. Range of motion should be pain-free for the demands of that phase. Standing should be tolerated before strengthening. Single-leg balance should be controlled before advanced return work. These criteria line up with functional progression principles used in ankle sprain rehabilitation guidance and reviews.[4][6]
If those boxes are checked, progression makes sense. If they are not, stay in the current phase, reduce the dose, or get evaluated. Readers who want the broader evidence context for home-based injury recovery can also review the 2026 ACSM guideline context. A towel, chair, and resistance band can carry a lot of ankle sprain recovery at home, but only if the phase gates have the final say.
References
- Comparison of PRICE and POLICE treatment protocols, Ulus Travma Acil Cerrahi Derg, 2023.
- Recovering from an Ankle Sprain, Harvard Health.
- Sprained Ankle: Rehabilitation Exercises, Kaiser Permanente.
- Recovering From an Ankle Sprain, AAFP, 2025.
- Sprained Ankle: Rehabilitation Exercises, HealthLink BC.
- Rehabilitation of the Ankle After Acute Sprain or Chronic Instability, Journal of Athletic Training, 2002.
Ready to adjust your schedule? Return to Routines to match cadence to your workouts.
Spot a citation issue?
This entry stays in general-population guideline territory and is not injury-specific or medical advice. If the cited figure or source looks outdated, sign in or create a free account to flag it, or reach us via the About page.