How to Progress Your Upper Body Workout With No Equipment
Build upper body strength at home with no equipment by following a structured progression ladder across four movement families. Simple self-tests tell you exactly when to advance to the next level.
Before you start
- Equipment required
- None
- Assumes build tier
- No specific tier required
- Duration
- 20 minutes
A home upper body workout with no equipment can build real strength, but only if it stops acting like “do more push-ups” is a plan. The useful question is simpler and more honest: which rung are you on today, and what clean test tells you to move up?
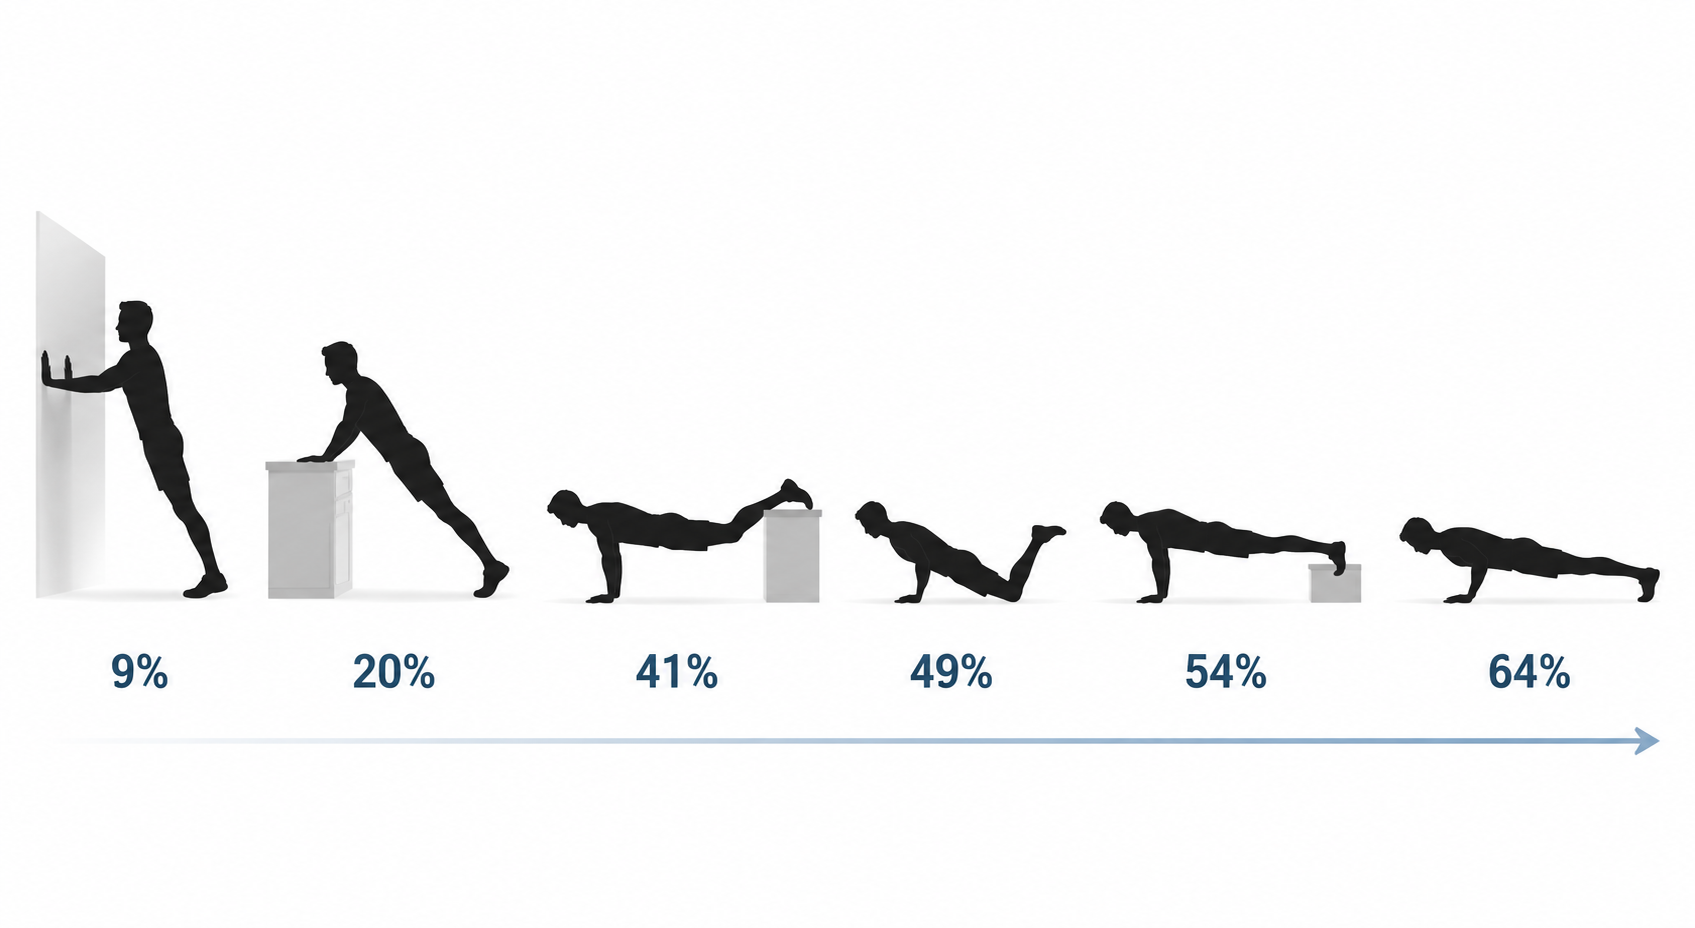
That matters most before your first full push-up. A wall push-up is estimated at about 9% of body weight, a counter push-up around 20%, a knee-high variation around 41%, a knee push-up around 49%, a 1-foot elevated variation around 54%, and a full floor push-up around 64%. Those numbers are approximations, not lab labels for every body, but they make one thing clear: beginner modifications are not fake push-ups. They are loading steps. [1]
Bodyweight strength improves because your nervous system, muscles, joints, and connective tissues adapt to repeated force demands over time. Without weights, the overload has to come from leverage, angle, range of motion, tempo, pauses, and harder variations rather than from adding plates to a bar. [2][3]
The Four Ladders You Need
Upper body training at home works better when it is organized into movement families instead of a long catalog of exercises. You do not need fifteen moves in every session. You need one appropriate push, one appropriate pull, one overhead pattern, and one core-stability pattern that helps your shoulders and trunk hold position.
| Movement family | Start here | Progress toward | What it trains |
|---|---|---|---|
| Push | Wall, counter, knee-high, or knee push-up | Full, decline, diamond, uneven, or archer push-up | Chest, triceps, front shoulders, trunk tension |
| Pull | Superman variation, towel isometric, doorway row, or table row | Lower-angle rows, longer holds, stricter tempo | Upper back, rear shoulders, biceps, scapular control |
| Overhead | Pike hold or short pike push-up range | Pike push-up, wall walk, wall handstand hold | Shoulders, triceps, upper-back control |
| Core stability | Knee plank or full plank | Shoulder taps, plank walks, hollow hold | Bracing, anti-rotation, shoulder stability |
This is also where “no equipment” needs a little honesty. Pushing and planking are easy to scale with the floor, a wall, and body angle. Pulling is not. You can train the back without buying equipment, but the ladder is shorter, the setup matters more, and at some point a bar, rings, straps, or bands make progress cleaner.
Find Your Push-Up Rung First
Start with the highest variation you can do for clean reps, not the hardest one you can survive. A clean rep means your body moves as one piece, your elbows bend and straighten under control, your shoulders do not shrug toward your ears, and your last rep looks almost like your first.
| If you can do this cleanly | Train this variation | Move up when |
|---|---|---|
| Fewer than 5 wall push-ups | Wall push-up partial range, then full range | You can do 3 sets of 8 controlled wall push-ups |
| 5-10 wall push-ups | Wall push-up | You can do 3 sets of 10, then use a lower surface |
| 5-8 counter push-ups | Counter or high-incline push-up | You can do 3 sets of 8-10 without hips sagging |
| 5-8 knee-high push-ups | Knee-high or low-incline push-up | You can do 3 sets of 8 clean reps |
| 5-10 knee push-ups | Knee push-up | You can do 3 sets of 10 with full control |
| 5 full floor push-ups | Full floor push-up | You can do 3 sets of 8-10 before choosing a harder variation |
The knee push-up deserves its place. It loads far more than a wall or counter variation, but still less than a full floor push-up: roughly 49% of body weight compared with about 64% for the full version. For many beginners, that is the missing bridge, not a consolation prize. [1]
Once full push-ups are comfortable, progression does not mean flailing into the hardest version on the internet. Change one variable at a time. A decline push-up increases the shoulder demand. A diamond push-up shifts more work toward the triceps. A slower eccentric makes the same variation heavier without changing the exercise. An uneven or archer-style progression asks one arm to handle more of the load, so it belongs after you can control standard reps.

The Pull Ladder Has a Lower Ceiling
Pulling is the awkward part of no-equipment upper body training. The back, biceps, and rear shoulders usually need something to pull against. PureGym and EōS both include bodyweight upper-body options such as superman variations and scapular-focused work, but these are not the same as a heavy row or pull-up progression. [4][5]
Use this ladder, but be stricter with setup than ego:
- Superman hold or prone arm raise: useful for back extension and shoulder control, but limited as a strength builder.
- Towel isometric pull: pull a towel apart or pull against your own foot for 10-15 seconds without jerking.
- Doorway row: hold both sides of a sturdy doorway, lean back slightly, and row your chest forward only after checking the frame and your grip.
- Table row: use only a heavy, stable table that cannot tip, slide, or flex; test it with partial body weight before attempting full reps.
- Harder row angle: step your feet farther forward or lower your torso only when the surface stays stable and your shoulder blades move cleanly.
Nerd Fitness lists doorway rows and table rows as pull-up alternatives, which makes sense for home training, but they come with an obvious condition: the door, frame, table, and floor contact have to tolerate the load before your muscles do. [6]
If your main goal is balanced push-and-pull training, use this article as the progression map and pair it with The No-Equipment Upper Body Workout That Trains Both Push and Pull. The pull work deserves that extra attention because it is the easiest part to underdose at home.
Overhead Work Starts Before Handstands
Pike push-ups are the cleanest no-equipment substitute for an overhead press pattern. They shift more of your body weight toward your shoulders and triceps while your hips stay high, which is why they appear in bodyweight upper-body exercise lists as a shoulder-focused progression. [4][5]
Do not rush the head-to-floor version. Start with a pike hold: hands on the floor, hips high, knees bent if needed, arms straight, shoulders active. If you can hold that position for 15 controlled seconds without collapsing into your wrists or shrugging hard, try small-range pike push-ups. When you can do 3 sets of 5 smooth reps, gradually increase the range.
Wall walks and wall handstand holds come later. They are not just shoulder exercises; they ask for wrist tolerance, trunk stiffness, overhead mobility, and calm breathing while inverted. A 15-second wall-facing hold with locked elbows and steady shoulders is a better entry test than a messy kick-up.
Core Stability Is Part of the Upper Body Workout
The plank family is here because your push-ups, rows, pike holds, and wall work all need the same skill: keeping the ribs, pelvis, and shoulders organized while the arms move. This is not a separate abs detour.
| If this is your current level | Use this core-stability move | Advance when |
|---|---|---|
| You cannot hold a straight plank yet | Knee plank | You can hold 3 rounds of 15 seconds without low-back sagging |
| You can hold a knee plank | Full plank | You can hold 3 rounds of 20-30 seconds with steady breathing |
| You can hold a full plank | Plank shoulder tap | You can tap slowly without rocking side to side |
| Shoulder taps are controlled | Plank walk or slow high-to-low plank | You can move without twisting or dumping into the wrists |
| You want more trunk tension for advanced push-ups | Hollow body hold | You can hold 15-30 seconds while keeping the low back controlled |
Use the 3-Rep and 15-Second Rules
Progression should feel earned, not guessed. For rep-based movements, move to the next rung when you can complete all prescribed sets and still have about 3 clean reps left in reserve on the final set. For holds, move up when you can hold the position for at least 15 seconds without losing the shape that makes the exercise useful.
That means a set of 10 counter push-ups where the last 3 reps are sagging, twisting, and half-depth does not qualify. Stay there. Add control. Lower the surface later. The same rule applies to pike holds, doorway rows, table rows, planks, and wall holds.
- Advance one variable at a time: lower the incline, increase range of motion, slow the lowering phase, add a pause, or choose a harder variation.
- Do not advance if joint discomfort increases from session to session, especially in the wrists, elbows, or front of the shoulder.
- Repeat a rung for another week if form improves but the rep target is not there yet.
- Deload by using an easier variation if your reps suddenly drop across two sessions without an obvious reason.
A Weekly Schedule That Does Not Beat Up Your Wrists
Most home trainees do best with 2-4 upper-body sessions per week, with at least 48 hours before hard work for the same muscle groups. That recovery gap matters when push-ups, planks, pike work, and handstand practice all load the wrists and shoulders. [7][1][5]
Here is a simple way to run the four ladders without turning every day into the same push-up workout:
| Weekly frequency | Session setup | Best for |
|---|---|---|
| 2 days per week | Day 1: push + pull + core. Day 2: overhead + pull + core. | Beginners, sore wrists, anyone also training legs or cardio |
| 3 days per week | Day 1: push focus. Day 2: pull + core focus. Day 3: overhead + lighter push. | Most steady progress without much schedule complexity |
| 4 days per week | Two harder upper-body days and two shorter technique days, with no same-family max effort on back-to-back days. | Intermediates who recover well and keep reps clean |
For beginners, 2 days is not too little. It gives your joints time to catch up to your enthusiasm. If you want broader programming while keeping the same no-equipment approach, the 12-Week At-Home Bodyweight Workout Plan is a better place to organize the full week than adding random extra upper-body circuits.
Two-Day Beginner Template
| Exercise | Sets | How hard |
|---|---|---|
| Push-up variation at your current rung | 3 | Stop with about 3 clean reps left |
| Doorway row, table row, towel isometric, or superman variation | 3 | Use controlled reps or 10-15 second holds |
| Pike hold or pike push-up progression | 2-3 | Stop before wrist or shoulder form breaks |
| Plank variation | 2-3 | Hold cleanly, then rest |
Three-Day Progression Template
| Day | Main work | Secondary work |
|---|---|---|
| Day 1 | Push-up progression: 3-4 sets | Pull variation + plank |
| Day 2 | Pull variation: 3-4 sets | Pike hold or pike push-up + hollow hold |
| Day 3 | Overhead progression: 3 sets | Lighter push-up variation + core stability |
Greatist’s 20-minute upper-body workout shows how many push-up variations can fit into one bodyweight session, with 15 variations across 3 difficulty levels. That is useful proof that one movement family has plenty of room to progress, but it should not become the whole plan unless you are deliberately running a push-focused day. [8]
When No Equipment Is No Longer Enough
A floor, wall, doorway, towel, and sturdy table can take you a long way. They cannot make every upper-body muscle equally easy to overload forever. Healthline’s no-weight arm exercise guidance includes bodyweight options, but the broader limitation remains: pulling muscles are harder to train heavily without something stable to pull against. [9]
You do not need to buy equipment on week one. You do need to notice when your pull ladder has stopped progressing while your push ladder keeps climbing. That is the moment a band, suspension trainer, rings, or pull-up bar stops being a luxury and starts being the cleanest next overload tool.
Your Next Decision
Pick one rung from each ladder today: push, pull, overhead, and core stability. Train those rungs for the next week. Move up only when the reps stay clean, the holds stay controlled, and you have recovered enough to repeat the work without joint irritation.
If you want the next layer of structure, use the 8-Week No-Equipment Bodyweight Workout Plan for broader programming, or add lower-body work with The Science-Based Home Leg Workout. Upper-body progress is easier to trust when the rest of the week is not improvised around it.
References
- Push-up Progression Plan — Nerd Fitness
- The Science of Getting Stronger Without Weights — Human Kinetics
- What Is Progressive Overload? — Nerd Fitness
- 10 Of The Best Upper Body Bodyweight Exercises — PureGym
- Top 10 Best Upper Body Bodyweight Exercises — EōS Fitness
- Pull-up Alternatives — Nerd Fitness
- Upper Body Exercises to Do at Home — Warwick University
- 20-Minute Upper Body Workout — Greatist
- Arm Exercises No Weights — Healthline
Don't have the gear this routine assumes? Find the build that covers it.
Wondering how much rest you need after this? Read our ACSM-cited recovery reference.
Questions about form, substitutions, or a correction? Leave it below.
Comments
Join the discussion with an anonymous comment.