
How to Drill the Calf Slicer at Home Without a Partner
This article shows you how to practice the calf slicer submission at home without a training partner. You'll learn shadow-drilling methods for each mechanical step, which substitute objects to use, and why this rare but effective technique is worth adding to your BJJ game.
- Equipment tier required
- none
- Duration
- 15 min
- Difficulty
- beginner
- Target area
- legs
Training the calf slicer alone is possible, but only if the goal is honest. At home, you can rehearse the body mechanics: where your shin wedges, how your hands collect the foot, and how your hips extend to create compression. What you cannot safely learn by yourself is the timing of the entry, the feel of a resisting leg, or the judgment of when a real person is in danger.
That distinction matters more with the calf slicer than with a harmless movement drill. This is a compression lock: your shin becomes the wedge behind the opponent’s calf, the opponent’s heel is drawn toward the glute, and your hip extension increases pressure through the folded lower leg. Technique breakdowns commonly emphasize those same mechanical pieces: deep shin placement, control of the foot, and extension through the hips rather than random squeezing with the arms.[1][2]
For home training, treat the calf slicer as three separate jobs before you try to make it one submission: shin wedge placement, two-on-one foot control, and hip extension. A grappling dummy helps, but a rolled mat, folded blankets, or a resistance band can give you enough feedback to stop the movement from becoming pure air-drilling. If you also want broader conditioning around these sessions, keep it separate from the technical work; BJJ home exercises can support your base, but they do not replace clean mechanics.
Set Up the Room So the Drill Has Boundaries
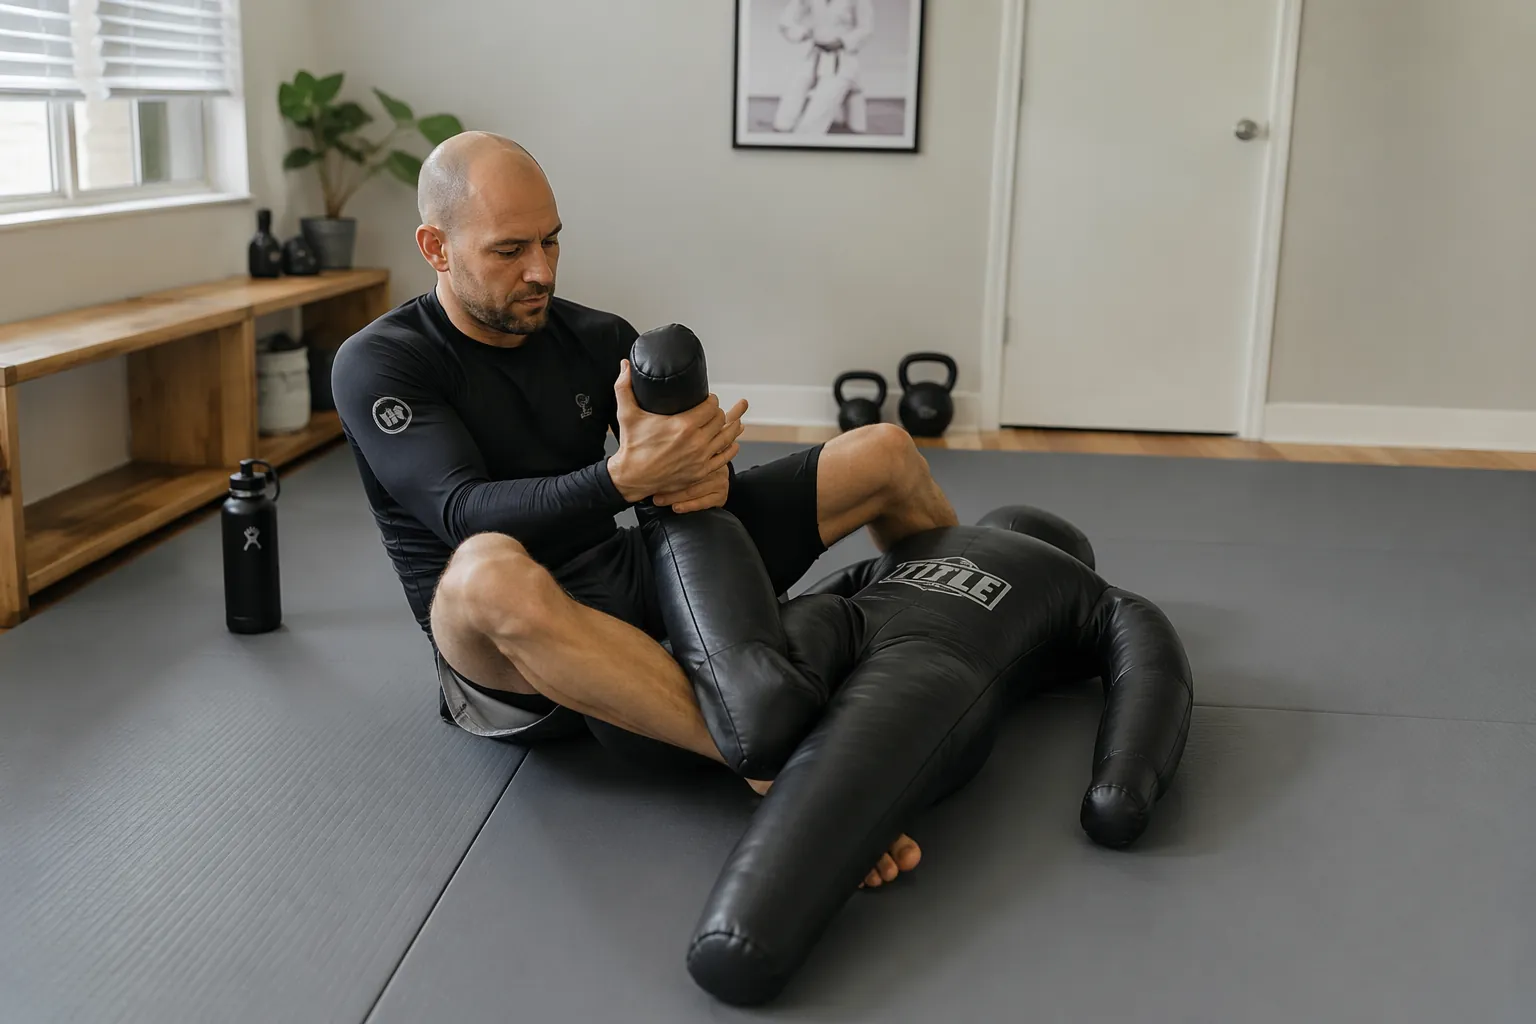
You do not need a full academy floor, but you do need a surface where your knees, hips, and ankles can move without you subconsciously shortening the technique. A small mat space is enough if you can sit, turn onto one hip, extend your hips, and reset without hitting furniture. Dense matting is better than a towel on hardwood because the finish motion asks you to drive through the floor, not slide away from it.
A grappling dummy is the cleanest substitute for the partner’s leg because it gives you a foot-shaped target and a calf line to wedge behind. A basic dummy often falls in the $50–120 range, but the exact model matters less than whether the leg can bend enough for you to practice the fold. If you do not own one, roll a mat tightly or stack folded blankets into a firm cylinder. A 6–8mm yoga mat can also work as a wedge target when rolled, especially if you already use that kind of surface for home training.
The substitute is not pretending to be a partner. It is there to answer simpler questions: did your shin land deep enough, did your hands find the foot without looking, and did your hips extend in the same direction as the compression? For mat selection and apartment-friendly floor setups, a practical small home gym mat guide is more useful here than buying another flashy training tool.
- Best substitute: grappling dummy with bendable legs.
- Good wedge target: rolled yoga mat or rolled workout mat.
- Budget option: folded blankets packed tightly into a calf-sized roll.
- Grip-feedback option: resistance band anchored low or looped around the substitute foot.
Drill the Shin Wedge Before You Drill the Submission
If the shin wedge is lazy, the rest of the calf slicer becomes theater. The wedge is the part of your leg that turns the opponent’s folded calf into a levered compression point. In live training, the opponent’s leg position tells you immediately whether you are shallow. At home, you have to create that feedback deliberately.
Start seated beside the dummy leg or rolled mat. Place the blade of your shin behind the “calf,” not across the knee joint and not down near the ankle. Your shin should feel like it is filling the bend of the leg. If you are using a roll instead of a dummy, mark an imaginary knee line at the top of the roll and keep your wedge just below it, where the calf would fold.
Now rehearse the entry without finishing. Slide your shin in, pause, remove it, and repeat. Do not grab the foot yet. The only goal is to make your leg arrive in the same place every time. A lot of home drilling goes wrong because the hands rescue bad leg positioning. Taking the hands away for a minute makes the truth harder to hide.
| Wedge Check | What You Should Feel |
|---|---|
| Depth | Your shin is behind the calf line, not floating on the outside. |
| Height | The wedge sits below the knee bend, not on the knee itself. |
| Angle | Your shin cuts across the fold so hip extension will increase compression. |
| Stability | The roll or dummy does not immediately slip away when you settle your weight. |
Once the placement is consistent, add body position. Sit heavy enough that the wedge is not cosmetic. Turn slightly toward the trapped leg, then slightly away, noticing when the wedge disappears. That small audit is valuable. In live rounds, many failed calf slicers are not failed finishes; they are failed wedges that never became real threats.
Add the Two-on-One Foot Pull Without Yanking
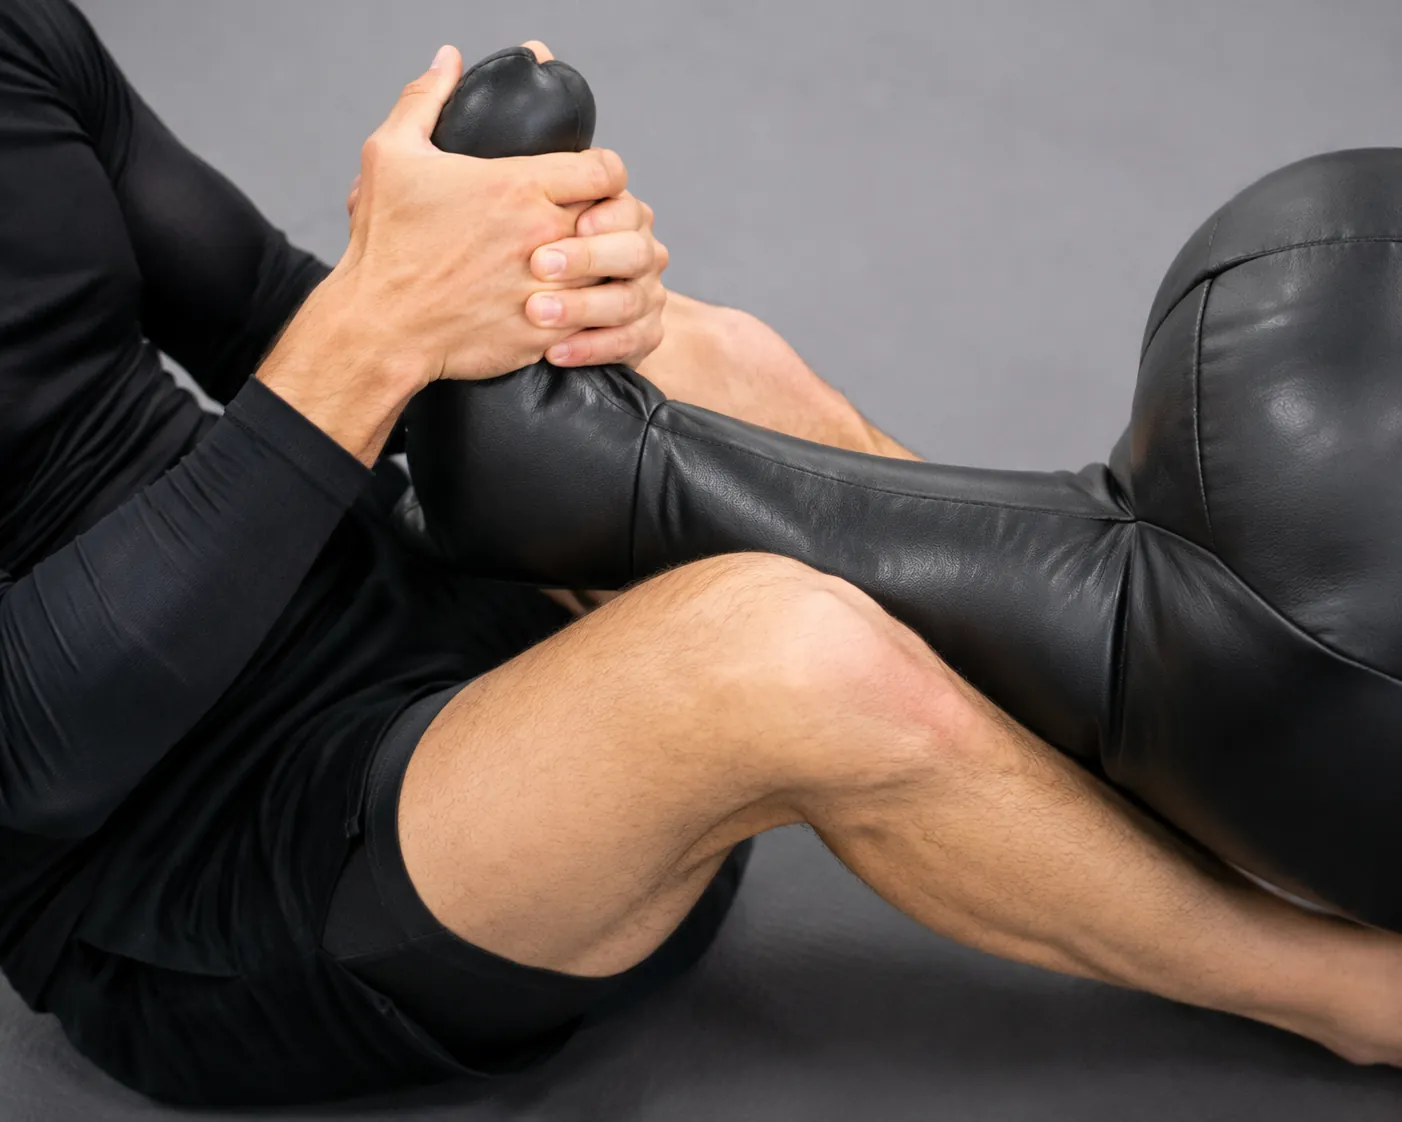
The hands do a specific job: they bring the opponent’s heel toward the glute so the lower leg folds over your shin wedge. Both Jiu Jitsu Legacy and LowKickMMA describe the calf slicer around this same compression mechanism, with the foot controlled and the calf compressed over the attacking shin.[1][2]
On a dummy, use both hands on the foot and pull the heel toward the seat of the dummy. If the dummy foot is too soft, grip around the ankle line instead. On a rolled mat, loop a resistance band around the far end of the roll and hold both sides of the band as if they were the foot. This will not feel like a person fighting you, but it does make your hands coordinate with the wedge instead of floating in space.
Keep your elbows close enough that the pull connects to your ribs and hips. If your arms straighten far away from your body, you are rehearsing a weak finish. Pull in short, controlled pulses: collect, tighten, pause, release. The pause is where you check whether the wedge stayed deep or whether the foot pull dragged the whole substitute out of position.
- Do five slow reps finding the foot without looking down.
- Do five reps pulling the heel line toward the glute line.
- Do five reps where the pull stops and you check whether the shin wedge stayed put.
- Reset completely between reps instead of wiggling into a better position after the fact.
Practice Hip Extension as the Finish, Not Arm Curling
The calf slicer finish is easy to misunderstand at home because the dummy will not tap and a rolled mat will not complain. That silence tempts people to pull harder with the arms. Resist that habit. Your hands maintain the fold; your hips create the pressure.
From the wedged position, secure the two-on-one grip, bring the heel line toward the glute, and extend your hips forward and slightly through the trapped leg. Think of making your shin heavier and more present inside the fold. The movement should be small. If you need a dramatic bridge to make the dummy move, the wedge or grip is probably off.
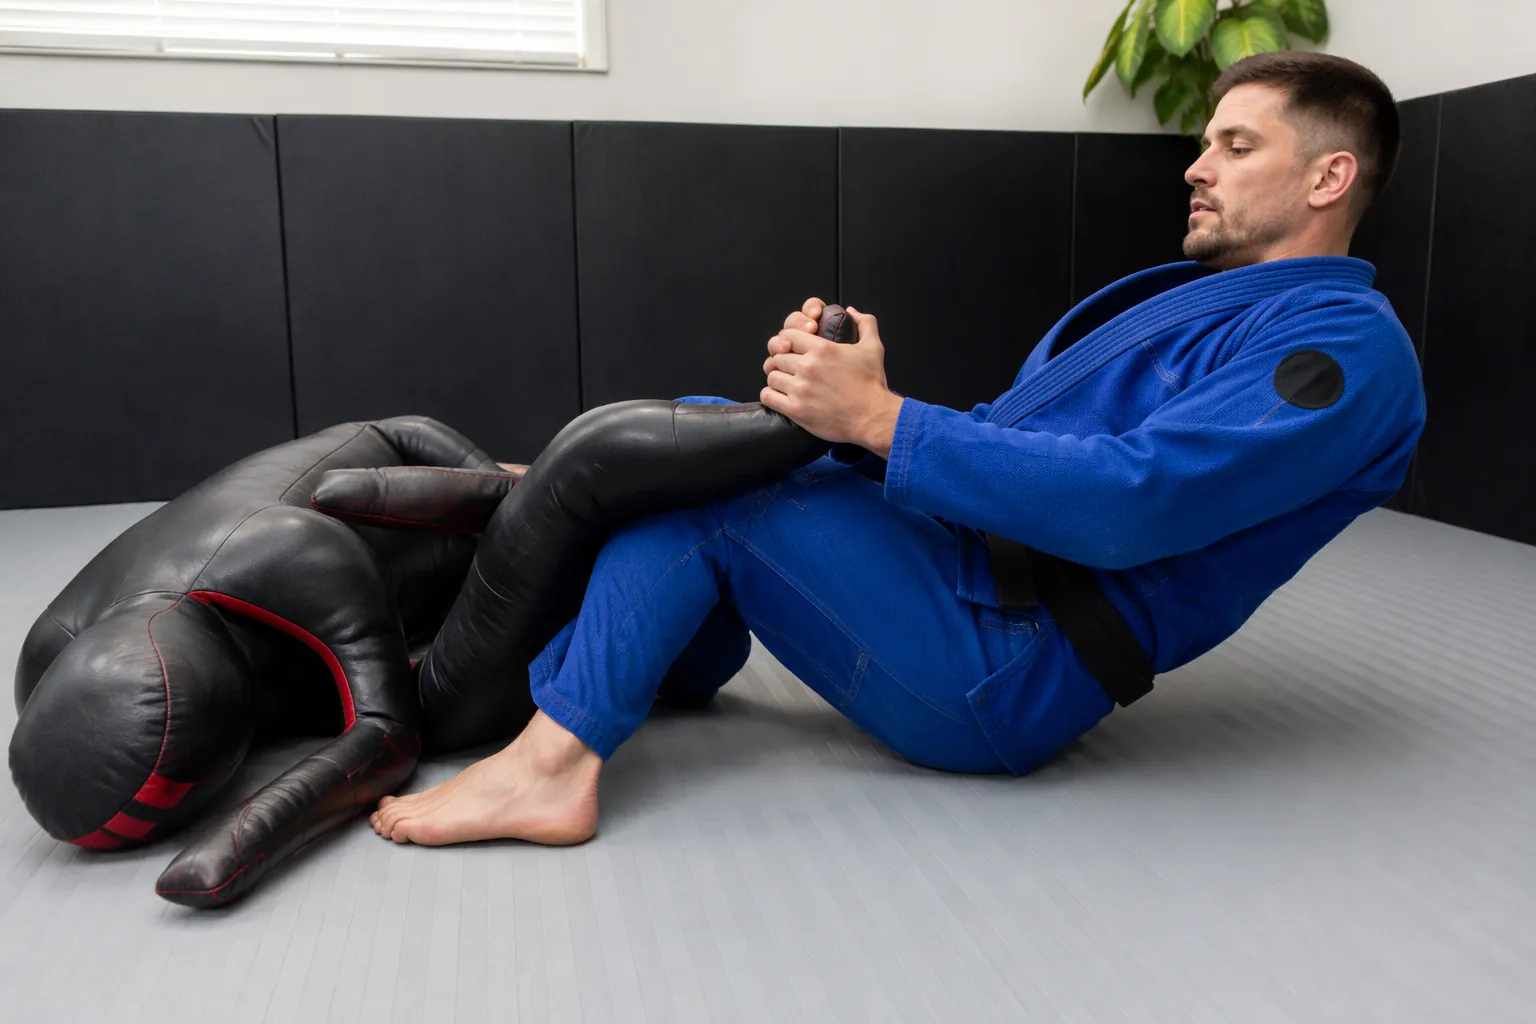
Use a slow count: set the wedge for one count, collect the foot for one count, extend the hips for two counts, then release. The release matters because you are training control. A calf slicer applied carelessly can create serious pressure through the knee and lower leg structure, so home practice should build the habit of measured entry and measured exit rather than sudden ripping.[2]
If your lower back is doing all the work, reset. The finish should feel like your hips, hamstrings, and trunk are connected to the wedge. A short mobility warm-up can help if you are stiff from sitting; a yoga and martial arts home routine fits well before technical drilling because it prepares the hips without turning the session into conditioning.
A 15-Minute Solo Calf Slicer Circuit
The circuit below is not an official calf slicer curriculum from a single source. It is a practical home adaptation: technique mechanics from calf slicer breakdowns, combined with the broader solo-drilling principle that isolated movement patterns can be rehearsed when a partner is not available.[1][2][3]
| Time | Drill | Main Job |
|---|---|---|
| 2 minutes | Set up mat, dummy or rolled substitute, and band if using one | Remove friction before the technical work starts |
| 3 minutes | Shin wedge entries only | Land the wedge at the right depth and angle |
| 3 minutes | Two-on-one foot control | Find and pull the foot without disturbing the wedge |
| 3 minutes | Hip-extension finish mechanics | Coordinate grip, wedge, and hips without yanking |
| 4 minutes | Full-sequence walkthrough | Link the pieces into one repeatable movement |
Minutes 0–2: Prepare the Substitute
Place the dummy or roll where you can approach the leg from the same side every rep. If you are using blankets, pack them firmly enough that your shin does not disappear into the material. If you are using a resistance band, anchor it low or loop it around the foot end of the dummy so the pull line roughly matches the heel-to-glute direction.
Minutes 2–5: Wedge Entries
Work in slow reps. Slide the shin into position, freeze, check depth, and come out. Do not touch the foot. Your hands can post lightly on the floor if needed, but they should not correct the leg. After each rep, reset far enough away that you have to enter again rather than adjust in place.
A useful home rule: if the wedge would not survive you taking your hands away, it is not a wedge yet. It is just contact. Spend the extra minute here even if it feels boring. This is the piece most likely to become vague when there is no partner giving you honest resistance.
Minutes 5–8: Foot Control
Now add both hands. Find the foot, pull the heel line toward the glute line, pause, release. Alternate grips if your academy teaches a preferred hand configuration, but do not turn this into grip collecting for its own sake. The test is whether the pull increases the fold over the shin wedge.
Minutes 8–11: Hip Extension
Connect the hands to the hips. Pull the foot into position, then extend through the hips for a slow two-count. Release with the same control you used to enter. If you feel yourself chasing pressure by curling harder, pause and reset the wedge instead of rewarding the wrong mechanic.
Minutes 11–15: Full Walkthrough
Put the pieces together, but keep the pace slow enough that every rep has a visible beginning and end. Enter the wedge. Secure the foot. Pull the heel toward the glute. Extend the hips. Release. Reset. That reset is not wasted time; it prevents the circuit from becoming one long scramble against a lifeless object.
For the final minute, visualize the missing partner response. Imagine the leg trying to straighten. Imagine the foot hiding. Imagine the knee line turning away. Do not invent a whole match in your head. Just add enough context that the sequence remains attached to a real grappling problem. Solo drilling guides often make this same larger point: home work is most useful when it rehearses transferable movement rather than pretending resistance is unnecessary.[3][4]
Where This Fits Into a Real BJJ Game
The calf slicer is not common enough that everyone in the room has a polished defensive reaction. Digitsu tracked 46 calf slicer wins across Fight to Win, IBJJF, Polaris, and WNO from 2019–2026, with 67.4% of those finishes occurring in no-gi.[5] That is useful information, but it has a narrow meaning. It shows rarity within selected high-profile tracked events, not the total worldwide frequency of the technique.
Still, rarity has practical value. A technique that appears infrequently may make opponents hesitate because they have not had many live looks at the danger. The right conclusion is not to spam calf slicers from every messy leg entanglement. The better conclusion is to understand the mechanics well enough that, when the position appears, your wedge and grips are not late.
That is the sweet spot for home training. You are not trying to become a calf slicer specialist in your living room. You are making the first layer automatic enough that your coach and partners can later give you the missing information: when the entry is available, where the opponent can escape, and how much pressure is too much.
If you are also doing broader stand-up or grappling movement work at home, keep the calf slicer session technical and short. Larger context pieces like MMA wrestling training at home are useful for understanding what home practice can and cannot carry, but this particular drill benefits from precision more than fatigue.
Legality Comes Before Experimenting With It Live
Before you try the calf slicer on a teammate, check the rules that actually govern your training and competition. Under IBJJF rules as summarized by multiple technique resources, calf slicers are legal only for adult brown and black belts and are prohibited in juvenile divisions.[1][2][6] That means many white, blue, and purple belts can drill the mechanics under supervision but may not be allowed to use the submission in IBJJF competition.
Other rule sets can differ. ADCC, EBI, local submission-only events, and individual gyms may allow or restrict compression locks differently. Do not assume that because a move appears in a no-gi highlight, it is legal for your division or acceptable in your room. Ask your coach, read the event rules, and be clear with partners before drilling.
The home version should make you safer, not bolder in the wrong way. If you have only practiced the finish against a dummy, your first live reps should be slow positional drilling with an instructor’s oversight. Your partner should know exactly what you are working on, and the tap should come early. Compression locks do not need surprise in the training room.
What Solo Drilling Can Actually Give You
A good solo calf slicer drill gives your body a map. It teaches your shin to look for the fold behind the calf, your hands to collect the foot without fumbling, and your hips to extend through the wedge instead of replacing technique with arm strength. Those are real gains, especially when you train irregularly or spend stretches without a reliable partner.
It does not teach the moment when the opponent’s knee line is free, the feel of someone hiding the foot, or the difference between controlled pressure and reckless pressure. Those lessons require another grappler. The point of the home circuit is to arrive at that partner drilling with fewer basic questions, not to skip the partner drilling altogether.
That makes the calf slicer a worthwhile home project if you respect its limits. The mechanics are separable. The technique is underexposed. The safety and legality concerns are real. Drill the wedge, the foot control, and the hip extension at home, then take the cleaned-up movement back to supervised rounds before you treat it as part of your live submission game.
References
- Calf Slicer Submission: Everything You Need To Know, Jiu Jitsu Legacy
- Calf Slicer BJJ Submission: Everything You Need To Know, LowKickMMA
- The Ultimate Guide To BJJ Solo Drills, Grapplearts
- 10 BJJ Solo Drills You Can Train at Home, Kingz
- Calf Slicer: BJJ Submission Breakdown & Stats, Digitsu
- Here's What You Need to Know About The BJJ Calf Slicer, Evolve MMA
What a small equipment investment adds
We don't have a build tagged to this exact tier yet. Browse all builds.
How often should you repeat this?
See our recovery and rest reference for citation-anchored rest-interval guidance.
Spot something off?
Tell us if a movement, tier assumption, or duration didn't match your experience.