
Yes, MMA wrestling-inspired training can work at home if the goal is fitness: better conditioning, more explosive movement, stronger legs, tougher trunk endurance, and enough weekly output to affect body composition. It does not teach you to wrestle competitively by itself. Without coaching, a partner, live resistance, and mat time, solo drills stay in the conditioning and movement-practice lane.
That boundary matters because wrestling-flavored home workouts are easy to oversell. A sprawl in your living room can build work capacity. It cannot tell you whether your hips are heavy enough against another person. A penetration step can improve coordination and leg drive. It cannot replace learning timing, setups, hand fighting, finishes, or defense against someone trying to stop you.
For home training, the useful formula is simple: shadow wrestling for conditioning, solo wrestling drills for repeated whole-body output, and progressive bodyweight circuits for strength endurance. Sweet Science of Fighting describes shadow wrestling as both aerobic work around 130–150 BPM and anaerobic work in 20–40 second high-effort intervals, while also laying out a no-equipment leg-circuit progression that gives this kind of training a measurable ladder instead of a random pile of drills.[1]

What Counts as a Real Result
At home, the first results are usually not dramatic mirror changes. They are repeatability changes. You recover faster between sprawls. Your stance stops popping upright after 30 seconds. You finish more circuits without turning every transition into a rest. Your breathing still gets loud, but it stops controlling the session.
A useful tracking sheet for this program measures four things:
- How many clean shadow wrestling rounds you complete without standing tall or stopping.
- How many sprawls, stand-ups, and penetration steps stay sharp under fatigue.
- How many non-stop leg circuits you can finish with controlled landings.
- How long it takes your breathing to settle between hard intervals.
Body composition can change too, but it is the slower scoreboard. If training is consistent and food intake does not quietly rise to match the extra work, many people can notice conditioning changes within 2–4 weeks and more visible body-composition changes around month 2. The program below is built around that timeline: first build repeatable output, then add density and volume.
If that already sounds like too much impact or coordination, start with a simpler base first. A general 4-week no-equipment beginner plan is a better doorway than forcing sloppy sprawls before your knees, wrists, and conditioning are ready.
The Weekly No-Equipment Workflow
This is a six-day template, but it is not six days of maximum effort. Wrestling drills get intense fast because they move you from the floor to your feet, side to side, and through braced positions. The week works only if easy days stay easy enough to let the hard days stay honest.
| Day | Session | Main Work | Effort |
|---|---|---|---|
| Monday | Drill density | Stance motion, penetration steps, sprawls, stand-ups | Moderate-hard |
| Tuesday | Aerobic shadow wrestling | Longer continuous movement at conversational-but-working pace | Moderate |
| Wednesday | Leg circuit progression | Squat, lunge, step-up, squat jump | Hard but clean |
| Thursday | Movement skill and trunk | Hip heists, technical stand-ups, stance motion resets | Moderate |
| Friday | Anaerobic intervals | 20–40 second bursts of shadow wrestling and sprawls | Hard |
| Saturday | Mixed circuit | Drills plus bodyweight strength endurance | Moderate-hard |
| Sunday | Off or easy mobility | Walk, stretch, light hips and shoulders | Easy |
For most home trainees, 25–40 minutes is enough. Beginners can run the same week with only Monday, Wednesday, Friday, and one easy movement day. The key is not to make every session heroic; it is to accumulate enough clean wrestling-style movement that your body has to adapt.
The Drill Library You Actually Need
Fanatic Wrestling’s home-drill list includes stance motion, stand-ups, penetration steps, sprawls, hip heists, and triangle-style movements that can be practiced without a mat or partner.[2] For this program, the first five do nearly all the useful work. They are simple enough to repeat in a spare room and demanding enough to expose weak legs, loose trunk position, and poor recovery.
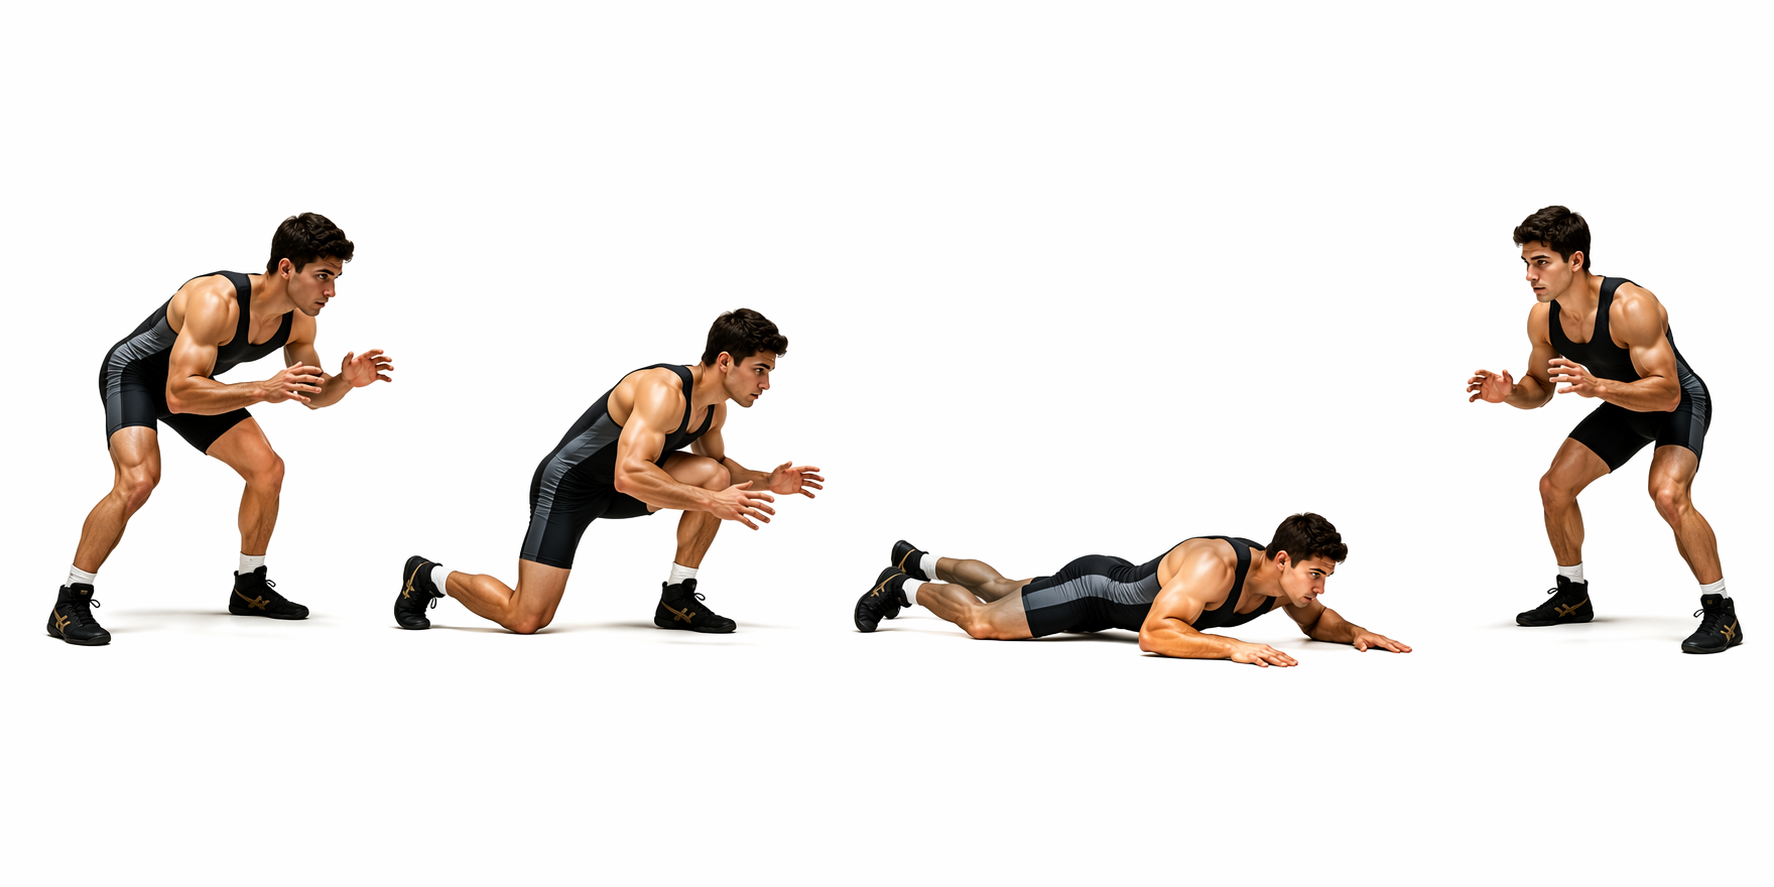
Stance Motion
Start in an athletic stance: feet a little wider than hips, knees bent, hips back, chest over thighs, hands in front of your body. Move forward, backward, left, and right without crossing your feet. Your head should not bob up and down like you are doing mini squats with every step.
Dose it first as time, not reps. Work for 30 seconds, rest for 30 seconds, and repeat for 4–6 rounds. Once that feels controlled, use 45-second rounds. The result you want is not a lower stance for one perfect photo; it is the ability to keep moving while your thighs start asking for a meeting.
Penetration Steps
From stance, step forward as if entering on a takedown. Drop the lead knee toward the floor only as far as your space and joints allow, drive through the lead leg, and recover back to stance. If kneeling bothers your knee or you are training on hard flooring, keep the level change shallower and treat it as a fast split-squat entry rather than forcing the knee down.
Use sets of 5–8 reps per side at first. Alternate sides even if one side feels awkward. That awkward side is usually where home trainees discover they have been turning every athletic movement into their dominant-leg pattern.
Sprawls
A sprawl is the drill that makes people believe the workout is working, and also the drill that gets ugly first. From stance, shoot your legs back, land in a strong plank-like position with hips dropping toward the floor, then pop back to stance. Keep your hands under control. Do not slam your wrists into the floor just because the interval says go.
Start with 3–5 reps at a time or 15-second bursts. If you cannot return to a stable stance, the set is over. Later, build toward 20–40 second hard intervals, which matches the anaerobic interval window described for shadow wrestling conditioning.[1]
Stand-Ups
For home fitness, use a technical stand-up pattern. Sit or drop to a seated hip position, post one hand behind you, keep the opposite hand protecting your face line, lift your hips, retract the bottom leg, and come back to stance. Move deliberately before you move fast.
This drill trains trunk control, shoulder posting, hip clearance, and getting off the floor without turning every rep into a sit-up. Use 4–6 reps per side, or include it in circuits where the goal is smooth transitions rather than maximum speed.
Hip Heists
Start in a bear-crawl or quadruped position. Shift weight into your hands and one foot, then thread the opposite leg through as your hips rotate. Reverse and switch sides. If your shoulders or wrists are not ready, elevate your hands on a sturdy couch edge or slow the drill down until you can control the rotation.
Hip heists are not filler. They are where many people find the missing piece between “I can do push-ups” and “I can move my body under fatigue.” Use 20–30 second sets, focusing on quiet foot placement and steady breathing.
Shadow Wrestling: The Conditioning Engine
Shadow wrestling is not shadowboxing with a lower stance. It is a continuous mix of stance motion, level changes, feints, penetration steps, sprawls, stand-ups, and resets. You are rehearsing the physical rhythm of wrestling without pretending there is an opponent in front of you who reacts correctly.
Use two versions.
| Version | How to Run It | What It Builds |
|---|---|---|
| Aerobic shadow wrestling | 3–6 rounds of 2–4 minutes, moving continuously at a pace you can sustain | Base conditioning, footwork endurance, breathing control |
| Anaerobic shadow wrestling | 6–10 rounds of 20–40 seconds hard with enough rest to keep quality high | Burst capacity, sprawl recovery, high-output tolerance |
The aerobic version should feel almost too restrained at the beginning. Keep circling, level changing, and resetting. If you are using a heart-rate monitor, the 130–150 BPM range from Sweet Science of Fighting gives you a practical target for this lower-intensity conditioning work.[1]
The anaerobic version is where the room gets small. Pick two or three movements and cycle them hard: stance motion, sprawl, penetration step, reset; or hip heist, stand-up, stance motion, sprawl. Stop the round when movement quality collapses, even if the timer has a few seconds left. Conditioning improves when hard work is repeatable, not when every round ends as floor theater.
The Leg Circuit Progression
The Gambetta-style leg circuit is the clearest progression in the whole plan because it gives you a specific standard: squat, lunge, step-up, squat jump, repeated as non-stop circuits and built from 3 circuits toward 5.[1] That is much cleaner than adding random “fighter finishers” whenever you feel motivated.
Run it like this:
| Exercise | Beginner Dose | Progression Target |
|---|---|---|
| Bodyweight squat | 6–10 reps | 10 reps |
| Alternating lunge | 4–6 reps per side | 10 reps per side |
| Step-up | 4–6 reps per side on a stable step | 10 reps per side |
| Squat jump | 4–6 soft landings | 10 controlled reps |
One circuit means completing all four exercises in order. Rest only after the squat jumps. Start with 3 non-stop circuits if your landings stay quiet and your knees track well. If that is too much, use 2 circuits for the first week and earn the third. The goal is to reach 5 non-stop circuits before making the workout more complex.
The step-up needs a stable surface. A staircase step is usually safer than a chair. If you do not have a safe step, replace it with reverse lunges and note the substitution in your log. Do not turn the equipment-free rule into a reason to climb onto furniture that shifts under you.
Four Weeks of Progression
This four-week block is long enough to show whether the training is doing anything and short enough that you do not need to redesign your life around it. Keep the same drill menu. Progress by adding rounds, shortening rest, improving continuity, or moving from 3 toward 5 leg circuits.
| Week | Main Goal | How to Progress |
|---|---|---|
| Week 1 | Learn the shapes | Use shorter sets, longer rest, and stop before form breaks |
| Week 2 | Add repeatability | Add 1 round to shadow wrestling or drill circuits on two sessions |
| Week 3 | Add density | Keep volume similar but reduce selected rest periods by 10–20 seconds |
| Week 4 | Test clean output | Try more non-stop circuits, longer shadow rounds, or more quality hard intervals |
A Monday drill-density session might look like this: 5 minutes easy warm-up; 4 rounds of 30 seconds stance motion and 30 seconds rest; 3 sets of 6 penetration steps per side; 5 rounds of 15 seconds sprawls and 45 seconds rest; 3 sets of 4 technical stand-ups per side; then 3 minutes of easy shadow wrestling to cool down.
A Friday interval session can stay brutally simple: warm up, then perform 8 rounds of 20 seconds hard shadow wrestling and 70–100 seconds easy walking or light stance motion. The hard interval can include one sprawl, one penetration step each side, and fast stance motion until the timer ends. If round 6 looks like a bad burpee contest, the workout was too aggressive.
Saturday can combine everything without turning into a punishment ritual. Try 3–5 rounds of stance motion, penetration steps, hip heists, push-ups, and squats. Keep the transitions quick, but let technique decide the pace. Home wrestling training works best when the room has enough structure that you know exactly what improved.
How to Know It Is Working
After 2–4 weeks, look for performance changes before chasing scale changes. You may be able to hold stance longer, recover faster after sprawls, complete an extra round, or move from broken leg circuits to 3 clean non-stop circuits. Those are not small wins. They are the exact adaptations this style of training is supposed to produce.
Research on trained combat athletes gives a useful upper boundary, not a beginner promise. In a 2018 study of national-level combat-sport athletes, a short-term training intervention was associated with 16–20% strength gains, 22% improvement in takedown speed, and 13% improvement in VO2max over 4 weeks.[3] That population was already trained, supervised, and far closer to competitive sport than someone doing solo drills between the coffee table and the couch.
Use that study as proof that combat-sport conditioning can move fitness markers quickly under the right conditions, not as a guarantee that a beginner will add 20% strength at home in a month. Beginners often improve fast, but some of that early jump comes from learning the movements, pacing better, and wasting less energy.
For weight loss expectations, stay just as careful. LI Mixed Martial Arts reports that MMA training can burn 500–1,000 calories per session and describes 15–25 pounds of weight loss over 3 months among students, but that is gym-reported context rather than a controlled home-training trial.[4] It can help frame what high-output MMA-style training may do when paired with consistency and nutrition, but it should not be treated as a promise attached to this routine.
Safety Rules for a Spare Room
Clear more space than you think you need. Sprawls and stand-ups travel. Remove low tables, loose rugs, pet toys, and anything that turns a tired step into a dumb injury. If the floor is hard, control the descent on penetration steps and sprawls instead of dropping your joints into it.
- Keep knees tracking in the same direction as toes during squats, lunges, and step-ups.
- Land squat jumps softly; reduce reps or remove jumps if landings get loud.
- Use shallow penetration steps if kneeling irritates your knees.
- Stop sprawl sets when your hips sag, wrists slap the floor, or you cannot return to stance cleanly.
- Treat dizziness, sharp pain, or joint pinching as a stop sign, not a toughness test.
The easiest way to make this program too hard is to turn every drill into a race. Speed belongs after shape. If your stance, sprawl, or stand-up changes completely the moment the timer starts, lower the dose and rebuild.
Optional Upgrades After the No-Equipment Base
You do not need bands, a dummy, a mat, or a pull-up bar to run this program. Add equipment only after you can complete the basic week without your drills falling apart. At that point, resistance bands can make sense because they add direction-specific tension to shots, rows, presses, and hip work.
Evolve MMA, citing Mass General Brigham research, reports that resistance bands can increase muscle activation by up to 40% compared with bodyweight alone.[5] That is a reason to consider bands as an upgrade, not a reason to delay starting. If you anchor bands to a door, use a proper setup and read a resistance band door-anchor safety guide before loading it hard.
If you want more variety after this block, a broader 4-week MMA home training routine brings in more general MMA conditioning. A 6-week no-equipment home MMA workout program is another path if you want a longer plan that is less wrestling-specific.
For a next step that stays closer to wrestling strength, move into an 8-week bodyweight strength program for wrestlers at home. If your schedule only allows a few hard sessions each week, the RJ Harris 3-workout routine is a useful contrast. Readers interested in how fighters adapt training outside ideal gym settings can also look at Diego Lopes' home workout approach.
The Honest Finish
MMA wrestling training at home is worth doing when it is structured, progressed, and judged by the right outcomes. You can build conditioning, explosive leg drive, trunk endurance, and work capacity with no equipment. You can also change body composition if the training is consistent and your eating supports the goal.
The result is not becoming a competent wrestler in isolation. It is becoming fitter in a way that borrows honestly from wrestling: lower stances, repeated floor-to-feet transitions, hard intervals, and legs that have to keep working after they would rather quit.
References
- Wrestling Workouts At Home: No Equipment Needed, Sweet Science of Fighting
- 6 Wrestling Drills You Can Do from Home without a Mat or Partner, Fanatic Wrestling
- The effect of short-term sport-specific strength and conditioning training on physical fitness of well-trained mixed martial arts athletes, PMC, 2018
- How Much Weight Can You Lose Training MMA?, LI Mixed Martial Arts
- Solo Grappling: How To Drill Takedowns And Transitions Without A Partner, Evolve MMA


Comments
Join the discussion with an anonymous comment.