
Yes, you can do Olympic gymnastics training at home if you mean the strength shapes behind gymnastics: hollow-body tension, arch control, L-sit compression, handstand alignment, active flexibility, and enough shoulder awareness to know where your body is in space. No, you should not treat your living room as a tumbling floor. Back handsprings, flips, release skills, high-beam work, and high-impact landings belong with a coach, proper surfaces, and room to miss safely.
That distinction is not a downgrade. The unflashy shapes are where much of the strength lives. A clean hollow hold teaches the ribs and pelvis to stay connected. An arch hold builds the back-body tension that keeps the body from folding. An L-sit develops compression instead of just “abs.” A wall handstand teaches the shoulders to support weight overhead without guessing.
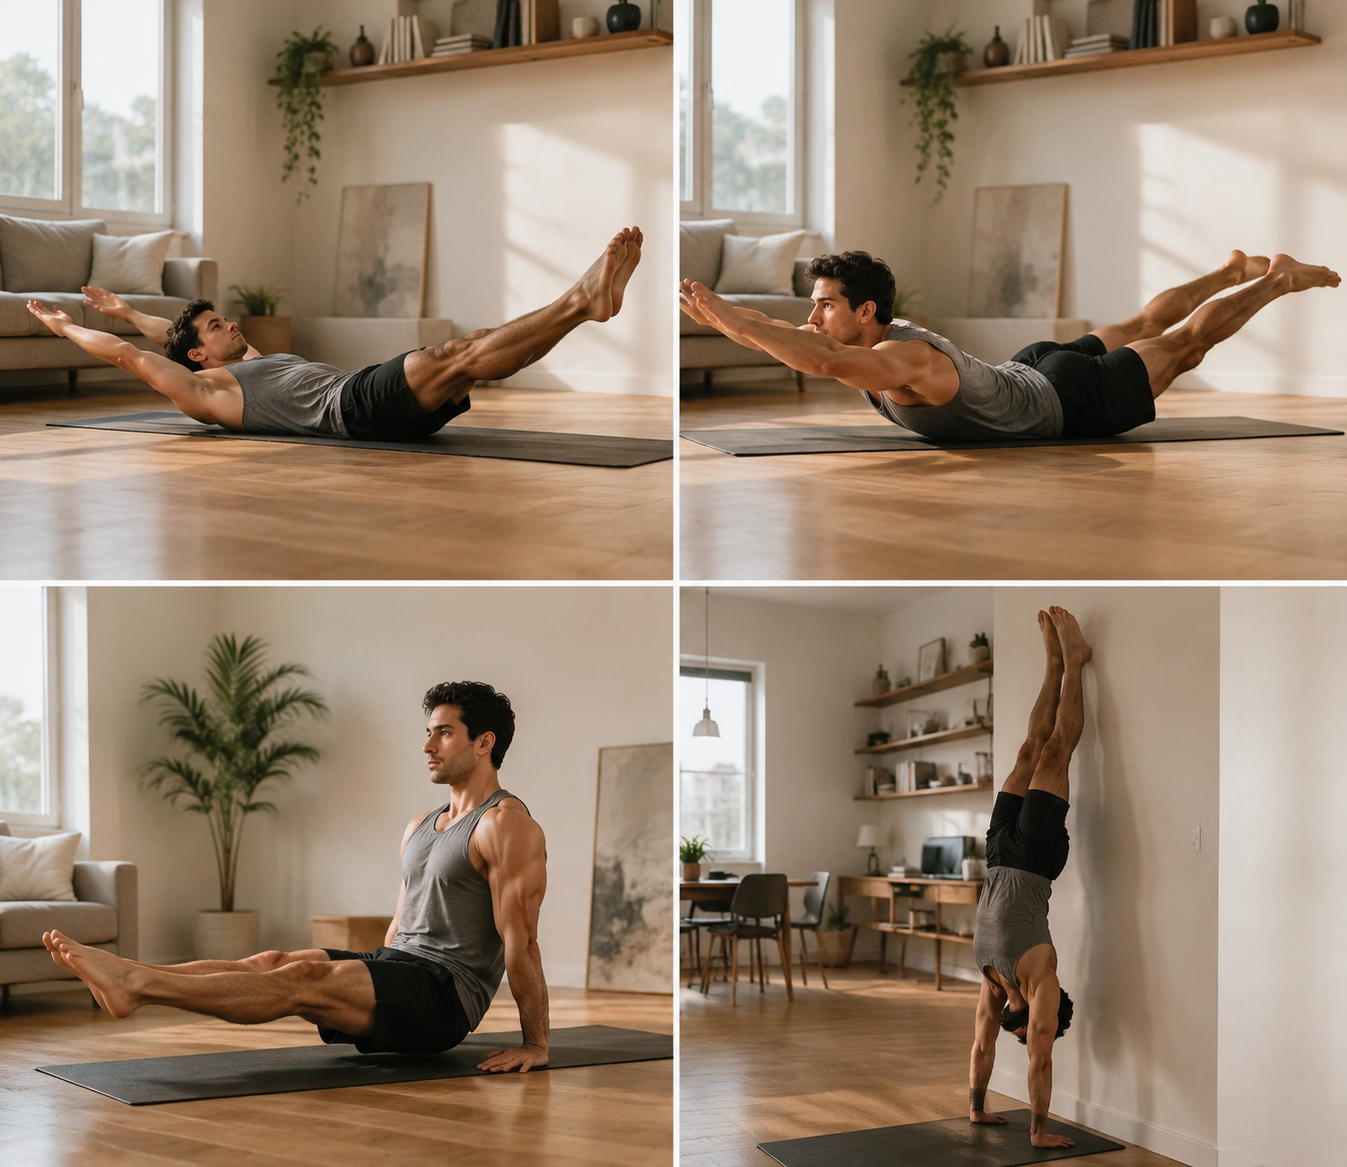
The useful home version of gymnastics is not cosplay. It is borrowing the standards. Danielle Gray of Train Like a Gymnast translated elite-style conditioning into a 30-minute bodyweight circuit for general fitness, using exercises such as burpees, kneeling tuck lifts, single-leg v-ups, plank push-ups, and lunge push-throughs.[1] GymnasticBodies similarly points to zero-equipment drills such as straddle-ups, cossack squats, hip swivels, and scapular shrugs to build the core, hip mobility, and shoulder integrity gymnasts depend on.[2] The pattern is clear enough: the home-friendly part is not the airborne trick. It is the repeatable position.
What “Gymnast Strength” Means at Home
For an adult beginner, Olympic gymnastics strength is better understood as a set of qualities than as a list of skills. You are training relative strength: how well you move and hold your own bodyweight. You are training total-body tension: the ability to make the arms, ribs, pelvis, legs, and toes participate in one shape. You are training active flexibility: range of motion you can control, not just collapse into. You are training shoulder integrity, compression strength, and body awareness.
That is why a hard home session does not need to look dramatic. A beginner doing a tucked hollow hold with a flat lower back may be closer to useful gymnastics conditioning than someone flinging tired kick-ups at a wall. The work is quieter, but the standards are stricter.
| Shape | Main quality | Home-safe starting point | What to avoid |
|---|---|---|---|
| Hollow hold | Anterior core tension and rib-pelvis control | Dead bug or tucked hollow hold | Letting the lower back arch off the floor |
| Arch hold | Posterior-chain control and back-body tension | Low prone lift with arms by sides | Cranking the neck or pinching the low back |
| L-sit | Compression strength and straight-arm support | Seated leg lifts or tuck support | Turning it into a hip-flexor cramp contest |
| Handstand | Shoulder support, overhead alignment, spatial awareness | Wall plank or pike wall hold | Repeated blind kick-ups without an exit plan |
The Hollow Hold: Where Most Adults Need to Start
The hollow hold looks simple enough to be underestimated, which is how it becomes a low-back endurance test. The point is not to hold your legs as low as possible while your spine peels off the floor. The point is to posteriorly tilt the pelvis, close the front ribs, press the lower back into the floor, and keep breathing while the limbs gradually move farther away from the center.
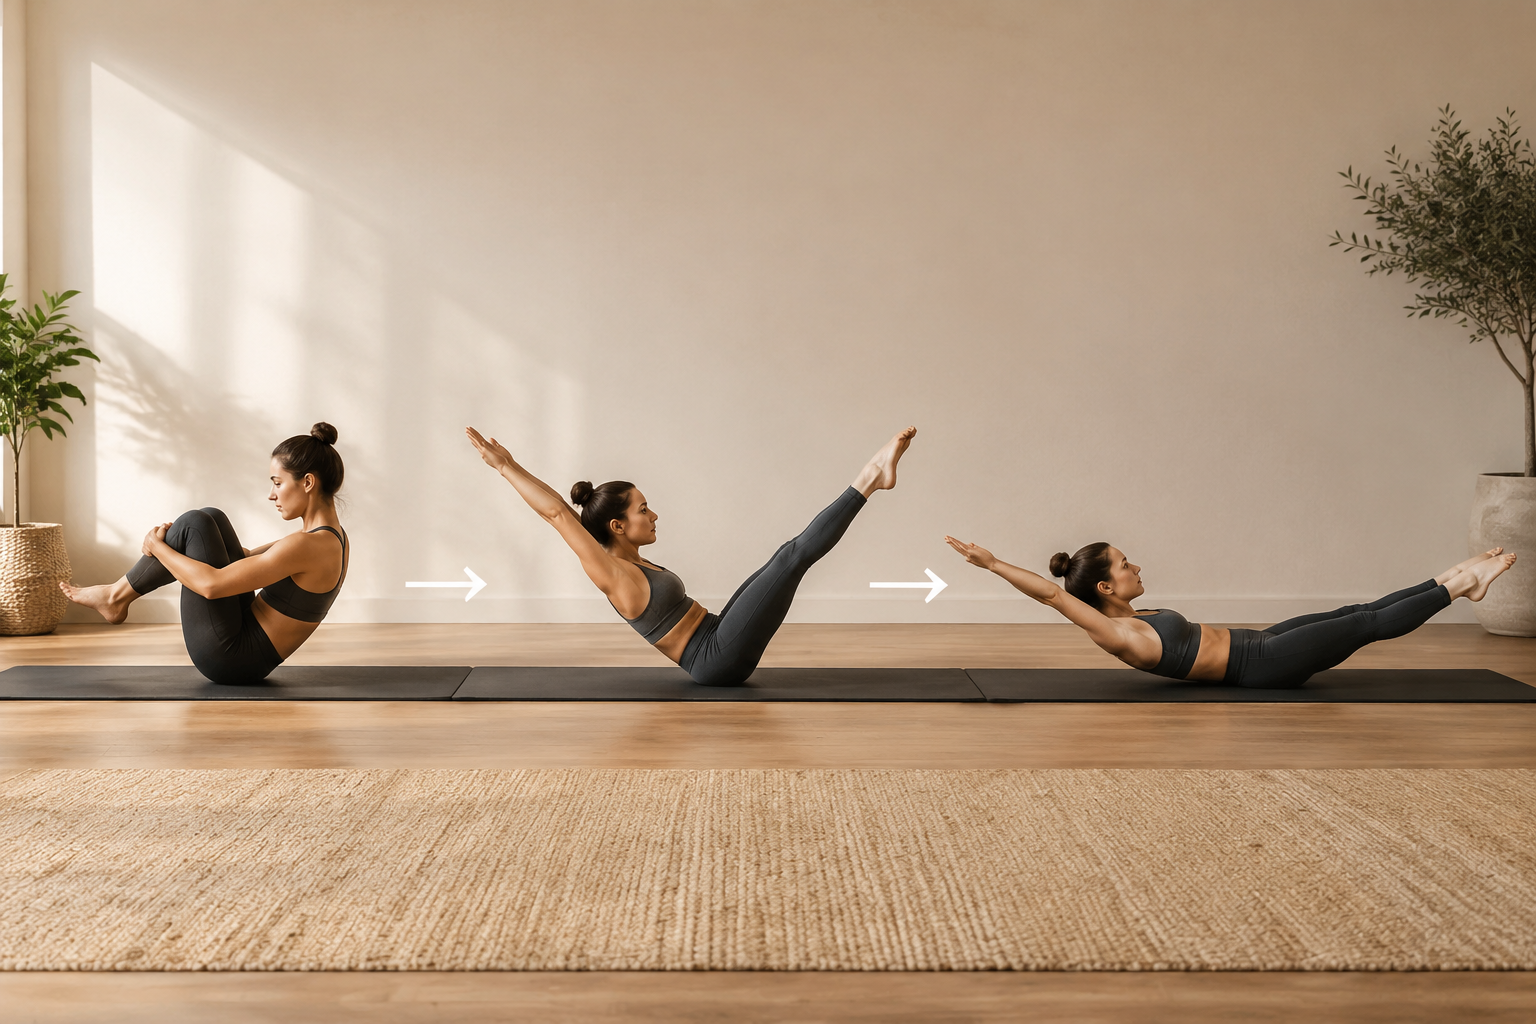
Begin with the version that lets you keep the standard. For many adults, that is not the full hollow shape. It is a dead bug, a bent-knee hollow hold, or a tuck hold with hands reaching toward the knees. If your lower back loses contact with the floor, the variation is too long-levered for today.
- Level 1: Dead bug with lower back pressed down, moving one arm or one leg at a time.
- Level 2: Tucked hollow hold with knees bent over hips and shoulders slightly lifted.
- Level 3: One-leg hollow hold, with one knee bent and one leg extended higher than you think you need.
- Level 4: Full hollow hold with arms overhead only if the ribs stay down and the back stays flat.
- Level 5: Hollow rocks, added only after the static shape stays clean.
A useful work set might be 10 to 25 seconds. Stop before the shape leaks. Adults often do better with several short clean holds than one long ugly one, because the exercise is teaching position as much as strength.
Use three checks. Can you keep your lower back heavy on the floor? Can you keep your throat and jaw relaxed? Can you inhale without your ribs popping up? If one answer is no, regress the lever before adding time.
The Arch Hold: Back-Body Strength Without Low-Back Drama
The arch hold is the hollow hold’s opposite shape. Lie face-down, reach long through the legs and arms, and lift into a gentle global extension. The goal is not to make the biggest banana shape your spine can tolerate. The goal is to distribute effort through glutes, upper back, hamstrings, and shoulders so the whole back line learns to turn on together.
Start small. Keep the forehead near the floor and arms by your sides. Lift the chest slightly, squeeze the glutes, and lengthen the legs behind you. If that feels controlled, reach the arms forward. If the low back pinches, lower the lift and think longer rather than higher.
- Beginner option: Prone chest lift with arms by sides.
- Next option: Alternating arm-and-leg lifts, keeping the hips quiet.
- Standard option: Arch hold with arms reaching forward and legs together.
- Dynamic option: Small arch rocks, only if the static hold feels smooth.
This shape matters because gymnastics is not only abs. Handstands, casts, swings, jumps, and landings all ask the back side of the body to organize force. At home, arch work gives you that posterior-chain piece without pretending you are training on bars.
The L-Sit: Compression Is Not Just Flexibility
The L-sit is where many strong adults discover that their abs and hip flexors do not automatically know how to work together. You need straight-arm pressure into the floor, lifted hips, active quads, pointed or flexed feet held with intent, and enough hamstring mobility to bring the legs forward without collapsing the chest.
If you do not have parallettes, use the floor. If your arms are short relative to your torso or your hip compression is limited, the full floor L-sit may not be available right away. That is fine. The early work is seated compression and tuck support, not forcing a picture.
- Seated single-leg lifts: Sit tall, hands beside thighs, lift one straight leg for controlled reps.
- Seated double-leg pulses: Keep the chest lifted and move the legs a small distance instead of leaning back.
- Tuck support: Hands on the floor or sturdy blocks, knees tucked, shoulders pushing down.
- One-leg L-sit: One knee stays bent while the other leg reaches straight.
- Full L-sit: Both legs straight only when the shoulders, hips, and knees can stay organized.
GymnasticBodies’ no-equipment recommendations include straddle-ups and hip mobility drills, which fit neatly here because compression depends on both strength and usable range.[2] Stretching the hamstrings may help, but the L-sit also asks you to actively close the angle at the hips. Passive flexibility alone will not lift your legs.
The Handstand: Train the Line Before the Kick-Up
Handstand training is the place where home gymnastics conditioning most often drifts into risk. A wall can be helpful; it can also hide poor shoulder position and encourage repeated blind kicking. Before you chase balance, train the support shape: hands spread, fingers active, elbows straight, shoulders elevated, ribs contained, glutes on, legs together.
The first question is not “Can I get upside down?” It is “Can my wrists and shoulders tolerate weight-bearing?” If wrists ache sharply, fingers tingle, shoulders pinch, or you cannot press the floor away without bending the elbows, spend more time on quadruped rocks, elevated plank holds, scapular push-ups, and pike shapes before loading a wall handstand.
- Wrist prep: Gentle palm rocks, finger pulses, and short plank holds.
- Shoulder prep: Scapular push-ups and wall slides, keeping the ribs from flaring.
- Entry shape: High plank with the floor pushed away.
- Intermediate shape: Pike hold with feet on the floor or on a low, stable surface.
- Wall shape: Chest-to-wall hold only if you can walk in and out under control.
For most adults, chest-to-wall is better than back-to-wall because it rewards a straighter line and makes banana-back leaning less tempting. Walk the feet up gradually, stop before fatigue changes the shape, and come down the same way. If you cannot exit calmly, you are too far up the wall.
A safe handstand practice can be as short as five to eight minutes inside a broader session. Do not save it for the end when wrists are tired and judgment is worse. Handstand work is skillful strength. Treat it like practice, not punishment.
How to Put the Four Shapes Into a Week
Home gymnastics strength works best when it is structured, not randomly heroic. Dr. Dave Tilley published a home program arranged across 6 days, with 4 strength days and 2 cardio days, showing that gymnastics-style home training can be organized rather than improvised.[3] Adult-gymnastics.com also frames adult conditioning as planned weekly volume, including core work 5 times per week with separate leg and arm emphasis across the week.[4]
You do not need to copy that exact volume. If you are new, three focused sessions per week is enough to build the habit and expose weak links without making every joint complain. The routine below keeps the center of gravity on the four shapes while adding just enough pushing, pulling, and mobility to make the work feel complete.
| Day | Focus | Session |
|---|---|---|
| Day 1 | Hollow + handstand | Wrist prep, hollow progression, wall plank or pike hold, push-up variation, hip flexor mobility |
| Day 2 | Arch + compression | Arch progression, seated leg lifts, split squat or cossack squat, hamstring mobility |
| Day 3 | Rest or easy cardio | Walk, bike, mobility, or complete rest |
| Day 4 | Full shape circuit | Hollow hold, arch hold, tuck support, pike hold, repeated for quality rounds |
| Day 5 | Optional light practice | Wrist prep, shoulder mobility, easy hollow and arch holds |
| Days 6–7 | Recovery | Rest, walking, or gentle flexibility |
A simple session can run 25 to 35 minutes:
- Warm up for 5 minutes with joint circles, wrist rocks, cat-cow, squats, and light shoulder work.
- Practice one priority shape for 8 to 10 minutes while you are fresh.
- Train two supporting shapes for 2 to 4 sets each.
- Add one push, one leg, or one mobility drill if it supports the day’s focus.
- Stop with one or two good reps left instead of turning positions into survival holds.
If you want a broader bodyweight strength plan alongside this work, add pulling patterns from a no-equipment upper-body workout. Gymnastics pushing can quietly dominate a home plan; adults usually need deliberate rows, prone pulls, reverse planks, or towel-based options to balance the shoulders.
Progress Without Pretending You Are in a Gym
Progression should be boring enough to work. Add time, range, or leverage one variable at a time. If you make the hollow hold longer, do not also lower the legs and add rocks. If you move the handstand closer to vertical, do not also double the number of holds. Gymnastics rewards precision, and adults recover better when precision comes before volume.
| If you can do this cleanly | Progress by |
|---|---|
| Three 20-second tucked hollow holds | Extending one leg or reaching arms farther overhead |
| Three 20-second low arch holds without pinching | Reaching arms forward or adding small rocks |
| Ten controlled seated single-leg lifts per side | Trying double-leg pulses or a short tuck support |
| Three 20-second pike holds with strong shoulders | Walking feet slightly higher or holding a chest-to-wall line briefly |
Breaking Muscle’s 12-week gymnastics-style program offers a useful example of progression from basic positions such as L-sit, splits, and bridge toward more complex work.[5] The catch is that a program with advanced elements should not be copied wholesale by a beginner at home. Use the idea of sequencing, not the hardest exercise on the page. A progression model is only useful if the first rung is actually reachable.
For apartment training, the same principle applies with less impact. Hollow holds, arch holds, seated compression, wrist prep, pike holds, slow squats, and mobility work can all be nearly silent. If noise is your limiting factor, pair this plan with a quiet small-space strength plan instead of adding jumping circuits.
A Four-Shape Home Routine
Use this as a starting template three days per week. Keep rest generous enough that the next set looks like the previous one. The goal is not to finish destroyed. The goal is to accumulate clean positions.
| Exercise | Beginner dose | Progression target |
|---|---|---|
| Dead bug or tucked hollow hold | 3–5 sets of 10–20 seconds | Full hollow hold with flat lower back |
| Low arch hold | 3 sets of 10–20 seconds | Longer arch hold or small arch rocks |
| Seated single-leg lift | 3 sets of 6–10 reps per side | Double-leg lifts or tuck support |
| Wall plank or pike hold | 3–5 sets of 10–25 seconds | Controlled chest-to-wall handstand hold |
| Cossack squat or hip mobility drill | 2–3 sets of controlled reps | More range without twisting or collapsing |
| Scapular push-up or shrug | 2–3 sets of 8–12 reps | Stronger shoulder elevation and control |
Every four weeks, review the shapes instead of only chasing harder variations. Film one hollow hold from the side. Check whether the back stays flat. Film a pike or wall hold. Check whether the ribs flare and elbows bend. Test one seated leg-lift set. Check whether you are leaning backward to fake compression. The camera is not there for performance; it is there because body awareness is part of the training.
If you later add equipment, parallettes, a pull-up bar, rings, or stall bars can widen the menu, but they are not required for the base. A tiered plan such as a home gym workout plan that grows with your equipment can help you decide what to add next instead of buying gear before you have a use for it. If you prefer complete weekly templates by setup, use home gym programs by equipment tier.
Stop Signs That Matter
Gymnastics conditioning should feel demanding, sometimes humbling, but not sketchy. Stop or regress when a joint, not a muscle, becomes the loudest signal. Wrists, shoulders, elbows, low back, and hip flexors all deserve attention because the shapes ask small structures to tolerate unfamiliar angles.
- Stop hollow work if your lower back repeatedly lifts and you cannot restore contact by bending the knees.
- Stop arch work if the sensation becomes sharp or compressed in the low back.
- Stop L-sit work if hip-flexor cramping replaces controlled lifting every set.
- Stop handstand work if the wrists hurt sharply, elbows buckle, or you cannot come down calmly.
- Do not practice flips, aerial skills, or tumbling passes at home because conditioning confidence is not the same as coached landing skill.
Adults who enjoy progressive bodyweight training may also like the structure of an 8-week bodyweight strength program for wrestlers. It is a different sport, but the useful overlap is clear: repeatable positions, planned progression, and strength you can build without a full gym.
At home, the win is not becoming an Olympic gymnast. The win is taking the shapes seriously enough that your core stops leaking tension, your shoulders know how to support you, your hips learn to compress, and your bodyweight starts to feel more negotiable. That is real gymnastics strength, even without a sprung floor.
References
- Train Like Olympic Gymnast Simone Biles With This 30-Minute Workout, Women's Health Magazine.
- No Equipment Needed: The Best 4 Strength Exercises You Can Do Anywhere, GymnasticBodies.
- Free 6 Day Gymnastics Strength, Flexibility and Cardio Program for Coronavirus, Shift Movement Science.
- Conditioning for Adult Gymnastics: Your One Stop Guide, adult-gymnastics.com.
- Train Like a Gymnast: Bodyweight Skills, Strength, and Flexibility, Breaking Muscle.


Comments
Join the discussion with an anonymous comment.