Buying an exercise bike for home looks simple until the box is in the room and the questions get practical: where should it go, how high should the saddle be, what should resistance feel like, and what are you supposed to do on day one? A bike can be one of the least intimidating ways to start home cardio because it is low-impact, weatherproof, and easy to pause. But it only stays useful if it fits your body, your space, and your first month of riding.
You do not need a premium connected bike to begin. A basic bike can be enough if it is stable, adjustable, quiet enough for your home, and paired with a plan you can actually follow. If you are still deciding whether a bike belongs in your broader starter setup, use the beginner home fitness equipment checklist to keep the purchase in perspective before you spend.

Start With the Bike That Belongs in Your Home
For a first bike, the choice is less about finding the “best” category and more about avoiding the wrong one. Most beginners can narrow the field with three questions.
| If this is your situation | Start your search here | Why it fits beginners |
|---|---|---|
| You want a familiar workout feel and can tolerate a forward-leaning posture | Upright cycling or spin-style bike | Good for structured rides, intervals, and app classes; usually the most versatile home option |
| Your back, hips, balance, or knees need more support | Recumbent bike | The larger seat and backrest reduce the need to brace your upper body while pedaling |
| You have very limited floor space or need to move the bike often | Folding upright bike | Trades some stability and ride feel for storage convenience |
| You mainly want light movement while working | Under-desk bike | Useful for low-intensity movement, but not a full substitute for a stable cardio bike |
A spin-style bike is often the safest default for a beginner who wants one machine for short rides, longer steady sessions, and occasional intervals. A recumbent bike is not a lesser option; it is often the better option when comfort and support decide whether the bike gets used. Folding and under-desk models solve space problems, but the smaller frame and lighter build can feel less planted during harder pedaling.
If you want a deeper buying comparison before choosing a type, read How to Choose a Home Exercise Bike That Actually Fits Your Situation. If you are still comparing a bike against a treadmill, rower, or no machine at all, start with Cardio at Home: Treadmill, Bike, Rower, or No Machine? instead.
Check Fit, Noise, and Adjustment Before You Buy
Price, resistance type, and screen size matter, but they are not the first failure points. A beginner usually quits because the bike is annoying to live with or uncomfortable to ride. Before buying, check these four things.
- Seat height range: confirm the published inseam or rider-height range, especially if you are tall.
- Handlebar adjustability: a small adjustment can reduce wrist, shoulder, and low-back strain.
- Footprint and clearance: leave enough room to mount, dismount, adjust the seat, and clean around the bike.
- Noise and maintenance: magnetic resistance is usually the apartment-friendlier choice; friction resistance can be cheaper but tends to need more upkeep.
Budget bikes can work well, but the fit range is where the cheap purchase can become expensive. Garage Gym Reviews’ budget-bike testing notes that many bikes under $500 comfortably fit riders up to about 5 feet 10 inches to 6 feet 2 inches, so taller riders need to check seatpost height specifications rather than assuming “adjustable” means adjustable enough.[1]
Noise claims also deserve a little skepticism. Magnetic resistance with a belt drive is commonly described as quieter than friction resistance, and some manufacturer claims place certain models around the 20-decibel range, but those numbers are not independently verified across every bike and every room.[1] In an apartment, the safer move is to combine a magnetic-resistance bike with a mat, avoid placing it directly against a shared wall, and tighten loose parts after the first few rides.
Subscription Classes Are Optional, Not the Starting Line
Connected bikes can make riding more engaging, especially if you like coached classes, leaderboards, or scenic routes. They are not required for a first month. A screen-free bike plus a phone timer can teach you the same beginner skills: consistent cadence, manageable resistance, warm-ups, cooldowns, and gradual progression.
If motivation fades without guidance, then a subscription or beginner-friendly app may be worth considering. Look for clear beginner labels, adjustable class lengths, simple intensity cues, and ways to track consistency without turning every ride into a competition. The app itself should reduce guessing, not add another dashboard to manage. For that decision, use Workout Apps for Beginners after the bike is set up.
Set the Bike to Your Body Before the First Ride
This is the part most buying guides skip, and it is the part your knees will notice first. Do not start with a workout. Start by making the bike fit the person who will ride it.

Seat Height
Stand next to the bike and raise the saddle until it lines up roughly with your hip bone. Then sit on the bike, place one pedal at the lowest point, and check your leg. You want a slight bend at the knee, not a locked leg and not a deep squat. Garage Gym Reviews’ beginner cycling guidance gives the target as a 25- to 30-degree knee bend at full pedal extension.[2]
If the seat is too low, the front of the knee often takes the complaint. If it is too high, the hips may rock side to side as you reach for the bottom of the pedal stroke. Neither feeling is something to “push through” on a new bike. Stop, adjust, and ride again for a minute before deciding.
Seat Position and Handlebars
If your bike allows fore-aft saddle adjustment, start with the seat centered on its rail. When the pedals are level, your front knee should feel stacked over the foot rather than shoved far forward. This does not need to become a laboratory measurement on day one; it just needs to keep you from riding with your knees cramped under you.
Set the handlebars high enough that you can keep your shoulders down, elbows soft, and hands light. Beginners often copy aggressive studio-bike posture too early. If your wrists are bearing your body weight, raise the bars or move the saddle slightly back if your bike allows it.
Resistance
Your first resistance setting should feel like pedaling on a flat road with a little pressure under your feet. If your hips bounce in the saddle, the resistance may be too light or your cadence too high. If you have to grind each pedal stroke, it is too heavy for a warm-up. A useful beginner cue is that you should be able to speak in short sentences during easy riding.
Your First Ride Should Teach You the Bike
The first ride is not a fitness test. It is a systems check. Wear shoes that stay secure on the pedals, keep water nearby, and use a timer you can see without twisting your neck.
- Pedal easily for 5 minutes and listen for rubbing, clicking, or wobbling.
- Increase resistance slightly for 3 minutes while keeping your breathing controlled.
- Return to easy pedaling for 2 minutes and notice your knees, hips, back, wrists, and feet.
- Get off the bike, adjust anything that felt wrong, and write down the seat height setting if the bike has markings.
If something hurts sharply, stop. If something feels mildly awkward, adjust before you add time. The point is to remove avoidable discomfort while the ride is still short.
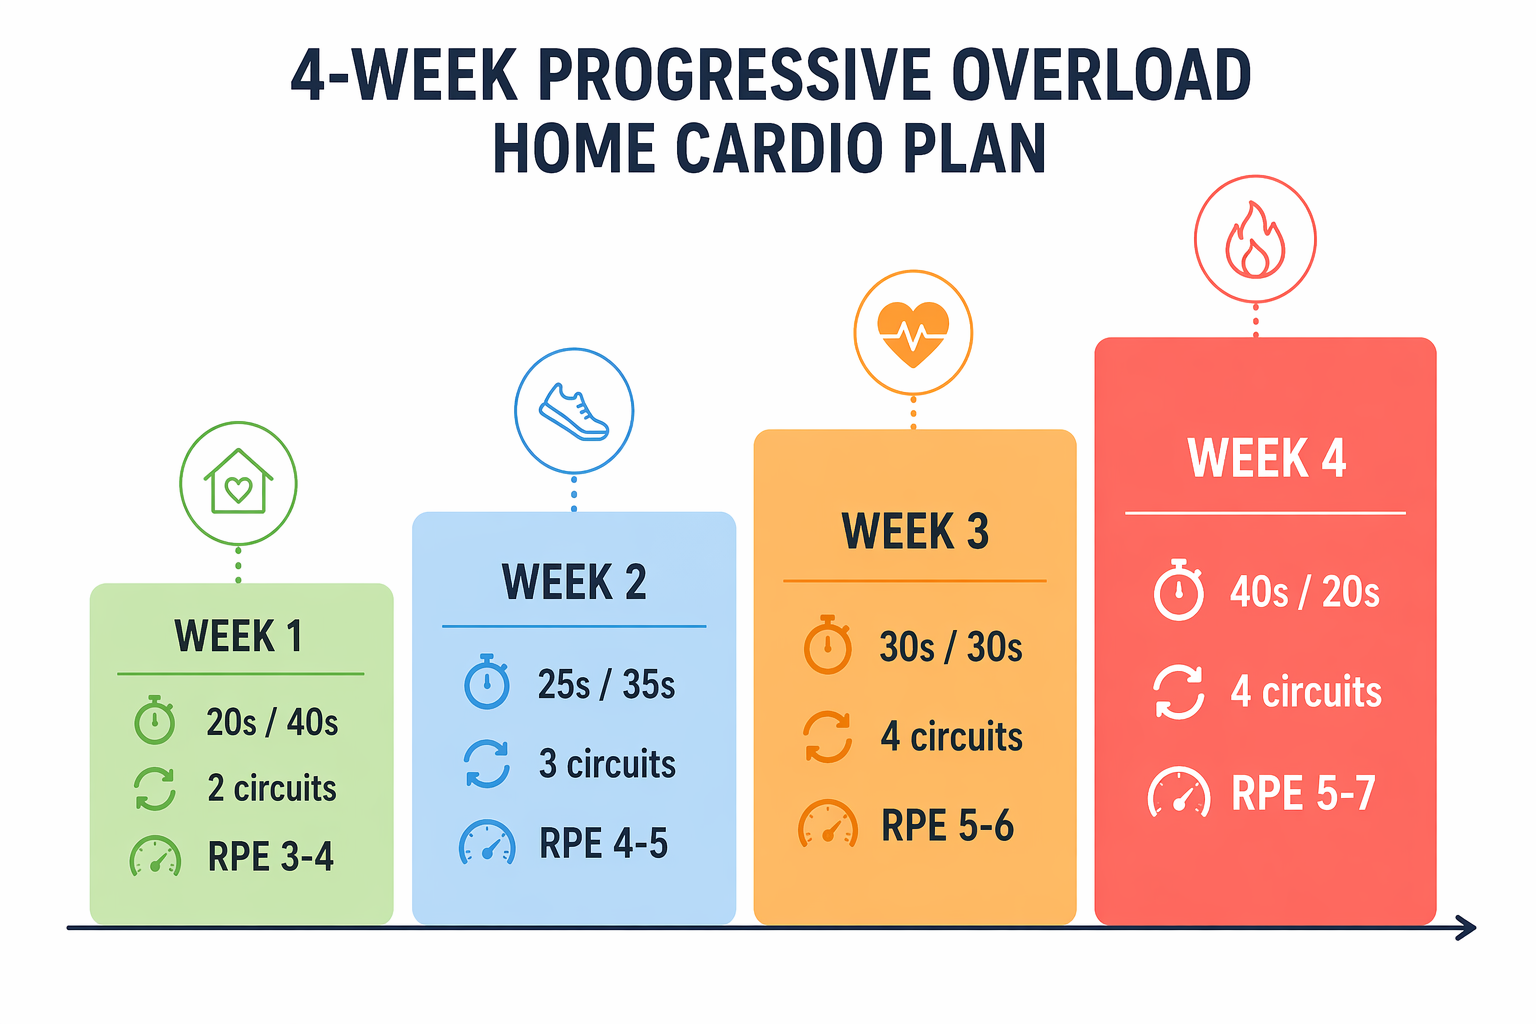
A Simple 30-Day Plan for Your First Month
Once the bike fits, the next problem is progression. Beginners do not need a heroic plan; they need a repeatable one. The first month should build the habit of getting on the bike, the skill of changing resistance without panic, and enough cardio capacity to make riding feel less foreign.

| Days | Ride frequency | Main goal | Ride structure |
|---|---|---|---|
| 1–7 | 3 rides | Comfort and setup | 10–15 minutes easy, with one small resistance change in the middle |
| 8–14 | 3 rides | Steady rhythm | 15–20 minutes, mostly easy with 2 short moderate segments |
| 15–21 | 3–4 rides | Controlled effort changes | 20–25 minutes, alternating easy and moderate blocks |
| 22–30 | 3–4 rides | Beginner intervals | One structured 30-minute interval ride, plus shorter easy rides |
Week 1: Make It Boring on Purpose
Ride three times. Keep the first ride around 10 minutes, then add a few minutes only if the bike feels comfortable the next day. Use easy resistance for most of the ride. In the middle, turn the knob or press the button just enough to feel more pressure for 1 minute, then return to easy pedaling.
The practical win this week is not sweat. It is learning your bike’s controls, finding a saddle position you can repeat, and finishing without knee or back irritation.
Week 2: Add Moderate Work Without Chasing Exhaustion
Keep three rides on the calendar and move toward 15 to 20 minutes. Add two moderate segments of 2 to 3 minutes each. Moderate means your breathing is more noticeable, but you are not counting the seconds until it ends.
If your legs feel heavy but your joints feel fine, take an easy day. If your knees, hips, or low back complain in a new way, revisit seat height before blaming your fitness.
Week 3: Practice Changing Gears
This is where the bike starts to feel less like furniture. Ride three or four times. On one ride, alternate 3 minutes easy with 2 minutes moderate until you reach 20 to 25 minutes. On the other rides, stay mostly easy and finish feeling like you could have done a little more.
If you also want leg strength for stairs, squats, and general durability, pair the bike with simple off-bike work from Your First 8 Weeks of Home Leg Workouts. Keep strength work separate from your hardest bike day at first.
Week 4: Try a Structured Beginner Interval Ride
Garage Gym Reviews publishes a 30-minute beginner stationary-bike workout from certified-trainer content: 7-minute warm-up, 5 minutes medium, 2 minutes high, 2 minutes medium, 1 minute recovery, 5 minutes medium, 3 minutes high, and 5-minute cooldown.[2] Treat it as a tested starting workout, not a medical protocol or a requirement to prove yourself.
For your first attempt, define “high” conservatively. It should feel challenging, but you should still control the pedals and keep your posture. If the 3-minute high segment turns into grinding, lower the resistance and keep moving. The workout is there to organize effort, not to punish you for being new.
During the rest of week 4, keep the other rides easy or moderate. One harder ride is enough while your body is still learning what indoor cycling feels like.
What Results Are Reasonable to Expect?
An exercise bike can support cardiovascular fitness, but the first month is mostly about consistency and tolerance. The broader research base is encouraging: a 2019 systematic review on indoor cycling reported cardiovascular benefits across included studies, though the exact effect depends on the population, program, and training dose.[3]
Joint comfort is another reason bikes are popular with beginners. Garage Gym Reviews cites Clinical Rehabilitation research indicating that indoor cycling improved joint function in people with knee osteoarthritis.[2] That does not mean a beginner ride is treatment for knee pain, and it does not replace medical advice. It does mean the bike’s low-impact nature is not just a marketing phrase.
Calorie burn can be motivating, but it is a rough estimate, not the main promise. Harvard Health data cited by Garage Gym Reviews places moderate stationary biking at about 210 to 294 calories in 30 minutes depending on rider weight.[2] If weight loss is your primary reason for riding, connect the bike plan to food, recovery, and weekly consistency rather than trying to turn every ride into the hardest possible session. For that broader angle, use Home Cardio for Weight Loss.
The Beginner Bike Checklist
Before you order, assemble, or start training, run through the few checks that matter most.
- Choose the bike type for your body and room first, then compare features.
- Check rider-height and seatpost specs, especially if you are near or above 6 feet tall.
- Prioritize magnetic resistance if the bike has to live near neighbors or shared walls.
- Set the saddle near hip height and confirm a slight knee bend at the bottom of the pedal stroke.
- Use the first ride to adjust the bike, not to test your fitness.
- Progress from easy rides to moderate blocks before attempting longer intervals.
The best first exercise bike is the one you can fit correctly, ride quietly, and return to without needing to guess what comes next. Get those pieces right, and the bike has a much better chance of becoming part of your home rather than another expensive object beside the wall.
References
- Expert-Tested: Best Budget Exercise Bikes (2026), Garage Gym Reviews
- Stationary Bike Workout for Beginners (2026), Garage Gym Reviews
- Health Benefits of Indoor Cycling: A Systematic Review, PubMed / Medicina, 2019


Comments
Join the discussion with an anonymous comment.