
The risky moment in tennis rehab is often the first week the injury feels quiet. The elbow no longer complains when you pick up a mug. The ankle looks normal in the morning. The shoulder lets you shadow-swing in the kitchen. That does not mean today is a league match day. It means you need to know which phase you are in, which tissue you are loading, and what has to stay calm before you move on.
This guide uses a three-phase structure for injury recovery exercises for tennis players at home. The best tennis-specific evidence for that structure comes from a 2025 systematic review of return-to-play programs in tennis players, but there is an important limit: the review found only five eligible studies, and all focused on shoulder injuries. So the phase rules are strongest for shoulder recovery. Using the same logic for tennis elbow, ankle sprain, and knee strain is a practical extrapolation, not proof that one tennis study covers every joint in the sport.[1]
Medical note: this article is educational and does not replace care from a clinician. If you are under active care, follow your physical therapist’s or physician’s protocol first. If you have sharp pain, unresolved swelling, numbness, instability, a recent fracture, a suspected tendon rupture, or symptoms that are not improving, get individual medical advice before using a home plan.
| Phase | Typical timing | Court volume | Effort limit | Main job |
|---|---|---|---|---|
| Return to participation | Weeks 1–2 | No more than 15% of normal match volume | RPE under 6/10 | Restore comfortable mobility and low-load control |
| Return to sport | Weeks 3–6 | Build toward 70% of normal match volume | RPE 8–10 only if symptoms stay controlled | Strengthen the injured area and reintroduce tennis patterns |
| Return to performance | Weeks 7–8+ | Progress toward full practice demands | Match-like effort only after repeated tolerance | Simulate points, restore serve speed, then return to competition |

Before You Pick Exercises, Pick the Phase
A flat exercise list is where motivated players get into trouble. Sleeper stretches, eccentric wrist extensions, lateral hops, wall sits, and band rotations are not interchangeable just because they all look harmless at home. The right exercise depends on two things: the phase of recovery and the injured body part.
For an uncomplicated mild-to-moderate injury, weeks 1–2 are not for proving fitness. They are for finding a repeatable baseline. The 2025 review’s early phase kept activity at no more than 15% of match volume and below RPE 6/10, which is a useful guardrail for the player who feels fine after five minutes and then pays for it that night.[1]
Weeks 3–6 allow harder work, but not random hard work. The review’s return-to-sport phase allowed progression toward 70% match volume, with higher RPE ranges and serve reintroduction below 50% of pre-injury speed.[1] That is the difference between strengthening for tennis and simply doing a workout while injured.
The first day back on court should still be deliberately small. Axis Sports Medicine’s return-to-tennis guidance describes a first session of 10–15 minutes followed by two days of rest, with full match play commonly taking 4–6 weeks from the start of rehab rather than arriving the moment pain drops.[2]
Phase 1, Weeks 1–2: Return to Participation
The goal in Phase 1 is not conditioning. It is to restore comfortable motion, reduce protective guarding, and test whether the injury can handle small, repeatable loads without a flare-up. Keep total tennis exposure under 15% of your normal match volume and effort under RPE 6/10.[1] For many club players, that means no match play, no serving session, and no “just one set” doubles.
Use this phase when symptoms are improving but not yet proven. The exercise should feel easy enough that you could repeat it tomorrow. If an exercise causes sharp pain during the movement, swelling later that day, or a next-morning setback, the dose was too high or the exercise is not appropriate yet.
| Injury focus | Phase 1 home work | What you are looking for |
|---|---|---|
| Tennis elbow | Wrist range of motion, gentle gripping with a towel or soft ball, pain-free forearm rotation | The forearm can move and grip lightly without next-day increase in elbow pain |
| Shoulder strain | Pendulums, pain-free wall slides, gentle sleeper stretch if prescribed or tolerated | The shoulder moves without pinching, guarding, or pain after sleep |
| Ankle sprain | Ankle circles, calf mobility, supported single-leg balance, weight shifts | You can stand and walk normally without swelling returning |
| Knee strain | Heel slides, quad sets, glute bridges, sit-to-stand from a high chair | The knee bends, straightens, and accepts body weight without swelling |
For shoulder injuries, do not let early comfort fool you into skipping rotation work later. During a tennis serve, the rotator cuff may experience forces reported around 120% of body weight, which is why shoulder rehab has to prepare the back of the shoulder and external rotators, not just the muscles you can see in the mirror.[3]
For ankle injuries, Phase 1 balance work is not a decorative add-on. Tennis ankle sprains are commonly inversion injuries, and one tennis-focused rehab source describes ankle sprains as about one quarter of tennis injuries, with about 85% being inversion-type sprains.[4] If the foot and ankle cannot sense position well on one leg, lateral movement on court becomes a gamble.
- Stay in Phase 1 if symptoms increase during daily activities after exercise.
- Stay in Phase 1 if swelling returns after walking, stairs, or light drills.
- Stay in Phase 1 if you cannot repeat the same home session 24–48 hours later.
- Move toward Phase 2 only when the basic motions feel controlled and the next day is no worse.
Phase 2, Weeks 3–6: Build the Strength Tennis Actually Uses
Phase 2 is where the plan starts to look like training again. The mistake is making it look like tennis too soon. You are allowed to work harder here, but only inside a controlled progression: build toward 70% of normal match volume, keep any serve work below 50% of pre-injury speed, and use higher effort only if the injured area stays calm afterward.[1]
Tennis Elbow: Eccentric Loading Before Full Hitting
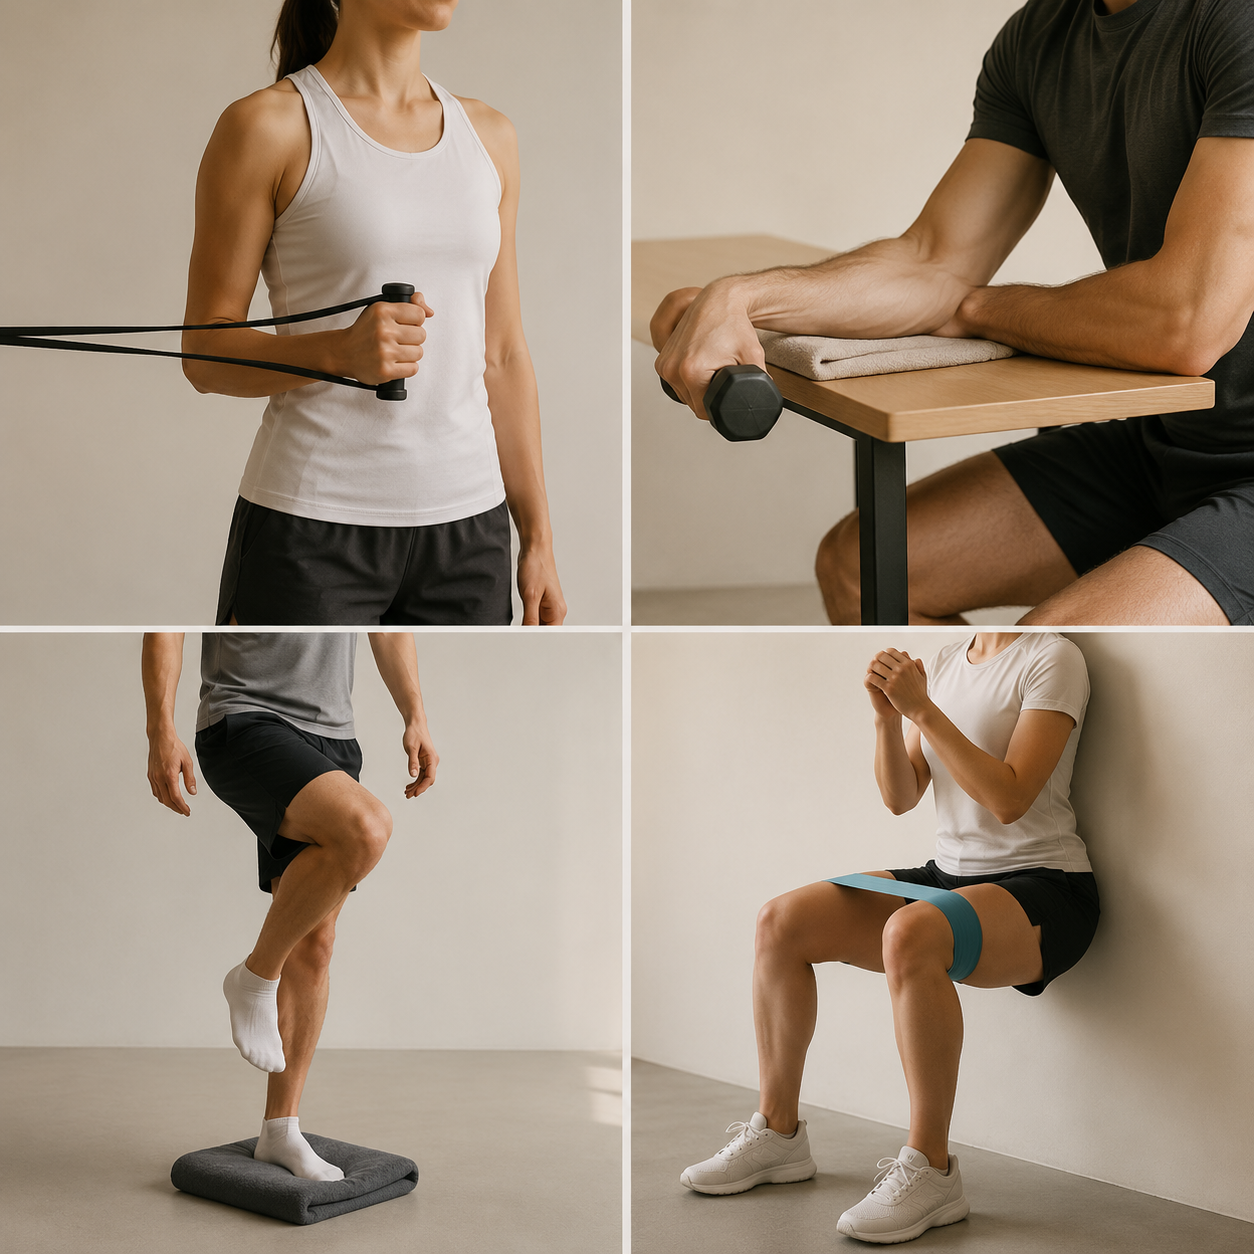
For tennis elbow, the key Phase 2 exercise is usually eccentric wrist extension. Sit with the forearm supported, palm facing down, and a light dumbbell in the hand. Help the wrist up with the other hand, then slowly lower the weight under control. Healthline’s tennis elbow rehab guidance describes starting this progression with a 1–2 lb dumbbell, which is the right spirit: boringly light at first, then earned gradually.[5]
Add towel twists or light fist clenches only if they do not increase elbow symptoms later. The tennis test is not whether you can do one pain-free forehand in the driveway. It is whether gripping, rotating, and extending the wrist can be repeated over several sessions without the tendon becoming irritable.
Shoulder Strain: External Rotation Is Not Optional
For shoulder recovery, Phase 2 should include banded external rotation, scapular control, and mobility work for the back of the shoulder. Hinge Health includes banded external rotation and sleeper stretch among exercises for tennis-related shoulder pain, while ProResults PT describes sleeper stretch dosing of 60–90 seconds for 3 repetitions when addressing shoulder internal rotation limits.[6][3]
Do not turn the sleeper stretch into a contest. A strong stretch sensation is not the prize. The useful version is controlled, slow, and followed by better motion rather than a cranky shoulder. If your shoulder pain is sharp, catching, or worse at night, get assessed instead of trying to stretch through it.
Ankle Sprain: Balance Comes Before Lateral Hops
For an ankle sprain, Phase 2 starts with single-leg balance that is almost too simple: barefoot or in shoes, near a wall, 20–30 seconds at a time. Then make it more tennis-like by turning the head, reaching the free foot lightly in different directions, or standing on a folded towel. Only after that should you add small lateral hops.
The order matters because ankle sprains can disturb proprioception, the joint’s position sense. Compleat Rehab’s tennis ankle sprain guidance emphasizes the relationship between inversion sprains, proprioception loss, and repeated ankle problems, while noting that chronic instability estimates vary by population.[4]
Knee Strain: Train the Chain, Not Just the Knee
For knee strain, Phase 2 should not be a pile of knee extensions alone. Tennis asks the hip, knee, ankle, and trunk to share force during starts, stops, lunges, and open-stance strokes. Tennis exercise guidance commonly emphasizes lower-body and kinetic-chain strength rather than isolating one joint, especially through glute, quad, calf, and trunk work.[7]
- Start with glute bridges, mini-squats, step-ups, and controlled wall sits.
- Add a resistance band around the thighs if the knees track well and symptoms stay quiet.
- Delay deep lunges, hard deceleration drills, and wide sliding movements until swelling and next-day soreness are consistently absent.
- Use the knee’s response to stairs the next morning as a practical check on whether the session was too aggressive.
How to Add Tennis Without Turning Rehab Into a Match
When court work returns in Phase 2, it should be narrower than your normal game. A baseliner does not need to prove baseline tolerance on day one. A doubles player does not need reaction volleys and overheads in the same session. Pick the lowest-risk tennis task that tests the injured area without burying it.
| Court task | Early version | Hold or regress if |
|---|---|---|
| Groundstrokes | Mini-tennis or easy feeds, short duration, no chasing | Grip pain, shoulder pinch, knee swelling, or limping appears |
| Footwork | Walk-through split steps, small side shuffles, planned direction changes | The ankle feels unstable or the knee reacts later that day |
| Serve | Shadow serves first, then serves below 50% pre-injury speed | Pain appears during acceleration, follow-through, or the next morning |
| Volleys | Controlled feeds close to the body | Reaching volleys provoke shoulder, elbow, ankle, or knee symptoms |
A useful first court session can feel almost unsatisfying: 10–15 minutes, low intensity, then two days away from the court to see what the body reports.[2] That rest interval is not wasted time. It is the test. Many tennis injuries do not reveal overload during the first five clean hits; they reveal it when the tissue has to recover.
Phase 3, Weeks 7–8+: Return to Performance
Phase 3 begins when strength work, controlled court exposure, and next-day symptoms are all predictable. This is where you move from “I can hit” toward “I can tolerate tennis.” Those are different standards. Tennis tolerance includes serving, recovering between points, changing direction when tired, and making the same joint accept repeated loads without swelling or protective movement.
Serve speed should climb gradually from the Phase 2 cap toward normal velocity, not jump from half speed to match speed because one session went well. The 2025 framework describes progressive serve velocity increases toward 100% in the return-to-performance phase, along with more sport-specific work and simulated match play.[1]
| Performance task | Progression |
|---|---|
| Serve | Move from shadow serves to half-speed serves, then staged increases only if the shoulder, elbow, back, and legs tolerate the prior dose |
| Rallying | Start with cooperative rallying, then add depth, direction changes, and less predictable balls |
| Footwork | Progress from planned shuffles to split-step reactions, controlled decelerations, and short point patterns |
| Competition | Use practice sets or simulated games with rest intervals before entering a full match |
For a shoulder injury, this phase still includes external rotation and scapular work. For tennis elbow, eccentric loading usually continues while racket volume rises. For an ankle sprain, balance becomes reactive and lateral, not just static. For a knee strain, strengthening should support the actual positions you play from: split step, open stance, controlled lunge, and recovery step.
Advance, Hold, or Regress
A phase is tolerated only if the work is repeatable. One good session is information; two or three good sessions with no delayed reaction are stronger evidence. The next-day check matters as much as the workout itself.
| Decision | What must be true |
|---|---|
| Advance | Pain stays mild and settles quickly, no swelling returns, movement quality stays normal, and the same session can be repeated 24–48 hours later |
| Hold | Symptoms are present but not worsening, daily activities are normal, and the current dose feels close to the limit |
| Regress | Pain changes your mechanics, swelling returns, soreness lasts into the next session, or you lose confidence loading the joint |
| Get assessed | Sharp pain, unresolved swelling, instability, night pain, neurological symptoms, or no progress after two weeks in a phase |
The two-week rule is deliberately conservative. If you cannot progress after two weeks in a phase, you may be dealing with more than a simple mild-to-moderate strain or sprain. That is when a sports physical therapist or sports medicine clinician can check strength deficits, joint mobility, tendon irritability, technique factors, and whether the original diagnosis still fits.
A Simple Home Week Can Be Enough
You do not need a clinic full of equipment to make the plan coherent. A resistance band, a light dumbbell, a towel, a chair or wall, and a racket cover most home needs. What matters is that each exercise has a job.
| Day type | Home focus | Court focus |
|---|---|---|
| Mobility day | Gentle range of motion, stretching only if it improves comfort | None or very short shadow swings |
| Strength day | Body-part-specific loading: wrist eccentrics, band rotation, balance, bridges, step-ups | No court or very light planned drills |
| Tennis exposure day | Brief warm-up and the minimum strength work needed to prepare the injured area | Short, controlled hitting below the current volume cap |
| Recovery check day | Easy walking and mobility | No hitting; use symptoms to decide whether the last dose was earned |
If you are in Phase 1, the week may contain more recovery check days than training days. If you are in Phase 2, strength work should carry more of the load than match simulation. If you are in Phase 3, tennis exposure grows, but the home work does not disappear the first time you win a practice set.
The Controlled Return-to-Court Decision
The first real return is not a full match. It is a short session, then rest. Start with 10–15 minutes and give yourself two days before deciding what that session meant.[2] If the injury stays quiet, add a small amount of volume next time. If it reacts, the honest answer is not “I’m back anyway.” It is that the current phase still has work to do.
Before full competition, you should be able to complete simulated match play with rest intervals, build serve velocity gradually, and finish multiple sessions without swelling, sharp pain, limping, guarded strokes, or next-day regression. That is the point of the three-phase plan: not to slow down a healthy player, but to stop an almost-ready player from paying for one reckless afternoon.
References
- A systematic review on return to play programs in tennis players, PLoS One, 2025
- Returning to tennis post injury, Axis Sports Medicine
- 3 Exercises to Ease Shoulder Pain from Tennis, ProResults PT
- How Tennis Players Can Resolve and Prevent Ankle Sprains, Compleat Rehab
- Tennis Elbow Rehab, Healthline
- Tennis Shoulder Pain, Hinge Health
- Tennis: The 10 Best Exercises for Prehab and Rehabilitation, White House Clinic



Comments
Join the discussion with an anonymous comment.