
Can You Powerlift at Home in a Small Apartment?
Wondering whether squats, bench, and deadlifts can actually work in a small apartment? This guide breaks the big three into quiet, deposit-safe substitutes — floor press for bench, front or Zercher squats for back squat, crash-pad deadlifts — and shows how to program them into a weekly plan you can run without a rack or tolerant neighbors.
- Equipment tier required
- $300-800
- Duration
- 60-90 min
- Difficulty
- beginner
- Target area
- full body
- Space footprint needed
- compact clear floor for floor press, squat, and barbell setup
- Noise level
- low
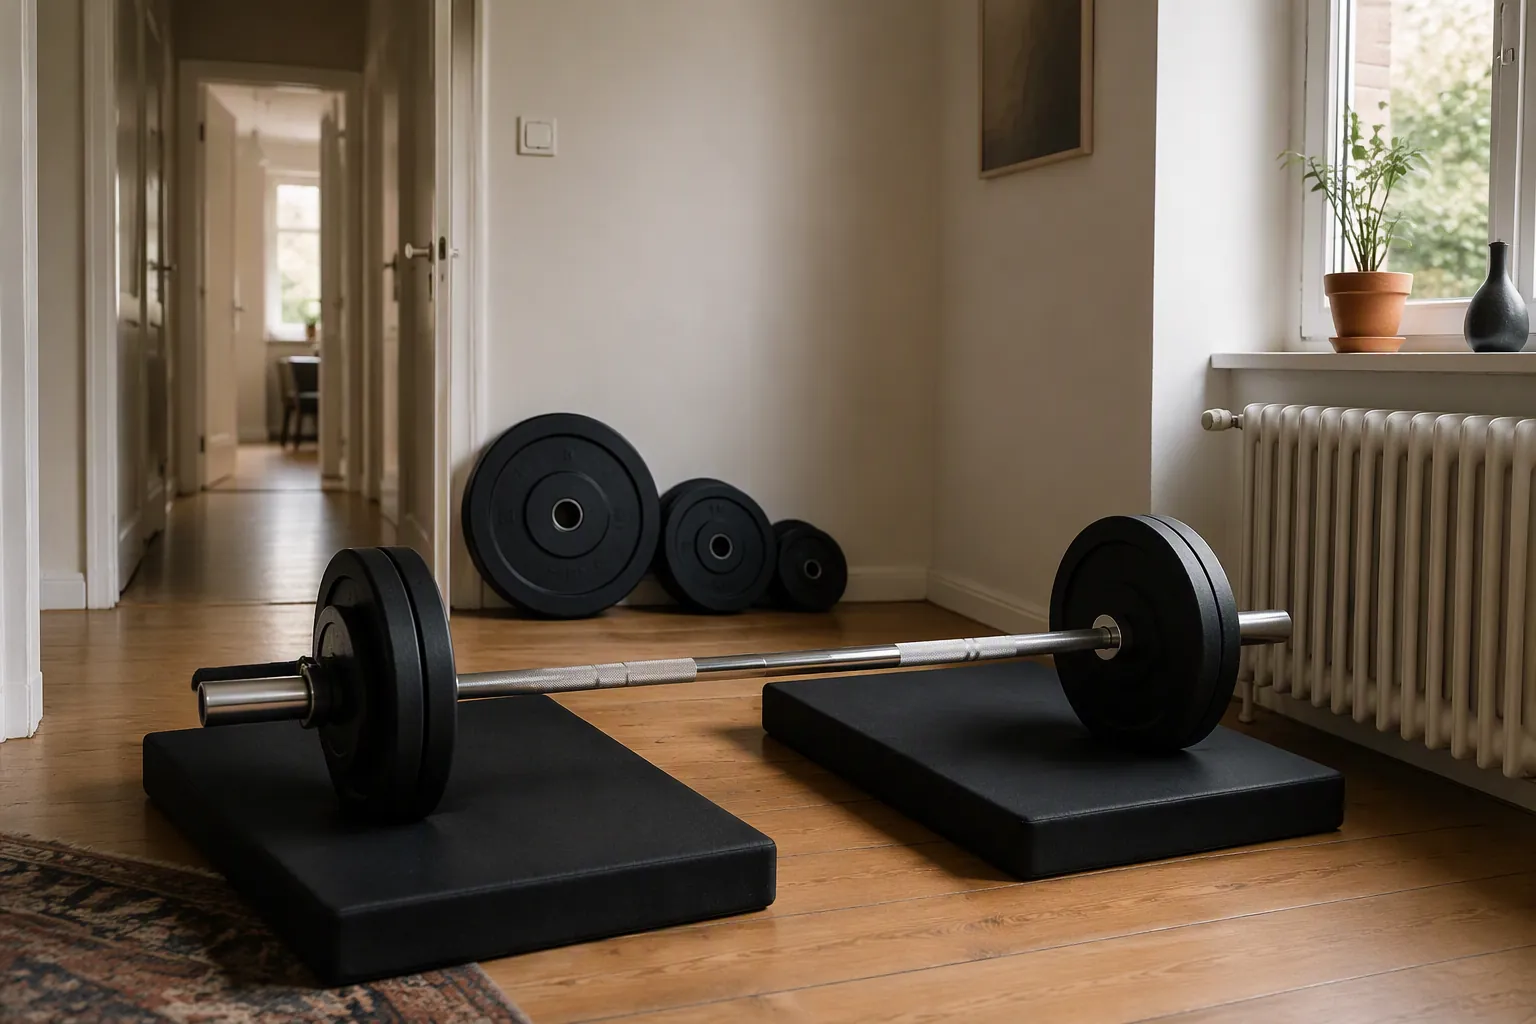
Yes, you can train the powerlifting patterns in a small apartment. The catch is that you cannot begin by asking where a full rack, flat bench, deadlift platform, and plate tree would go. That is garage-gym thinking dragged through a rental doorway. A useful powerlifting at home small apartment guide starts one step earlier: translate each lift into the version the room can tolerate, then buy only what that version requires.
That usually means floor press instead of bench press, front squats or Zercher squats instead of rack-walkout back squats, and deadlifts that are lowered onto pads instead of dropped onto the building. These are not cute substitutions for people who do not care about strength. They are the versions that stay loadable, repeatable, quiet enough, and less likely to make the floor look different at move-out.
| Competition lift | Apartment version | Problem it solves | Main tradeoff |
|---|---|---|---|
| Bench press | Barbell floor press | No bench, no rack, less fall distance if a rep goes wrong | Shorter range of motion; no normal bench arch or leg drive |
| Back squat | Front squat cleaned into position, or Zercher squat from the floor | No squat rack required; bar starts from the floor | Load is often limited by the clean, upper back, elbows, or bracing before the legs are fully maxed |
| Deadlift | Deadlift from crash pads, silencer pads, or low blocks with a controlled descent | Reduces impact noise and spreads contact at the floor | Pads can change start height; careless lowering still sends vibration through the structure |
Rack-free barbell training is not a theory exercise. Published no-rack barbell programming uses front squats, Zercher squats, deadlift variations, landmine work, and other barbell movements to load the lower and upper body without a cage or bench setup.[1] The question is not whether a barbell can be used in an apartment. The question is whether the setup survives the boring details: ceiling height, door swing, plate storage, downstairs impact, failed reps, and the lease.
Start with the lifts, not the rack
A small apartment setup can be brutally simple: a barbell, plates, collars, a mat layer, crash pads or silencer pads for pulling, and enough clear floor to lie down, squat, and set the bar down without clipping furniture. That is already a lot in a studio. If the bar has to rotate past a door frame, if plates have to be carried across hardwood at midnight, or if the only open space overlaps a neighbor’s bedroom below, the plan needs changing before the first warm-up set.
The rack becomes a later upgrade, not the entrance fee. A rack gives better back-squat practice and normal benching, but it also asks for ceiling clearance, walkout clearance, storage space, and a place for missed reps to go. In an apartment, those are not minor details. A lifter who can run floor press, Zercher squat, and quiet deadlift work for several months has better information than a lifter trying to justify a four-post cage before knowing how loud one loaded barbell sounds in that room.
Floor press: the bench pattern that does not need a bench
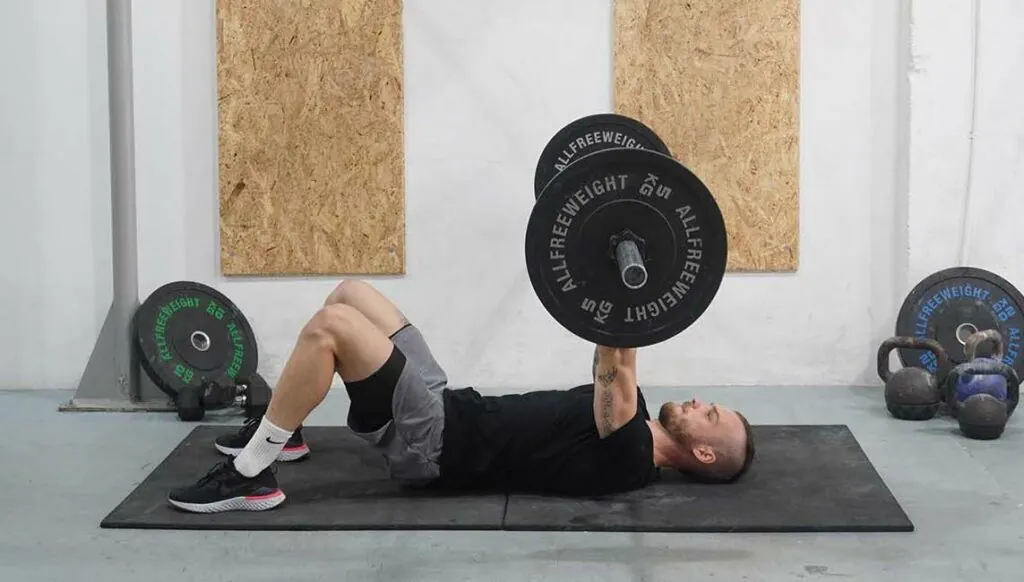
The floor press is the cleanest apartment answer to benching because it removes the two awkward pieces: the bench and the rack. The bar can be worked from the floor by bridging it into position, a method Bret Contreras has demonstrated specifically for lifters without a spotter or rack.[2] It is still a horizontal barbell press. It still loads the pecs, shoulders, and triceps. It just refuses to pretend your living room is a competition bench station.
Set it up conservatively. Put down a mat so your shoulders and elbows are not grinding into the floor. Load the bar with plates that roll predictably. Start with the bar over the hips or lower torso, bridge high, guide the bar into the pressing position over the shoulders, then lower the hips before beginning the set. Practice the setup with an empty bar and warm-up loads before treating it like a work set.
The floor will stop the elbows, so the bottom position is different from a bench press. That is not a defect; it is the boundary the room gives you. Pause each rep with the upper arm controlled against the floor, press without bouncing the elbows, and keep most sets one or two reps shy of failure. A true failed floor press without a rack is annoying at best and unsafe at worst, especially in a tight room where rolling the bar away is not guaranteed.
Program it as the main press, not as an afterthought. One heavy floor-press day can use sets of 3 to 6 reps at a controlled effort, followed by back-off sets of 5 to 8. A second weekly pressing slot can use a close-grip floor press, paused floor press, or push-up variation for 6 to 12 reps. If the setup is new, do not chase a one-rep max in week one. Earn the right to load it by making the unrack, descent, press, and exit boring.
Squatting without a rack: front squat first, Zercher when the clean is the limiter
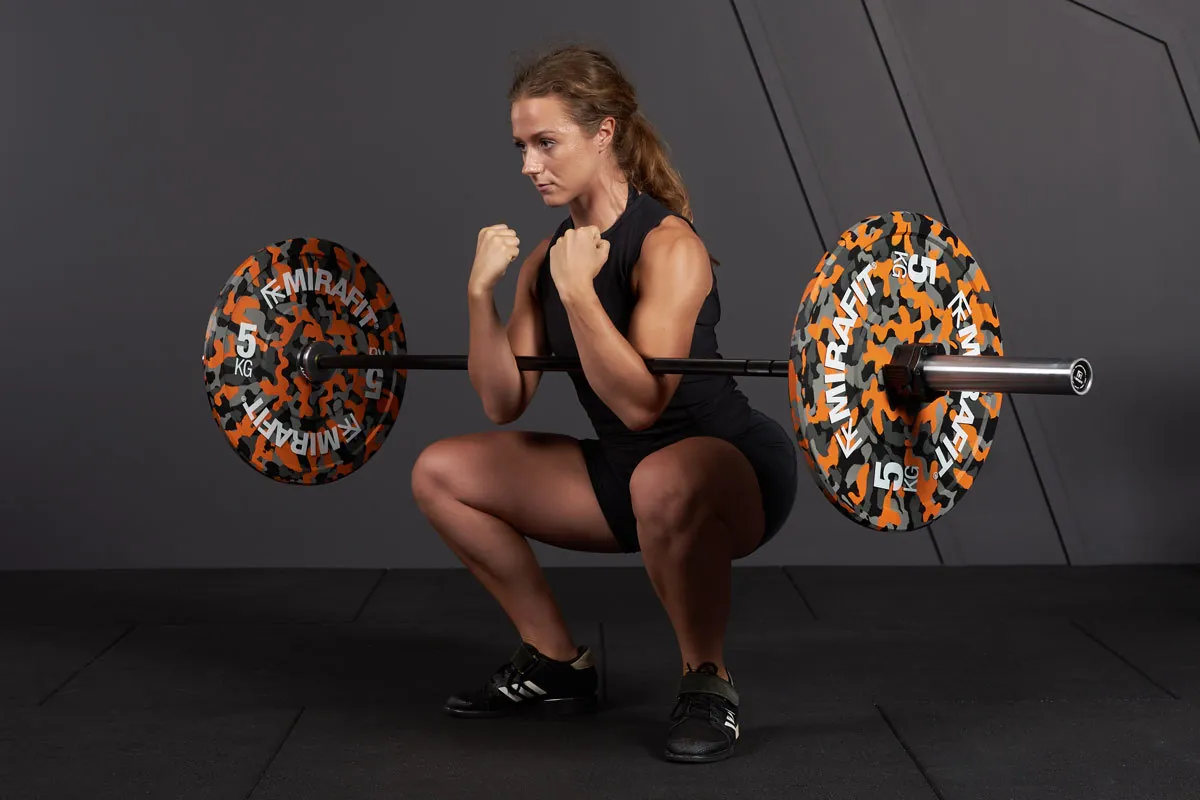
The back squat is the hardest lift to preserve without a rack because a heavy bar normally begins at shoulder height. In a small apartment, that usually means the squat pattern has to move to the front of the body. Front squats and Zercher squats are both used in rack-free barbell programming for exactly that reason.[1]
If you can clean the bar comfortably, the front squat is the cleaner first choice. The bar starts from the floor, comes to the shoulders, and stays in a strong upright squat pattern. The obvious ceiling is that your front-squat work weight may be capped by what you can clean into position, not what your legs could squat from a rack. In an apartment, that is still a useful cap. A lift you can start and finish quietly beats a theoretical back squat that requires furniture rearrangement and a prayer.
Use front squats for lower-rep strength practice if your clean is solid: sets of 2 to 5, with enough rest that the clean does not turn the squat into conditioning. If the clean is the bottleneck, keep the front squat lighter and use pauses, tempo descents, or higher-rep back-off work to create training stress without needing more plates on the bar.
The Zercher squat is less elegant and often more apartment-realistic. Deadlift the bar to the thighs, sit down enough to lap it, hook the bar into the crooks of the elbows, stand up, then squat. The bar path is compact, the setup does not require a clean, and the torso has to brace hard. The tradeoff is comfort and load tolerance. The elbows, biceps, and upper back may complain before the legs are done. A towel, hoodie, or bar pad can help, but it also changes the feel, so keep it consistent from week to week.
A practical squat week can use one main variant and one support variant. For example, run Zercher squats for 4 sets of 4 to 6 on the heavier day, then front squats, split squats, or Romanian deadlifts later in the week for moderate reps. If your goal is eventually to compete, a rack will matter later. If your goal is to keep the squat pattern strong in a rental, front-loaded squats are not a joke. They are the version that can actually be repeated in the room.
Deadlifts decide whether apartment powerlifting works
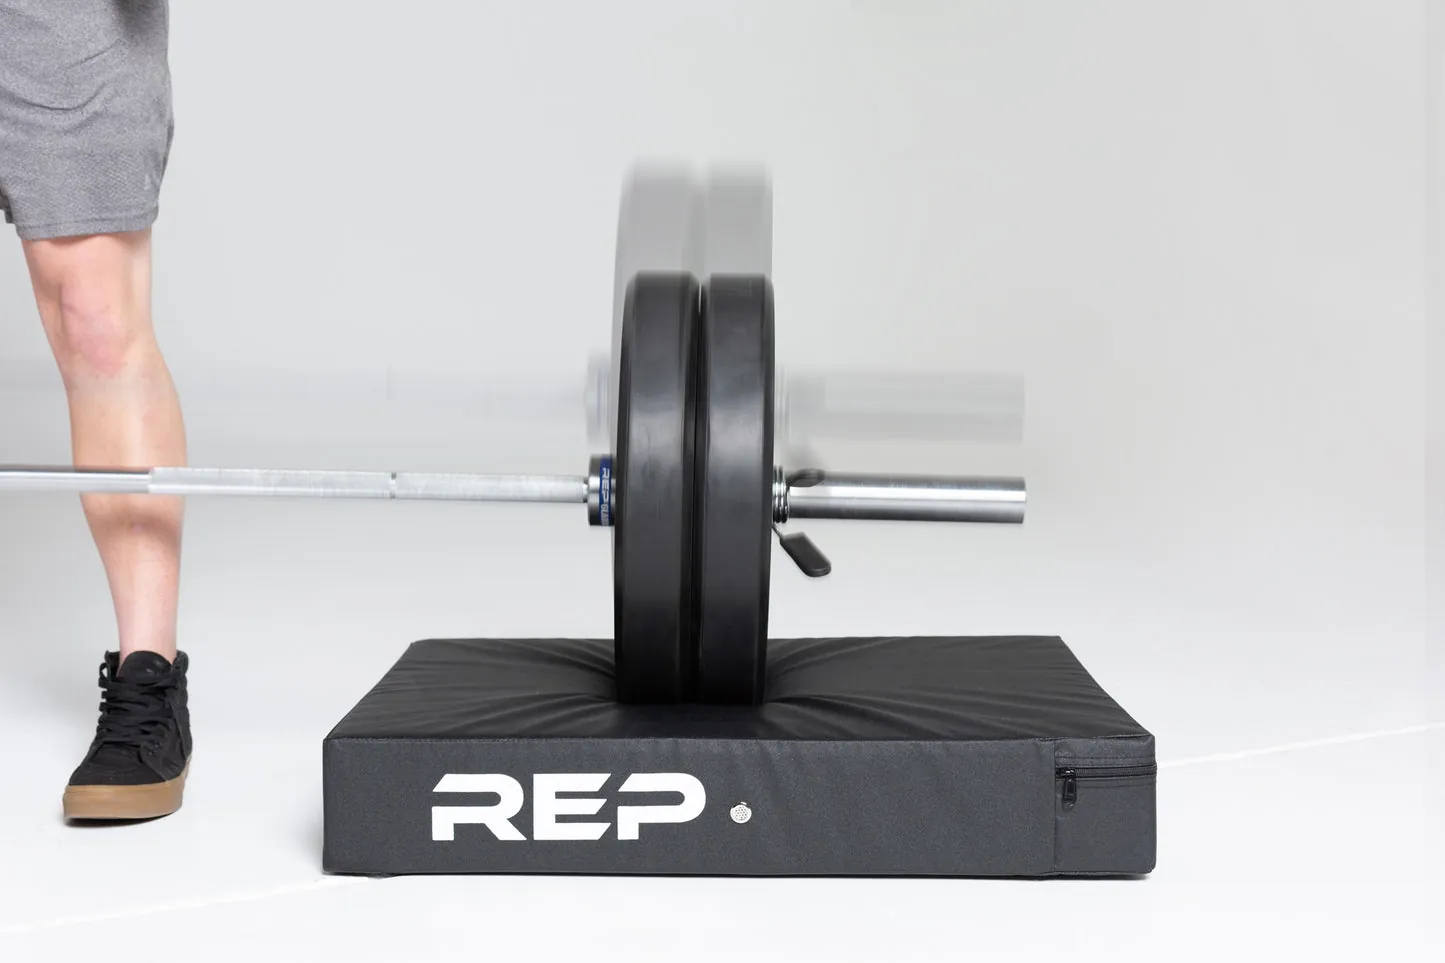
Pressing and squatting can be awkward in an apartment. Deadlifting can get you hated. The sound is not only airborne clang from plates; it is impact traveling into the structure. That is why the apartment deadlift rule is simple: the rep is not finished when the bar leaves the floor. It is finished when the bar returns to the pads under control.
There are useful field cases, but they need to be read with adult caution. Home Strength Toolbox describes a competitive 63 kg-class powerlifter deadlifting 400+ lb on a fifth-floor apartment for roughly two years with zero complaints, using silencer pads and controlled descents.[3] The same site also describes a portable DIY deadlift platform in a New York City studio: 8 ft by 30 in by 6 in, about 70 lb, built from 3/4-inch plywood, 2x4s, and silencer pads, and reported to survive a 500 lb deadlift with no neighbor complaints over two years.[4]
Those cases prove that heavy apartment pulling can be done under controlled conditions. They do not prove that every renter can drop heavy singles upstairs. The important details are not the big numbers; they are the pads, the controlled lowering, the platform, the long testing period, and the absence of complaints in those specific buildings.
Build the deadlift stack in layers
A survivable apartment deadlift station usually has several layers, not one magic mat. Start with a protective floor layer, add dense rubber or plywood to spread contact, then place crash pads or silencer pads where the plates land. Bumper plates or rubber-coated plates help reduce plate noise compared with bare iron, but they do not cancel the thud of weight meeting the building.
Manufacturer guidance from REP Fitness reports that thick rubber mats or panels can reduce impact sound by roughly 16 to 23 dB, and notes the common acoustics rule that a 10 dB reduction is perceived as about half as loud.[5] Treat that as useful direction, not a lease guarantee. The same bar can sound different on old hardwood, concrete, carpet-over-subfloor, or a joist bay that happens to sit above someone’s ceiling fan.
Strength Shop makes the distinction that matters in real rooms: platforms and rubber layers can turn the sharp crack of a deadlift into a duller thud, but they do not eliminate structural vibration.[6] That is why the descent matters as much as the equipment. A 2- to 3-second controlled lower is less glamorous than a dropped lockout. It is also the difference between training deadlifts and auditioning for a building-wide group chat.
Control the height change
Crash pads raise the plates. That can turn a normal deadlift into a block pull. This is not automatically bad, but it should be programmed honestly. If the pads raise the bar noticeably, call the main lift a padded block pull and use slower eccentrics, paused reps just below the knee, Romanian deadlifts, or lighter technique pulls from lower blocks when the room allows. Do not pretend a high-pad pull is the same test as pulling from the floor.
If you need closer-to-floor height, use lower-profile silencer pads, recessed platform sections, or dense side blocks that let the plates land softly without lifting the bar too far. Keep the setup symmetrical. A bar that lands on one soft pad and one compressed pad will roll, twist, and make every rep louder than it needs to be.
The quiet-pull protocol
- Clear the bar path and the plate landing zones. No chair legs, lamp cords, baseboards, or radiator pipes near the sleeves.
- Warm up with the same descent you plan to use on work sets. If 135 lb is already shaking the room, 405 lb will not become polite.
- Use submaximal working weights most of the time. Doubles, triples, and sets of 4 to 6 are easier to lower consistently than grinder singles.
- Lower every rep for about 2 to 3 seconds until the plates are fully settled on the pads.
- Stop a set when the descent gets loose, even if the pull up still looks strong.
- Test noise at the times you actually train. A Sunday afternoon pull and a 10 p.m. pull are different events for the person downstairs.
Horse stall mats are often recommended because they are durable and cheaper than many gym-specific tiles, but the odor matters in a small enclosed apartment. Home Strength Toolbox flags the off-gassing issue, which is easy to dismiss in a garage and much harder to ignore when the mat shares air with your bed, couch, and kitchen.[3]
Floor load is mostly a static-weight question until you drop the bar
The fear that a barbell will simply fall through an apartment floor is usually less useful than the quieter, more expensive fear: dents, cracked flooring, vibration complaints, and damage where the load concentrates. Two Rep Cave summarizes common U.S. residential design references as 30 psf for bedrooms, 40 psf for apartments, and 200 lb concentrated loads over 4 square inches, while also explaining that a 10 by 10 ft room at 30 psf corresponds to about 3,000 lb of uniform live load.[7]
Those numbers are context, not permission. Building age, joist direction, construction type, previous damage, and local code all matter. They also describe design loads, not the shock load from a barbell being dropped. A static setup spread across mats, plywood, or a platform is a different problem from plates striking the floor in the same two small spots over and over.
This is why the deadlift setup deserves more attention than the rack wish list. A rack, plates, and lifter may sit within a reasonable static-load range when the load is spread, but a dropped bar can create impact forces far beyond the simple weight on the bar. Two Rep Cave’s apartment-noise guidance makes the same practical point: the goal is reducing vibration and impact at the source, not just covering the floor with something that looks gym-like.[8]
A weekly plan that fits the room
You do not need a perfect home gym before you can run a serious week. You need a repeatable squat pattern, a repeatable press pattern, a pull you can lower quietly, and enough accessory work to keep progress moving when load is capped. Muscle & Strength’s published rack-free barbell template runs as a 4-day upper/lower plan over 8 weeks, with 60- to 90-minute sessions and movements such as sumo deadlifts, stiff-leg deadlifts, landmine work, front squats, and Zercher squats.[1] An apartment plan can borrow that logic without copying every exercise.
| Apartment tier | Assumption | Main lifts to run | What to avoid |
|---|---|---|---|
| Bare minimum | Barbell, plates, collars, mat, enough clear floor | Floor press, Zercher squat, Romanian deadlift, rows | Heavy dropped deadlifts, failed press attempts, max cleans in tight clearance |
| Deadlift-ready | Barbell, plates, mat layer, crash pads or silencer pads | Floor press, front or Zercher squat, padded deadlift or block pull | Treating pad-height pulls as meet-standard deadlifts |
| Rack-curious | Measured ceiling and walkout clearance, squat stands or no-bolt rack considered | Back squat and bench may return if safety arms, clearance, and noise are solved | Buying a full cage before measuring the room and neighbor tolerance |
Three-day apartment powerlifting template
| Day | Main work | Secondary work | Apartment note |
|---|---|---|---|
| Day 1 | Zercher squat or front squat: 3–5 sets of 3–6 | Floor press: 3–4 sets of 5–8; row variation | Best day for the heaviest squat because the bar does not repeatedly hit the floor |
| Day 2 | Floor press: 4–6 sets of 3–6 | Romanian deadlift: 3–4 sets of 6–10; split squat or lunge | Good option for lower-noise training if neighbors are home |
| Day 3 | Padded deadlift or block pull: 3–5 sets of 2–5 | Paused front squat or Zercher back-off work; upper-back work | Do this when you can control the descent and the building is least sensitive to noise |
The three-day plan is the safer default for a renter still learning the room. It gives each pattern a real slot without asking for loud pulling multiple times per week. Progress by adding a small amount of load when all work sets move cleanly and return quietly. If load jumps are too large because of limited plates, add a rep per set, add a pause, or slow the eccentric before buying more iron.
Four-day upper/lower version
| Day | Focus | Main lift | Support work |
|---|---|---|---|
| Day 1 | Lower heavy | Front squat or Zercher squat | Romanian deadlift, split squat, trunk bracing |
| Day 2 | Upper heavy | Floor press | Barbell row, overhead press if ceiling allows, push-ups |
| Day 3 | Lower pull | Padded deadlift or block pull | Paused squat variation, hip hinge accessory |
| Day 4 | Upper volume | Close-grip or paused floor press | Rows, rear-delt work, curls or triceps work if equipment allows |
Four days only makes sense if setup and teardown do not become their own workout. If every session requires moving a coffee table, rolling mats out from behind a bed, and carrying plates through a hallway, the extra day may be the reason the plan dies. In that case, keep the three-day version and use short quiet accessories on off days.
For renters starting from almost nothing, a quiet bodyweight phase can still be useful while the barbell setup is being tested. A no-equipment quiet routine like this boxing workout at home or other apartment-friendly conditioning work can fill non-lifting days without adding more floor impact. If the problem is shoe noise, floor protection, or how training sounds in a real room, the site’s apartment training shoe test is more relevant than most generic home-gym shopping advice.
When a rack starts to make sense
A rack is worth considering only after the adapted lifts are no longer the main limitation. Before buying one, measure ceiling height, rack height, pull-up bar clearance if present, the path of the bar during setup, and the space needed for safety arms or spotter arms. Apartment rack guides consistently stress measuring ceiling and folded-out clearance before purchase, because the problem is often not only whether the rack fits while standing still.[9]
No-bolt racks, squat stands, and compact rack options are the apartment middle ground. Bells of Steel’s apartment gym guidance and squat-rack guidance both frame these as more realistic options than assuming a full garage-style installation in a rental.[10][11] Even then, the rack only solves the start position for squats and benching. It does not solve deadlift impact, plate storage, neighbor tolerance, or the consequences of loading too aggressively over delicate flooring.
The decision boundary is simple enough. If you can floor press safely, squat from the floor with a front or Zercher variation, and deadlift onto pads with a controlled descent, you can start apartment powerlifting now. If those lifts are progressing and the room is behaving, then measure for stands or a no-bolt rack. The rack is not the beginning of powerlifting in a small apartment. Matching the movement to the room is.
References
- 4 Day Barbell Only Workout (No Rack Required) — Muscle & Strength
- How to Floor Press Without a Spotter or Rack — Bret Contreras
- Can You Build a Home Gym Upstairs (House Or Apartment)? — Home Strength Toolbox
- Building a Portable DIY Deadlift Platform: Apartment Home Gym — Home Strength Toolbox
- The Quiet Home Gym — REP Fitness
- Deadlifts at Home — Strength Shop
- A Home Gym Upstairs: How to Not Break the Floor — Two Rep Cave
- How to Work Out in an Apartment Without Making a Racket — Two Rep Cave
- Weightlifting in an Apartment — The Ultimate Guide — Fitness Drum
- Can I Have a Home Gym in an Apartment? — Bells of Steel
- Can I Put a Squat Rack in My Apartment? — Bells of Steel
What a small equipment investment adds
Tour a Small Apartment Home Gym at $100, $300, and $800
Three real apartment gym setups at $100, $300, and $800 with itemized costs, measured decibel ratings, floor-protection methods, and honest notes on what each tier can and cannot do — so you can choose the right entry point without risking your deposit or your neighbor's patience.
How often should you repeat this?
See our recovery and rest reference for citation-anchored rest-interval guidance.
Spot something off?
Tell us if a movement, tier assumption, or duration didn't match your experience.