
Athlete's Guide to Knee Rehab Exercises at Home
A phased home knee rehab protocol for athletes that progresses from early isometric activation through strength and plyometric loading to return-to-sport readiness, with concrete readiness tests for each phase.
- Equipment tier required
- none
- Duration
- 30 min
- Difficulty
- beginner
- Target area
- legs
- Noise level
- low
If you have been cleared to do knee rehab at home as an athlete, the real question is not “Which ten moves should I do?” It is: what does the knee need today, and what has it proven before you ask for more?
This plan is for athletes already cleared for home rehab after a knee injury, knee pain episode, or surgery with an assigned protocol. It is not for an undiagnosed acute injury, a knee that gives way, rapid swelling, locking, sharp pain, new numbness, fever, wound concerns, or a surgical knee without clinician instructions. If your surgeon or physical therapist gave you a more specific plan, that plan wins.
The need for structure is not theoretical. ACL injury rates among high school athletes increased 25.9% over 15 years in an analysis of High School RIO surveillance data reported through the National ACL Injury Coalition and Hospital for Special Surgery, with a rate of 7.3 injuries per 100,000 athlete exposures [1]. That does not mean every sore knee is an ACL problem. It does mean a lot of athletes are trying to bridge the space between clinic instructions and the living-room floor.
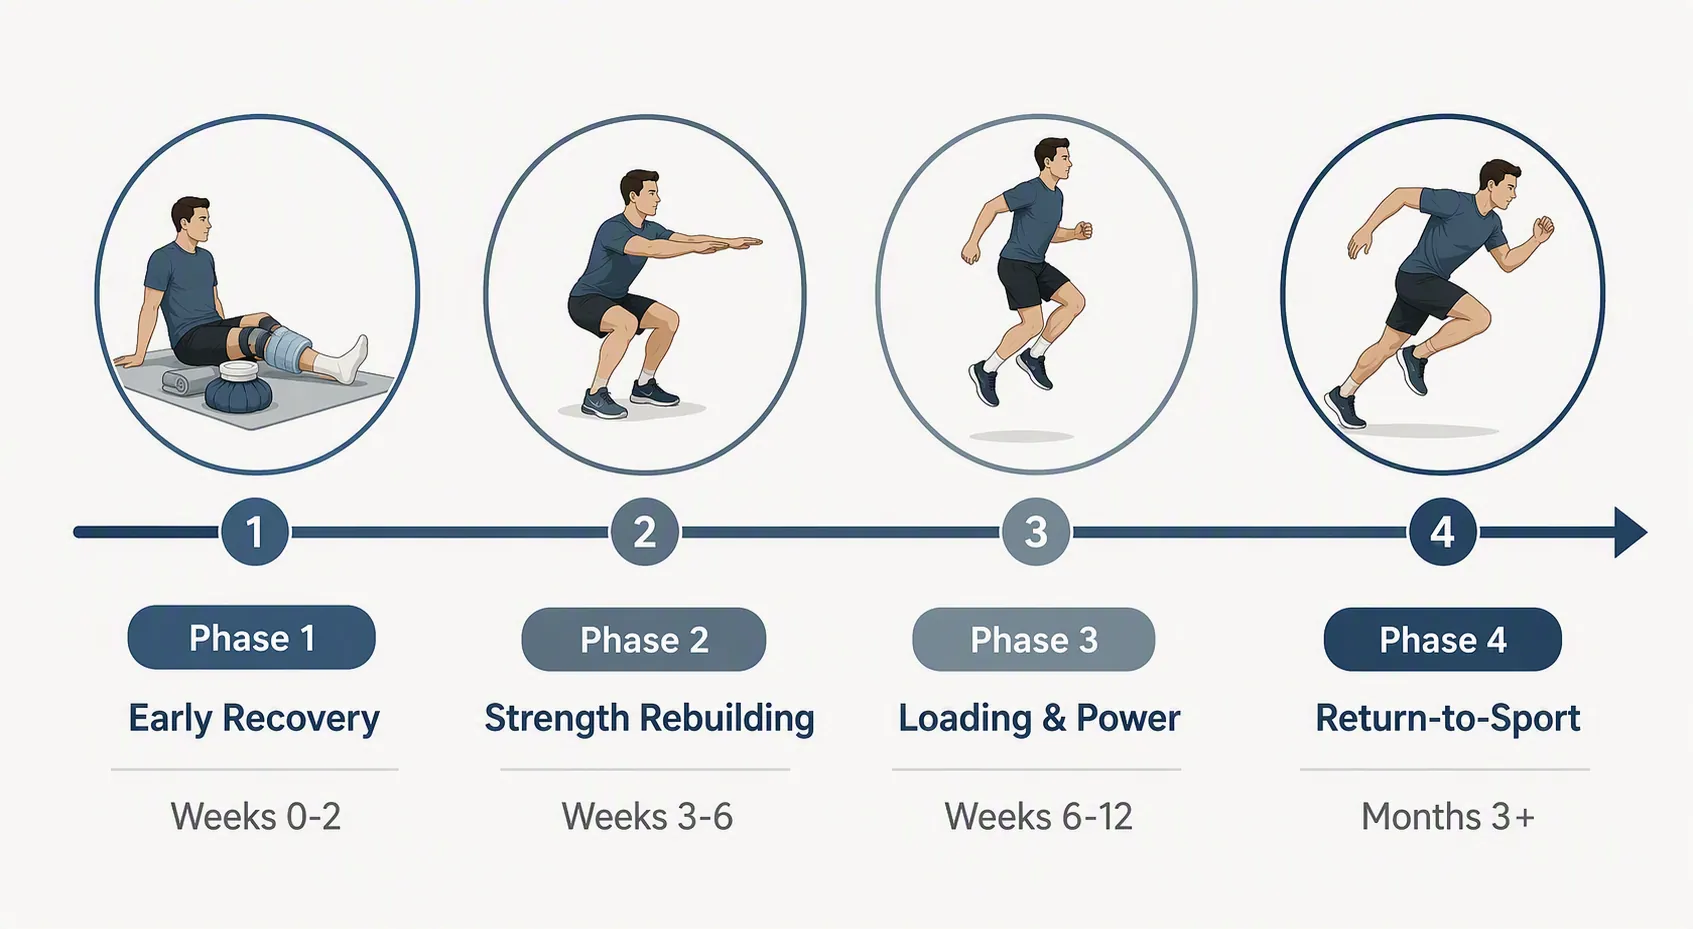
| Phase | Typical timing | Main job | Advance when |
|---|---|---|---|
| 1. Early recovery | Weeks 0–2, or until symptoms settle | Restore motion, wake up the quadriceps, tolerate gentle loading | Pain stays low, swelling is controlled, gait and basic activation improve |
| 2. Strength rebuilding | Weeks 3–6, often longer | Build closed-chain strength and control without impact | Squat, step, calf, and hamstring work stay controlled and pain does not spike |
| 3. Loading and power | Weeks 6–12, readiness-based | Introduce faster loading, landing prep, and eventually hopping | You meet pain and calf-raise gates before hop progressions |
| 4. Return-to-sport readiness | Months 3+, often later | Prove running, landing, cutting, and sport-specific tolerance | Sport demands are exposed gradually and clinician clearance aligns |
Home rehab can be legitimate when the plan is appropriate and the athlete is actually following it. A 2024 systematic review in knee osteoarthritis found home-based exercise programs were as effective as center-based programs for short-term pain reduction, physical function, and lower-limb strength [2]. That finding should be used carefully: knee osteoarthritis is not the same as an ACL reconstruction, meniscus repair, cartilage procedure, patellar dislocation, or acute ligament sprain. The useful takeaway is narrower but still important: home-based work can produce meaningful outcomes when the exercises, dosage, and progression rules are clear.
The two rules that control the whole plan
First, symptoms decide the day’s ceiling. Rathleff and colleagues reported an 86% success rate in adolescent athletes with patellofemoral pain using symptom-guided activity modification that kept pain at 2 out of 10 or less during rehab [3]. That does not prove the same success rate for every knee condition, but the pain rule is useful at home because it gives you a brake before you drift into guessing.
- During exercise: pain should stay at 0–2/10 unless your clinician gave a different limit.
- After exercise: the knee should not swell, feel unstable, or become more painful later that day or the next morning.
- Progression: a good day earns one small increase, not a jump from squats to hops.
- Regression: swelling, limping, sharp pain, or giving way means you reduce load and contact your clinician if it does not settle.
Second, each phase has a job. Early rehab is not supposed to feel athletic. Strength rebuilding should feel repetitive. Power work should arrive only after the knee has earned faster force. Return-to-sport work is not a calendar celebration; it is a test of whether the knee can handle the actual demands of your sport.
Phase 1: early recovery without poking the bear
In the first phase, the target is boring on purpose: calm symptoms, restore usable range of motion, and get the quadriceps working again. Athletes often overdo this phase because the exercises look too simple. The knee is not impressed by how simple an exercise looks; it responds to how much stress it is actually receiving.
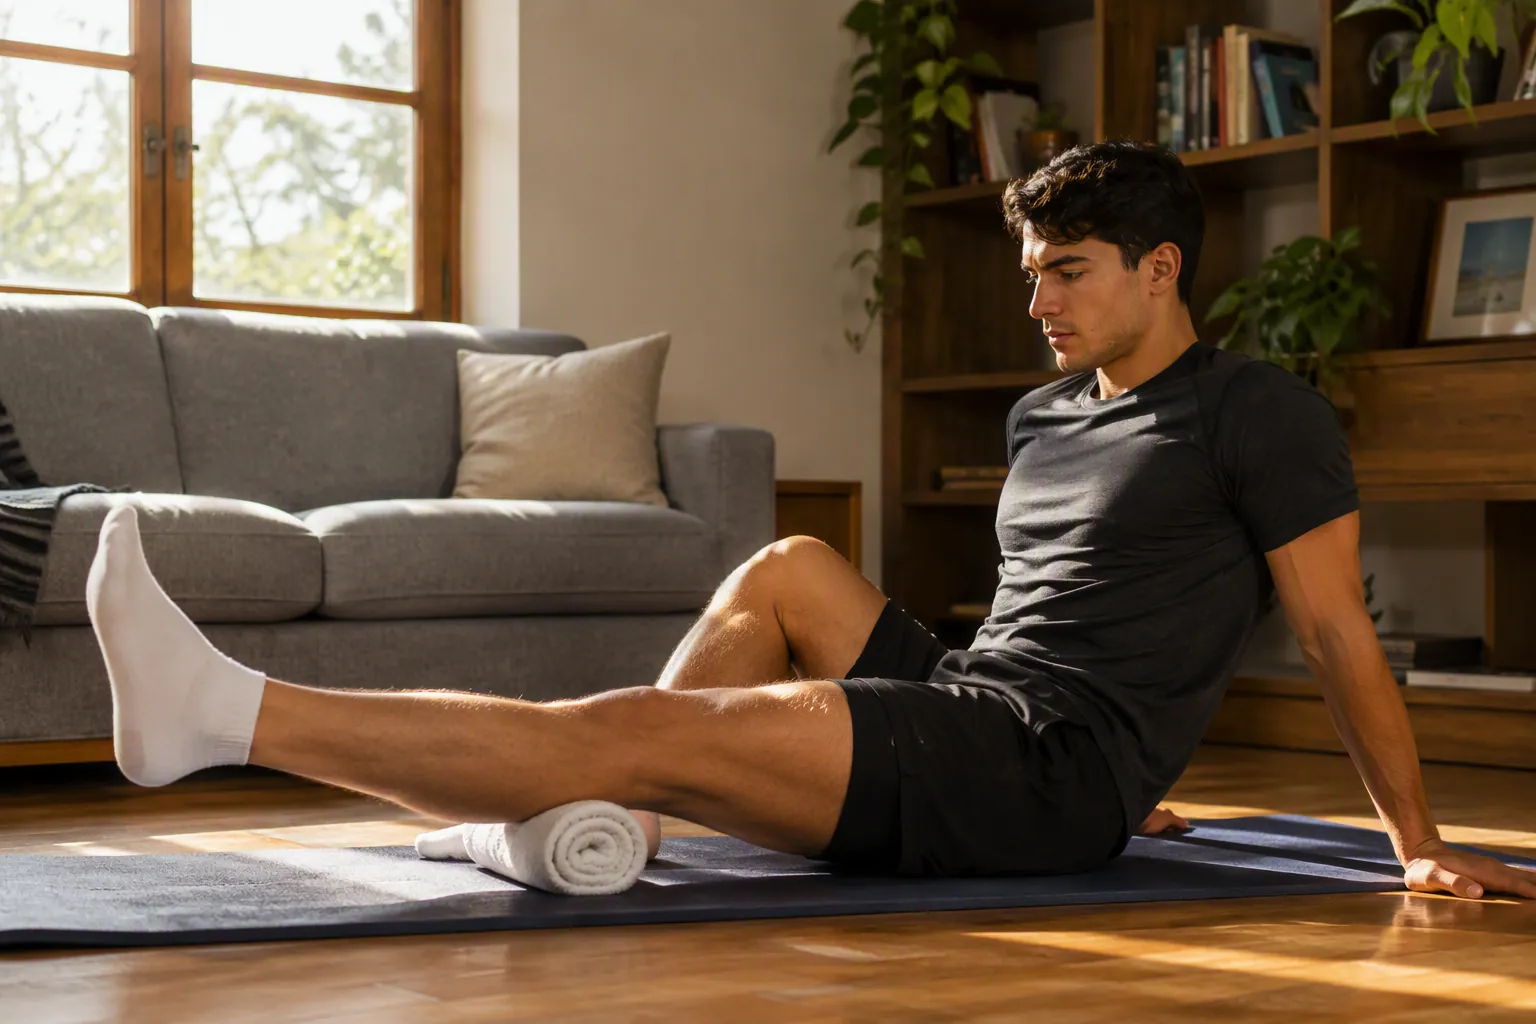
Exercises to start with
- Quad sets: lie or sit with the leg straight, tighten the front of the thigh, hold briefly, then relax. The kneecap should glide upward without the hip doing the work.
- Straight leg raises: tighten the quad first, keep the knee straight, lift slowly, and stop if the knee lags or pain climbs.
- Heel slides: bend and straighten the knee within a comfortable range. Do not yank for extra motion.
- Short-arc knee extensions: place a rolled towel under the knee and straighten the leg through a small range if this is allowed in your protocol.
- Pain-free isometric holds: gentle wall sit holds, terminal knee extension holds with a band, or quad squeezes can work if the knee tolerates them.
- Calf and heel-cord stretching: keep it mild, especially if swelling or guarding is present.
For athletes with anterior knee pain, Theisen and colleagues recommend early strengthening ranges that reduce patellofemoral joint stress: short-arc closed-chain work from 0° to 45° and open-chain work from 90° to 45° [4]. In plain language, that means shallow, controlled ranges usually make more sense early than deep squats, deep lunges, or heavy knee extensions through the most irritating angles.
| Exercise type | Home dosage style | Stop or reduce if |
|---|---|---|
| Quad sets | 2–4 short sets spread through the day | Pain increases, the thigh cramps hard, or swelling rises |
| Straight leg raises | 2–3 sets of smooth reps | The knee bends during the lift or the hip flexor takes over |
| Heel slides | Gentle repetitions, not forced stretching | The knee feels pinched, blocked, or sharply painful |
| Short-arc extensions | Small range, slow tempo | Front-of-knee pain climbs above the agreed limit |
| Isometric holds | Short holds at easy-to-moderate effort | Pain lingers after the set or the knee feels more swollen |
The AAOS Knee Conditioning Program includes home-friendly exercises such as heel cord stretches, half squats, hamstring curls, calf raises, leg extensions, and straight leg raises, with progression possible through ankle weights [5]. In Phase 1, use that menu conservatively. A straight leg raise done cleanly is more useful than a sloppy set of twenty done because the list said so.
Move toward Phase 2 when you can walk your normal household distances without a protective limp, activate the quad on command, bend and straighten the knee through your current allowed range, and finish a light session without next-day swelling or a pain jump. If you need a simpler starting point before this athlete-specific plan, use a basic list of no-equipment knee rehab exercises rather than forcing the later phases early.
Phase 2: rebuild strength before you chase athletic movement
This is where many athletes split in two bad directions. One group stays with gentle mat work for too long because it feels safe. The other group adds running because walking feels fine. Phase 2 is the middle ground: closed-chain strength, single-leg control, and enough repetition to make the knee trustworthy under bodyweight.
Closed-chain means the foot is planted while the hip, knee, and ankle share the load. For most athletes at home, this starts with shallow squats, sit-to-stands, step-ups, controlled step-downs, calf raises, hamstring curls, bridges, and banded terminal knee extensions if a band is available.
| Exercise | How to perform it at home | Control standard |
|---|---|---|
| Half squat | Feet about hip-width, squat only as deep as symptoms allow, then stand tall | Knees track over the middle toes; no collapse inward |
| Sit-to-stand | Stand from a chair without using the hands, then sit down slowly | Weight stays even unless your clinician wants a specific bias |
| Step-up | Use a sturdy low step, drive through the full foot, and control the lowering | No push-off from the trailing leg to fake strength |
| Step-down | Lower the non-working heel toward the floor from a low step | Pelvis stays level; knee does not dive inward |
| Standing hamstring curl | Bend the knee to bring the heel toward the glute, using ankle weight only if tolerated | No hip hiking or trunk swinging |
| Double-leg calf raise | Rise onto the balls of both feet, pause, and lower slowly | Equal pressure through both feet |
| Bridge | Lift hips from the floor while keeping ribs down and feet planted | Hamstrings and glutes work without knee pain |
A good Phase 2 session does not need much equipment. A mat makes floor work less annoying. A sturdy step changes the program more than a fancy machine because it exposes how the knee behaves when the body moves over the foot. Bands and ankle weights can help later, but only if they improve the dose instead of hiding poor control.
A practical Phase 2 session
- Warm up with easy walking, stationary marching, or gentle cycling if available.
- Do quad activation: quad sets or terminal knee extensions for a few controlled sets.
- Train the squat pattern: sit-to-stands or half squats.
- Train step strength: low step-ups first, then step-downs when control is clean.
- Add posterior-chain work: bridges and standing hamstring curls.
- Finish with calf raises and light mobility.
Use two to four sessions per week depending on symptoms, your sport, and your clinician’s plan. The first variable to increase is usually quality volume: cleaner reps, more even loading, a slightly slower lowering phase, or one more set. Depth, speed, external load, and single-leg demand come later.
Do not let the stronger leg do charity work forever. If every squat shifts away from the injured side, reduce the depth or use a chair target. If every step-down caves inward, lower the step. If calf raises look easy but the injured side is barely contributing, put a hand on the wall for balance and slow the lowering until both legs are honest.
Move toward Phase 3 when you can complete closed-chain strength work with pain at or below 2/10, no next-day swelling increase, no limp, and no obvious loss of knee control during squats and step work. For ACL-specific, meniscus-specific, or cartilage-specific restrictions, do not assume this general progression fits; use ACL recovery guidance, a meniscus recovery timeline, or cartilage rehab exercises that match the tissue involved.
Phase 3: loading and power, with a real gate before hopping
Impact is not one exercise. It is a series of increasingly fast contacts with the floor. Athletes get into trouble when they treat the first hop as proof that the knee is ready for all jumping, sprinting, and cutting. A single pain-free hop in the hallway is not the same as repeated sport loading under fatigue.
Before hopping progressions, the E3 Rehab return-to-sport framework recommends that athletes be able to perform 20–25 double-leg heel raises without pain [6]. That is a modest-looking test, but it matters. If the ankle-calf system cannot absorb and produce force repeatedly, the knee often pays for the missing capacity when impact arrives.
| Gate before impact | Pass standard |
|---|---|
| Pain | 0–2/10 during the session and no symptom spike afterward |
| Swelling | No new or increasing swelling later that day or the next morning |
| Gait | No limp during normal walking |
| Strength control | Squats, step-ups, and step-downs stay aligned and controlled |
| Calf capacity | 20–25 pain-free double-leg heel raises |
| Clinician restrictions | No unresolved surgical or tissue-specific limits that block impact |
How to introduce impact
Start with landing before you chase height. The knee needs to learn how to accept force quietly: foot tripod on the floor, knee tracking over the toes, hip controlling the line, trunk not folding or rotating to escape the load.
- Fast calf raises: rise and lower with more snap while staying pain-free.
- Mini squat to calf raise: move from a shallow squat into a controlled rise onto the toes.
- Snap-downs: start tall, drop into a shallow athletic stance, and freeze the landing position.
- Low pogo contacts: small, two-leg, low-amplitude bounces if the gate is passed.
- Two-leg line hops: forward-back or side-to-side over a line, low height, short sets.
- Single-leg landing prep: only when double-leg impact is quiet, controlled, and symptom-free.
- Single-leg hops: short, planned, low-volume contacts before any reactive or sport-like hopping.
Keep early impact sets short. The first win is not exhaustion; it is repeatability. If the first three reps look clean and the next seven get loud, stiff, twisted, or protective, you learned your current dose. Cut the set there next time and build from the dose you can actually own.
Running should follow the same logic. Start with walk-jog intervals only when walking, strength work, and low-level impact are tolerated. Increase one variable at a time: total time, running interval length, speed, slope, or surface. Do not add hills, sprints, and cutting in the same week just because the first jog felt fine.
If you live above neighbors or need quieter options, use apartment-friendly modifications from knee surgery recovery workouts for renters instead of skipping the loading phase entirely. Quiet does not have to mean unloaded.
Phase 4: return-to-sport readiness is more than feeling good
By the time an athlete reaches the late stage, daily life may feel normal. That is useful, but it is not the same as sport readiness. Sport asks for landing, acceleration, deceleration, rotation, contact, fatigue, attention shifts, and bad positions you did not plan. A knee that feels fine on stairs has not automatically proven it can handle a defender closing space or a trail descent on tired legs.
The E3 Rehab framework places landing and jumping progressions, high-speed linear running, and change-of-direction drills in the late return-to-sport stage before clearance [6]. That sequence matters because each demand tests something different. Linear speed does not prove cutting readiness. Good squat strength does not prove landing readiness. A few casual jump shots do not prove repeated game-speed tolerance.
| Sport demand | Home or field progression | What you are watching |
|---|---|---|
| Landing | Drop to stick, two-leg landing, single-leg landing, repeated landing | Quiet contact, knee alignment, no protective shift |
| Jumping | Low vertical jumps, broad jumps, repeated jumps, sport-specific jumps | Symmetry, control under fatigue, no next-day swelling |
| Linear running | Walk-jog, steady run, strides, faster intervals, high-speed exposures | No limp, no braking asymmetry, no pain climb |
| Deceleration | Run to controlled stop, faster stop, stop into backpedal | Knee and hip absorb force instead of collapsing |
| Change of direction | Planned cuts, sharper angles, reactive cuts, sport-specific patterns | Body control when attention shifts |
| Sport exposure | Individual drills, non-contact practice, controlled contact, full practice | Tolerance to volume, speed, and decision-making |
This phase should look less like a living-room workout and more like a controlled re-entry into the sport environment. A basketball athlete needs deceleration, lateral shuffles, closeouts, jumps, and repeated landings. A soccer player needs acceleration, cutting, striking, and reactive changes of direction. A runner needs progressive volume, terrain, pace changes, and downhill tolerance if those are part of the goal. The knee does not need a motivational speech; it needs exposure to the demands it will actually face.
Athletes whose main issue is ongoing pain rather than return-to-sport progression may need a lower-impact training block instead of pushing Phase 4. In that case, use a low-impact workout for knee pain while you sort out load tolerance with your clinician.
Return-to-sport readiness checklist
Use this checklist as a conversation tool with your clinician, not as permission to clear yourself. The calendar is secondary to symptoms and performance.
- You can complete your current strength sessions with pain at or below 2/10 and no next-day swelling increase.
- You can squat, step up, and step down without the knee collapsing inward, the hip shifting away, or the foot losing control.
- You can perform 20–25 double-leg heel raises without pain before starting or progressing hopping work.
- You have progressed from low-level two-leg impact to controlled single-leg landing or hopping only when the previous level stayed quiet.
- You have rebuilt linear running gradually, including faster running if your sport requires it.
- You have practiced deceleration and change-of-direction drills before returning to cutting sports.
- You have tolerated sport-specific drills at increasing speed and volume without swelling, instability, or compensatory movement.
- Your clinician’s protocol, surgical restrictions, or return-to-play testing does not conflict with the next step.
A good rehab day is useful data, not a free pass. Advance when the knee has shown tolerance repeatedly. Hold or step back when symptoms say the tissue has not earned the next demand. If your clinician’s instructions conflict with this general home plan, follow the clinician’s protocol.
References
- ACL Injuries in High School Sports Increased 26% Over Past 15 Years, Project Play / Aspen Institute, 2023.
- Home-based exercise therapy versus center-based exercise therapy for knee osteoarthritis: a systematic review and meta-analysis, Frontiers in Public Health, 2024.
- Activity Modification and Load Management of Adolescents With Patellofemoral Pain: A Prospective Intervention Study, PubMed, 2019.
- Optimizing Rehabilitation and Return to Sport in Athletes With Anterior Knee Pain Using a Biomechanical Perspective, Arthroscopy, Sports Medicine, and Rehabilitation, 2022.
- Knee Conditioning Program, AAOS OrthoInfo.
- Return to Sport Rehab, E3 Rehab.
What a small equipment investment adds
We don't have a build tagged to this exact tier yet. Browse all builds.
How often should you repeat this?
See our recovery and rest reference for citation-anchored rest-interval guidance.
Spot something off?
Tell us if a movement, tier assumption, or duration didn't match your experience.