
If you came here because something hurts after golf, start with the body part that hurts. A sore low back, a sharp wrist, and an angry elbow do not need the same recovery exercise list. Golf injuries cluster heavily enough in a few places that a body-part approach is more useful than another generic “best stretches for golfers” routine.
The distribution is not perfectly identical across every study, but the pattern is hard to miss. The AAOS notes that low back injuries can account for up to 34% of golf injuries, while a 2024 Portugal study reported lumbar injuries at 27% and wrist injuries at 22% among golf athletes.[1][2] In a 2023 study of Korean amateur golfers, wrist injuries were also reported at about 22%, and lateral elbow pain was three times more common than medial elbow pain.[3] Those numbers are why this guide spends more time on the low back, wrist, and elbow than on the shoulder and knee.
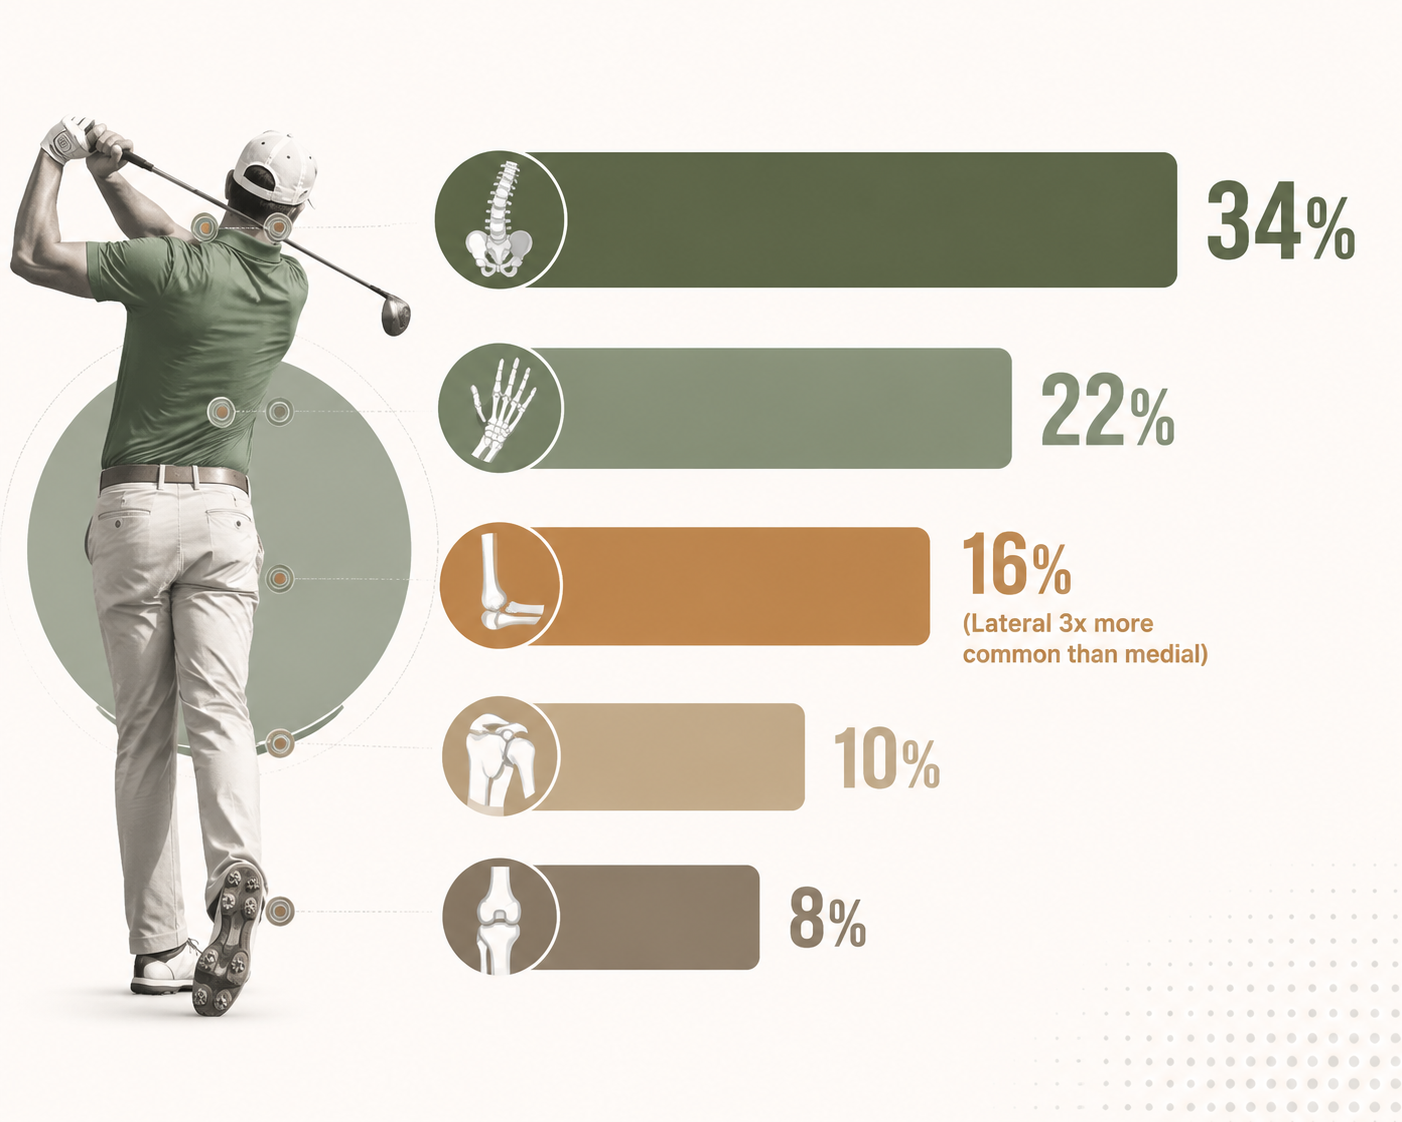
There is one more uncomfortable detail: plenty of golfers are already treating themselves. In Moon and Kim’s sample of 208 Korean amateur golfers, only about 30% of injured golfers did preventive exercise, and 60 of 133 injured golfers self-treated without professional input.[3] Robinson and colleagues found a higher prevention-exercise rate in a different amateur cohort — 44.5% of 910 golfers — which is a useful reminder that behavior changes by population and setting.[4] Either way, the weekend golfer with a nagging ache is often trying to make a decision at home before a clinician ever sees the injury.
| Where it hurts | Why it matters in golf | Home recovery emphasis |
|---|---|---|
| Low back | Most consistently prominent injury area; high lumbar loading during the swing | Core endurance, glute support, gentle spinal mobility |
| Wrist | Common injury site, especially with impact, turf contact, and gripping demands | Controlled wrist flexion, extension, eccentric lowering, grip tolerance |
| Elbow | Lateral elbow symptoms appear much more often than medial symptoms in golfers | Forearm tendon loading, isometric holds, gradual grip work |
| Shoulder | Important for rotation and club control, but less central in the available injury distribution | External rotation, scapular control, thoracic mobility |
| Knee | Often linked to rotation, balance, and load transfer rather than one simple stretch | Hip strength, single-leg balance, glute support |
Low Back: Build Endurance Before You Chase Mobility
Low back pain gets the first and longest look because golf gives the lumbar spine a rough job: rotate, brace, side-bend, and absorb force while the player is trying to move fast. The AAOS and golf medicine sources describe lumbar compressive forces during the swing reaching up to eight times body weight.[1] That does not mean every sore back is damaged, but it does explain why the usual “just stretch your hamstrings” answer feels too thin.
For home recovery, the first target is usually not a heroic range of motion. It is the ability to keep the trunk steady while the hips and shoulders move. That is why the most useful starting exercises are boring in the best possible way: bird dog, glute bridge, side plank, and cat-cow.

A Simple Low-Back Recovery Block
- Bird dog: Start on hands and knees. Reach the opposite arm and leg long without twisting the trunk. Hold briefly, return, and alternate sides. Keep the movement small enough that your low back does not sag.
- Glute bridge: Lie on your back with knees bent. Push through the heels and lift the hips until your torso and thighs form a straight line. Pause at the top rather than rushing through reps.
- Side plank: Begin from the knees if needed. Hold a straight line from shoulder to hip to knee or foot. Stop before the low back pinches or the hips roll backward.
- Cat-cow: Move slowly between gentle spinal flexion and extension. Treat this as a motion drill, not a stretch contest.
A reasonable home starting point is one to three rounds, using short, clean sets rather than fatigue sets. For example, a golfer might do 6 to 8 bird dogs per side, 8 to 12 glute bridges, 10 to 20 seconds per side plank, and 6 to 10 slow cat-cow reps. Those are not magic numbers. They are a way to keep the first session honest enough that the back can answer the next morning.
The bird dog teaches the trunk to resist rotation while a limb moves. The glute bridge brings the hips back into the job instead of asking the low back to do everything. The side plank builds lateral trunk endurance, which matters when the swing pulls the body around and over. Cat-cow is there to keep the spine moving gently, not to “crack” the back into place.
Use pain and function as the limit. Mild muscular effort is acceptable; sharp pain, symptoms traveling down the leg, numbness, weakness, night pain, fever, or pain after a fall are not home-exercise problems. If the back feels worse with every session, the exercise selection may be wrong, the dose may be too high, or the issue may need a professional exam.
Wrist: Match the Exercise to the Side That Complains
Wrist pain in golf is often where generic advice falls apart. A golfer says “my wrist hurts,” and a list gives the same stretch whether the pain is on the thumb side, little-finger side, palm side, or back of the wrist. The research does not diagnose those patterns for you, but it does justify paying attention: wrist injuries show up around 22% in both the Korean amateur study and the Portugal golf-athlete study.[2][3]
At home, the safest useful goal is usually controlled loading. You are trying to restore tolerance to gripping, hinging, and impact without hammering the sore tissue every time you pick up a club.
Wrist Flexion, Extension, and Eccentric Lowering
- Wrist curl: Rest the forearm on a table or thigh with the palm up. Curl a light dumbbell, can, or hammer handle upward, then lower slowly.
- Reverse wrist curl: Turn the palm down. Lift the back of the hand toward the ceiling, then lower with control.
- Band wrist extension: Anchor a light band under the foot or opposite hand. Extend the wrist against the band without letting the elbow drift around.
- Eccentric lowering: Use the opposite hand to help lift the sore wrist into position, then let the sore side do the slow lowering phase.
The eccentric version is useful when lifting into position is still touchy but lowering can be controlled. That distinction matters. If every rep hurts on the way up, forcing normal wrist curls because they appeared on a list is not sensible. Help the wrist up, lower slowly, and see whether symptoms settle rather than spike.
Keep the load deliberately light at first. A club, hammer, soup can, or very small dumbbell is enough for many home sessions. The wrist should feel worked, not punished. Pain that increases during the set, swelling, bruising, loss of grip strength, clicking with pain, or pain after a direct chunk into hard turf deserves more caution than a home routine can provide.
Elbow: Most Golfers Should Think Lateral First, Then Check the Details
Golfers love the phrase “golfer’s elbow,” but the name can mislead people. In Moon and Kim’s golfer sample, lateral elbow pain was three times more common than medial elbow pain.[3] In plain English: many golfers who blame “golfer’s elbow” may actually be dealing with symptoms closer to the tennis-elbow side of the forearm.
That does not mean you should diagnose yourself from one statistic. It does mean you should notice where the pain sits. Pain on the outside of the elbow usually points you toward the wrist extensor side of the forearm. Pain on the inside usually points more toward the wrist flexor and gripping side. The exercise menu overlaps, but the emphasis changes.
For Outside-Elbow Symptoms
- Isometric wrist extension hold: Palm down, forearm supported, gently press the back of the hand upward into your other hand or a band without moving the wrist. Hold briefly and relax.
- Eccentric wrist extension: Help the wrist lift with the other hand, then slowly lower from an extended position.
- Light grip squeeze: Use a tennis ball or soft ball. Squeeze at a tolerable effort, pause, and release slowly.
For Inside-Elbow Symptoms
- Isometric wrist flexion hold: Palm up, forearm supported, press gently upward into the opposite hand without moving the wrist.
- Eccentric wrist flexion: Help the wrist curl up, then slowly lower into extension under control.
- Controlled grip work: Start with a soft object and avoid max-effort squeezing early on.
Elbow tendon work tends to punish impatience. The early goal is not to prove toughness; it is to find a load the tendon tolerates today and can recover from by tomorrow. If shaking hands, lifting a mug, opening a jar, or picking up a golf bag is getting worse week to week, the exercise is not “working through it.” It is a sign to back off and get assessed.
Shoulder: Restore Rotation Without Letting the Shoulder Blade Coast
Shoulder pain may not dominate the injury distribution the way low back and wrist pain do, but it can ruin a swing quickly. The shoulder has to rotate, guide the club, and cooperate with the rib cage. When it hurts, golfers often stretch the front of the shoulder aggressively and skip the quieter work that keeps the ball-and-socket joint centered.
- Band external rotation: Keep the elbow near the side, bend it to about a right angle, and rotate the forearm outward against a light band. The shoulder should not shrug.
- Scapular retraction: Pull the shoulder blades gently back and slightly down, then release. Avoid turning it into a military posture drill.
- Wall slide: Slide the forearms up a wall while keeping the ribs from flaring. Stop before the painful range.
- Thoracic rotation: Sit or kneel and rotate through the upper back, not by yanking the sore shoulder across the body.
For a golfer, shoulder recovery is rarely just a shoulder project. If the upper back does not rotate, the shoulder often steals motion. If the shoulder blade does not move well, the rotator cuff gets a harder assignment. That is why a small shoulder block should include both band rotation and thoracic mobility rather than only arm circles.
Get help sooner if the pain follows a fall, you cannot raise the arm, you feel marked weakness, or night pain keeps showing up. Those are not situations where more band reps are the brave answer.
Knee: Look at the Hip and Balance, Not Just the Joint
Knee irritation in golf often shows up during walking, slopes, rotation, or posting into the lead side. The knee is caught between the foot and hip, so a useful home routine usually includes glute strength and balance rather than only knee bends.
- Glute bridge variation: Start with two legs. If tolerated, progress to a staggered stance rather than jumping straight to single-leg work.
- Single-leg balance: Stand near a counter. Hold balance on one leg while keeping the knee from collapsing inward.
- Hip hinge drill: Practice sending the hips back with a soft knee bend, keeping the weight controlled through the foot.
- Gentle hip mobility: Use controlled hip circles or open-book-style rotation work to reduce the need for the knee to twist for missing hip motion.
If your knee problem involves swelling, locking, catching, giving way, or a known meniscus injury, a more structured plan is wiser than guessing from a golf article. The phase-based guide to meniscus tear exercises at home is a better fit for that specific situation.
How Much Should You Do at Home?
The honest answer is less dramatic than most golfers want. Pick the section that matches the painful body part. Choose two to four exercises. Do them with a low enough dose that symptoms do not climb during the session and do not flare the next day. If the first round goes well, repeat it several times during the week before adding load, time, or complexity.
That conservative approach fits the bigger injury picture. Minghelli and colleagues reported that 66.7% of injuries in their golf-athlete sample were due to overuse.[2] Overuse does not usually reward the player who suddenly adds a long rehab workout on top of the same range bucket and weekend round that irritated the tissue in the first place.
Robinson and colleagues also found that 7.5% of golfers who did not warm up reported injury in their prospective amateur cohort.[4] That does not prove a warm-up prevents every golf injury, and it does not turn warm-up into treatment. It does support a plain habit: once your symptoms calm down, do a short preparation routine before practice or play instead of walking from the parking lot to the first tee and asking a sore body for full speed.
For general between-round recovery habits, the post-workout recovery routine at home can sit alongside these body-part exercises. It should not replace the more specific work if one area is clearly the problem.
Returning to Golf Without Restarting the Injury
Once daily pain is settling and the body-part exercises feel tolerable, the next mistake is jumping straight back to a full round plus a range session because one practice swing felt fine in the garage. TPI’s return-to-play guidance emphasizes screening, symptom response, and interval-style progression rather than a single all-clear moment.[5]
- Start with putting and short chips before full swings.
- Add partial swings before driver swings.
- Hit fewer balls than you think you can tolerate, then judge the next day.
- Walk or ride based on the injury, not pride.
- Stop if pain changes your swing, grip, posture, or willingness to finish through the ball.
The important test is not whether you can survive one session. It is whether the painful area is still calmer the next morning and whether normal tasks — stairs, lifting, gripping, sitting, sleeping — are trending in the right direction.
When Home Exercises Are Not Enough
Home golf injury recovery exercises are not a diagnosis. They are a starting point for common, non-emergency aches that behave like mild overuse or irritation. Get professional evaluation for severe pain, traumatic injury, visible swelling or bruising, numbness, tingling, weakness, pain that radiates down the arm or leg, symptoms that worsen despite backing off, or pain that does not improve with a short period of sensible load reduction.
Most golfers do not need a bigger list. They need the right smaller list. Start where it hurts: low back, wrist, elbow, shoulder, or knee. Use the exercise block that matches that area, keep pain and next-day function as your limits, and do not let a generic stretch routine talk you into treating every golf injury as the same problem.
References
- Golf Injury Prevention. American Academy of Orthopaedic Surgeons.
- Epidemiology of musculoskeletal injuries in golf athletes. 2024.
- Golf-related injuries in Korean amateur golfers. 2023.
- Injury prevention practices and injuries in amateur golfers: a prospective cohort study. BMJ Open Sport & Exercise Medicine. 2024.
- When to Come Back. Titleist Performance Institute.




Comments
Join the discussion with an anonymous comment.