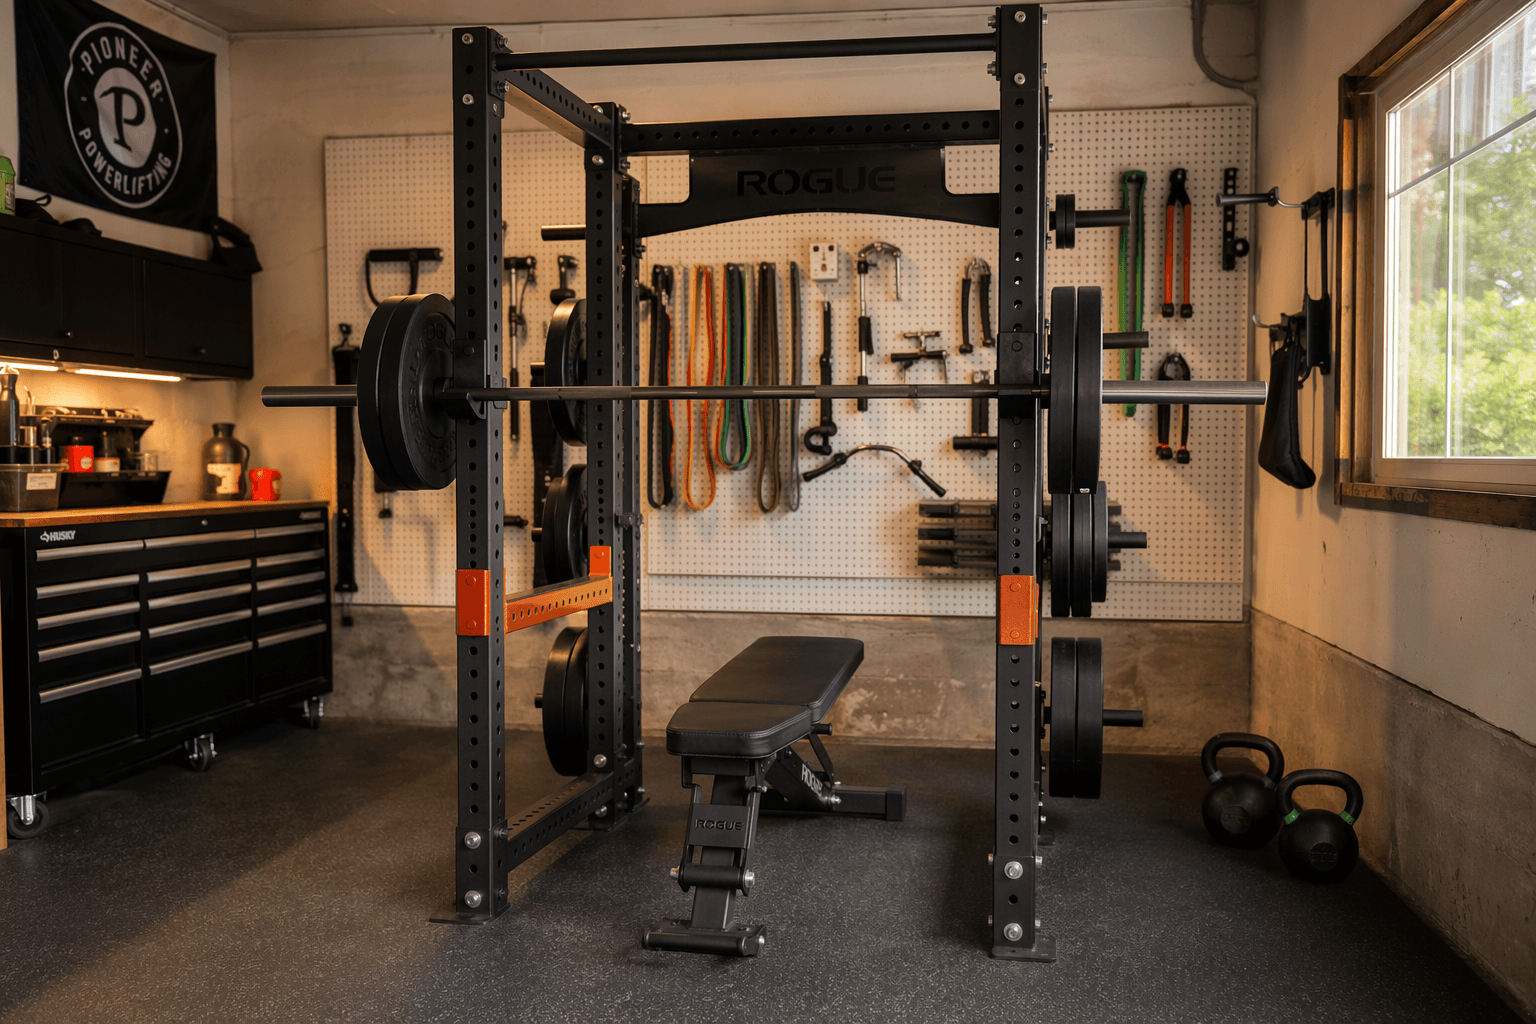
The Squat Rack Is Your Home Gym’s Centerpiece — Choose It Wisely
If you are building a home gym for strength training, the squat rack is the single most consequential purchase you will make. It defines your training ceiling, dictates how much floor space you need, and determines whether you can train alone safely. Yet most buyers approach this decision backward — they start with brand names or a price point and only later discover that their ceiling is too low, their floor space is too tight, or their rack can’t handle the attachments they want.
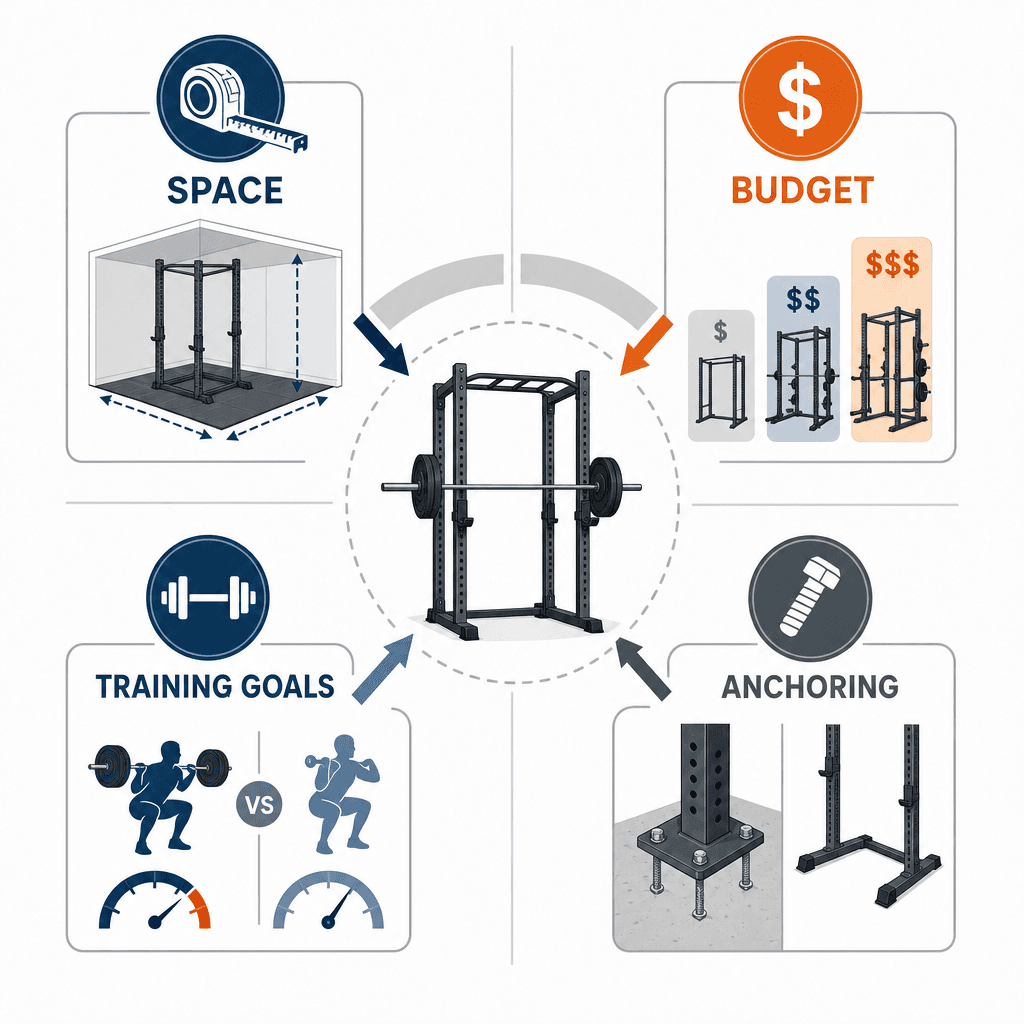
This guide takes a different approach. Instead of ranking products by popularity, we walk through four constraint axes that every buyer must answer honestly before looking at a single spec sheet: available floor space and ceiling height, budget, training goals, and willingness to bolt the rack to the floor. The core thesis is simple: most home gym builders misallocate spend. They either overspend on features they do not need — like a 1,000-lb-rated rack for bodyweight-only training — or underspend on safety features they absolutely do need, like reliable spotter arms in a power rack.
The average squat rack price across tested models in 2026 is approximately $708, according to Garage Gym Reviews. But that average masks a wide range — from $349 entry-level stands to $1,000-plus premium cages. The right number for you depends entirely on your constraints. Let’s work through them.
The Five Rack Types at a Glance (And How They Map to Your Constraints)
Before we dive into the decision framework, it helps to know the landscape. The site already has a detailed comparison of rack types, so this section is intentionally brief — a quick map of the five main forms and how each one scores on the four constraint axes.
| Rack Type | Space Needed | Budget Tier | Training Ceiling | Anchoring Required? |
|---|---|---|---|---|
| Power rack (four-post cage) | ~4 ft x 4 ft footprint; needs 8 ft width for loading | $500–$1,500+ | Highest — supports heavy squats, bench, pull-ups, attachments | Often not needed if weight stored on posts |
| Half rack | Slightly smaller footprint than full cage | $500–$1,200 | High — similar to power rack but fewer attachment options | May need bolting for stability at heavy loads |
| Squat stand (two-post) | Smallest footprint; no rear cage | $300–$600 | Moderate — limited to squats and bench; no spotter arms | Usually needs bolting or is inherently less stable |
| Folding / wall-mounted rack | Minimal floor footprint when folded; needs wall space | $400–$900 | High — can match power rack capacity if well-built | Requires bolting to wall studs |
| All-in-one / combo rack | Larger footprint; includes pulley system | $1,000–$3,000+ | Highest — adds cable exercises, often includes weight stack | Usually free-standing due to weight |
The key takeaway: a power rack (four-post cage) is the recommended choice for most home gyms because it provides the best combination of safety, versatility, and future-proofing. Squat stands and half racks trade safety and attachment compatibility for a smaller footprint. Folding racks solve space constraints but require drilling into walls. All-in-one units add cable functionality at a significant price premium.
Your Decision Framework: The Four Constraint Axes
Rather than starting with a brand or a price, start with four honest answers about your situation. Each axis narrows the field significantly.
Axis 1: Available Floor Space and Ceiling Height
This is the most common dealbreaker. A typical power rack occupies roughly 4 feet wide by 4 feet deep. But the rack itself is only part of the equation. You also need clearance on both sides to load and unload plates, and overhead clearance for the barbell and your own height during a press or pull-up.
- Minimum width: At least 8 feet of clear width is recommended for comfortable plate loading on both sides of the bar. This accounts for the rack width plus the barbell overhang and room to walk around.
- Minimum ceiling height: Your ceiling must be at least 4–6 inches taller than the rack’s listed height. A standard 87-inch tall rack needs a ceiling of at least 91–93 inches. If you plan to do pull-ups or overhead press inside the rack, add your own height plus arm reach to that calculation.
- Rack depth: Racks come in depths from 24 inches to 43 inches. A 24-inch deep rack saves space but limits your ability to bench press inside the cage. A 30-inch or 43-inch deep rack is more comfortable for benching and allows more room for the lifter and spotter.
Axis 2: Budget
Your budget determines the steel gauge, weight capacity, attachment compatibility, and overall build quality you can expect. We break this down in detail in the budget tiers section below, but the short version is: $300–$500 gets you an entry-level rack with thinner steel and limited capacity; $500–$1,000 is the sweet spot for most buyers, offering 11-gauge steel and 1,000+ lb capacity; and $1,000+ unlocks premium features like 3x3 uprights with 1-inch hardware and Westside hole spacing.
Axis 3: Training Goals
What you plan to do in the rack determines what you need from it.
- Max strength / powerlifting: You need a rack with a high weight capacity (1,000+ lbs), reliable safety bars or straps, and Westside hole spacing for precise J-hook and spotter positioning. A four-post power rack is the standard choice.
- General fitness / bodybuilding: A mid-range power rack with standard 2-inch hole spacing and a pull-up bar is sufficient. You may want attachments like a landmine or dip handles, but you do not need the highest weight capacity.
- Olympic weightlifting: You need a rack with a wide enough base to accommodate a 6-foot or 7-foot barbell and enough depth for a full squat. A half rack or squat stand may work, but a power rack with a wide stance is safer for catching failed lifts overhead.
- CrossFit / functional fitness: Look for a rack with a pull-up bar, plate storage, and compatibility with a plyo box or rower. A folding rack can work well if space is tight.
Axis 4: Willingness to Bolt Down
Some racks are stable enough to stand alone without bolting to the floor, especially when weight plates are stored on the rear posts. Others — particularly lighter squat stands and folding racks — require anchoring to prevent tipping during heavy lifts or pull-ups.
- If you can bolt down: You have the widest range of options, including folding racks and lighter stands that become very stable when anchored. Drilling into concrete or wood subfloor is straightforward with a hammer drill and concrete anchors.
- If you cannot bolt down: You need a rack that is inherently stable on its own. Look for a power rack with a wide base (at least 4 feet wide) and the option to add weight storage posts to the rear. Avoid squat stands and folding racks unless you are willing to bolt them.
Key Specs Decoded: Steel Gauge, Upright Size, Weight Capacity, and Hole Spacing
Once you have narrowed your options by the four constraint axes, the next step is understanding the specifications that separate a rack that will last a decade from one that will wobble after a year. Four specs matter most.
Steel Gauge: 11-Gauge Is the Standard
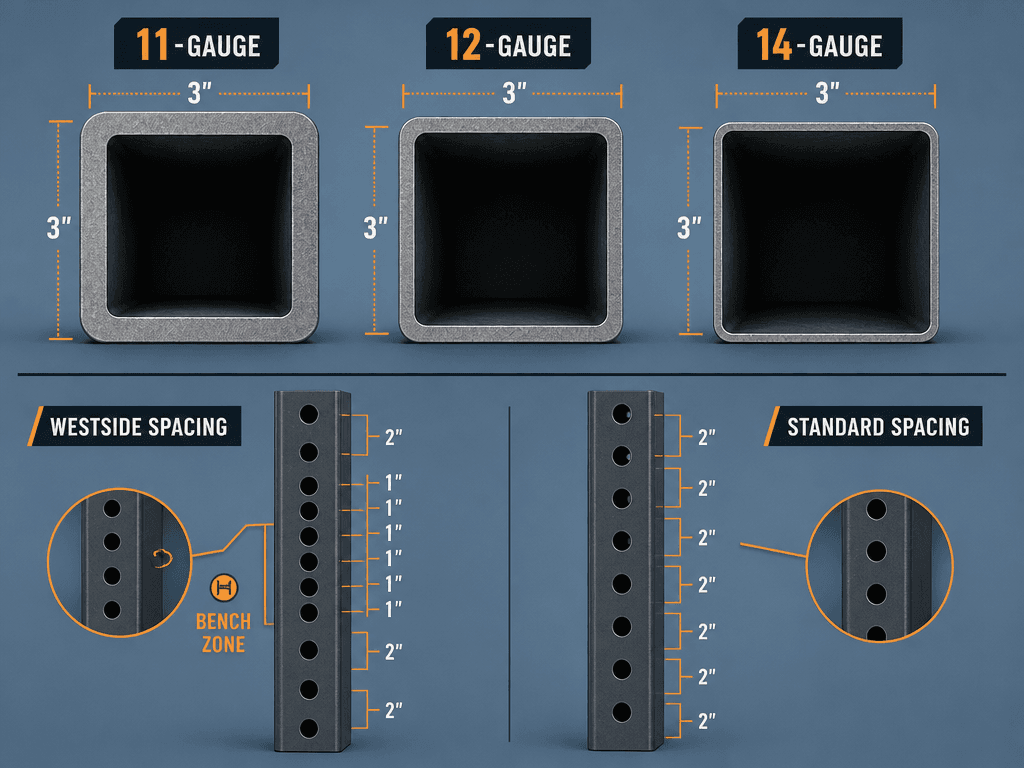
Steel gauge measures the thickness of the steel tube wall. Lower numbers mean thicker steel. The industry consensus across multiple sources is clear: 11-gauge steel is the ideal standard for home gym racks. It provides the right balance of strength, weight, and cost. 12-gauge steel is acceptable for lighter loads but may flex under heavy weight. 14-gauge steel is too thin for anyone lifting over 200 lbs and should be avoided for serious training.
Upright Size: 3x3 Is the Industry Standard
Upright size refers to the cross-section dimensions of the vertical posts. The most common sizes are 2x3 inches and 3x3 inches. 3x3 uprights with either 5/8-inch or 1-inch holes are the current industry standard and the most future-proof choice. They offer greater rigidity and a much wider selection of compatible attachments — J-hooks, safety straps, dip handles, landmine mounts, and cable pulley systems — than 2x3 racks. The Gray Matter Lifting guide notes that 3x3 with 1-inch hardware is "the gold standard for the home gym enthusiast who wants to avoid FOMO."
A 2x3 upright is still functional and can support heavy loads — the Titan T-3 Series uses 2x3 11-gauge steel and is rated at 1,000 lbs — but attachment compatibility is more limited. If you plan to add accessories over time, 3x3 is the safer bet.
Weight Capacity: 1,000 Lbs Is the Industry Benchmark
Most mid-range and premium racks advertise a weight capacity of 1,000 lbs or more. This is more than enough for the vast majority of home gym users — even a 300-lb lifter squatting 400 lbs with 100 lbs of bar and collars is well under that limit. However, pay attention to whether the listed capacity is "rackable" (the weight the rack can hold statically on the J-hooks) or "total system" (including the rack's own weight). A rack with a 600-lb capacity may be fine for a beginner but limiting for an intermediate lifter who wants to squat heavy.
Hole Spacing: Westside Spacing Is a Game-Changer for Bench Press
Hole spacing determines how precisely you can position your J-hooks and safety bars. Standard spacing is 2 inches apart across the entire upright. Westside spacing uses 1-inch increments through the bench press zone (roughly 12–24 inches from the floor) and 2-inch spacing above and below. This allows you to set your J-hooks at the exact height needed for your bench press arch and arm length, rather than being forced into a position that is either too high or too low.
The Garage Gym Reviews guide states that Westside spacing "gives you the ability to be more exact in your J-hooks, safeties" and notes that this feature is now copied by nearly every major manufacturer. If you bench press regularly, Westside spacing is a meaningful upgrade over standard spacing.
| Spec | Entry-Level ($300–$500) | Mid-Range ($500–$1,000) | Premium ($1,000+) |
|---|---|---|---|
| Steel gauge | 12-gauge or 14-gauge | 11-gauge | 11-gauge |
| Upright size | 2x3 or 2x2 | 3x3 | 3x3 |
| Hole size | 5/8" | 5/8" or 1" | 1" |
| Hole spacing | Standard 2" | Standard or Westside | Westside |
| Weight capacity | 600–800 lbs | 1,000 lbs | 1,000+ lbs |
| Attachment compatibility | Limited | Good | Extensive |
| Example model | Fringe Sport Squat Rack ($349) | REP PR-4000 ($799.94) | Rogue RM-6 Monster Rack (~$1,500) |
Space Planning: How Much Room Do You Really Need?
Space planning is where many home gym dreams meet reality. A rack that looks compact in a showroom can feel cramped in a 10x10-foot spare room. Here is the concrete math.
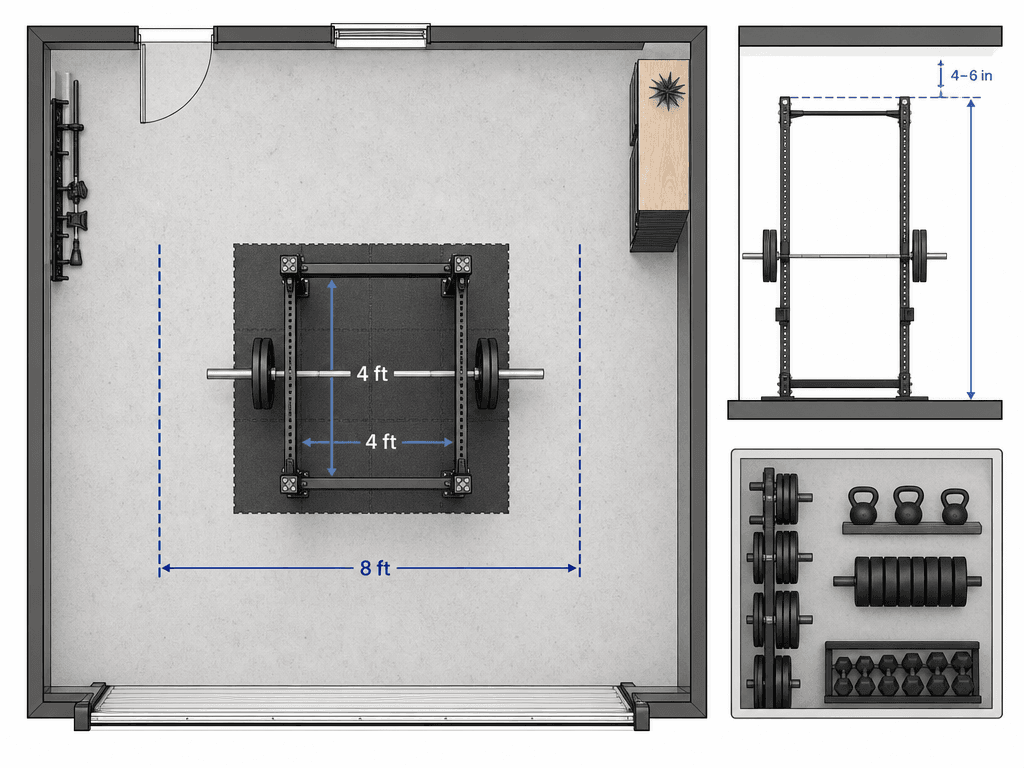
- Rack footprint: Most power racks measure approximately 46–48 inches wide and 42–48 inches deep. That is roughly 4 ft x 4 ft of floor space.
- Loading clearance: You need at least 8 feet of clear width to load and unload plates comfortably. This accounts for the rack width (4 ft) plus the barbell overhang (about 2 ft on each side) plus room to walk around. If your space is narrower than 8 ft, you may need to load plates from one side only, which is inconvenient but workable.
- Ceiling height: Measure from the finished floor to the lowest overhead obstruction (ceiling, joists, light fixtures). Your rack height must be at least 4–6 inches below that measurement. A standard 87-inch tall rack needs a 91–93 inch ceiling. If you are tall or plan to do overhead pressing inside the rack, add your height plus arm reach to the calculation.
- Depth for benching: If you plan to bench press inside the rack, a depth of at least 30 inches is recommended. A 24-inch deep rack leaves very little room between the barbell and the rear uprights, which can feel claustrophobic and may interfere with your bench setup.
For a detailed breakdown of how to fit a rack into different room sizes — including 10 sq ft, 30 sq ft, 50 sq ft, and 100 sq ft spaces — see our Compact Home Gym by Space Tier guide.
Budget Tiers: What You Get at $300–$500, $500–$1,000, and $1,000+
Your budget is the second constraint axis, and it directly determines the steel quality, weight capacity, and attachment ecosystem you can access. Here is what to expect at each tier.
Entry-Level ($300–$500): Functional but Limited
At this price point, you are looking at squat stands or basic power racks with 12-gauge or 14-gauge steel, 2x3 or 2x2 uprights, and weight capacities in the 600–800 lb range. The Fringe Sport Squat Rack ($349, 600 lbs, 2x3 12-gauge) is a typical example. The Titan T-3 Series Squat Stand ($379.99, 1,000 lbs, 2x3 11-gauge) is an outlier at this price — it offers 11-gauge steel and a 1,000-lb capacity, which is why Horton Barbell recommends it as the top budget pick.
Mid-Range ($500–$1,000): The Sweet Spot
This is where most home gym buyers should land. At this price, you get 11-gauge steel, 3x3 uprights, 1,000+ lb capacity, and good attachment compatibility. The REP PR-4000 ($799.94, 1,000 lbs, 3x3 11-gauge, 5/8" holes) is a standout example. The Rogue HR-2 Half Rack ($765, 3x3 11-gauge) is another strong option if you prefer a half-rack configuration.
The Gray Matter Lifting guide recommends a budget of "$500+ for a starter rack for most people, and upwards of $1,000 for those looking for everything." This aligns with the data: the average squat rack price across tested models is $708, which falls squarely in the mid-range tier.
Premium ($1,000+): Future-Proof and Feature-Rich
At this level, you are buying a rack that will likely outlast every other piece of equipment in your gym. Expect 3x3 11-gauge steel with 1-inch hardware, Westside hole spacing, extensive attachment ecosystems (cable pulleys, dip stations, landmines, monolifts), and weight capacities well above 1,000 lbs. Rogue's Monster series and REP's PR-5000 are typical examples. These racks are overkill for a beginner but make sense for an experienced lifter who wants a single, permanent solution.
One common mistake at this tier is overspending on a premium rack when the money would be better allocated to a good barbell, weight plates, or a bench. For guidance on how to prioritize your overall gym spend, see our Garage Gym Equipment Tier System.
Must-Have vs. Nice-to-Have Attachments
One of the fastest ways to blow your budget is buying attachments you do not need. Here is a clear separation between what you must buy and what you can add later.
Must-Have Attachments
- Safety bars or straps: These are non-negotiable for solo training. They catch a failed squat or bench press and prevent the barbell from crushing you. Most racks include a pair of safety pins; upgrade to safety straps if your budget allows — they are gentler on the barbell and quieter.
- J-hooks: The rack comes with J-hooks, but check whether they are plastic-coated or bare steel. Plastic-coated hooks protect your barbell knurling. If the included hooks are bare steel, budget $30–$50 for aftermarket coated hooks.
- Pull-up bar: Most power racks include a pull-up bar as part of the top crossmember. If yours does not, or if you are buying a squat stand, add a separate pull-up station or a wall-mounted bar.
Nice-to-Have Attachments
- Dip handles: Great for triceps and chest dips, but you can also do dips on a sturdy bench or parallel bars. Not essential for a beginner.
- Landmine attachment: Enables landmine presses, rows, and rotational exercises. A versatile addition but not needed on day one.
- Cable pulley system: Adds cable exercises (lat pulldowns, tricep pushdowns, face pulls) to a power rack. These range from $150–$500 and are a significant upgrade. Only buy if you know you will use cable movements regularly.
- Weight storage pegs or posts: Storing plates on the rack saves floor space and adds stability. Most racks offer add-on weight storage posts. This is a high-value upgrade for garage gyms.
Your Squat Rack Purchase Checklist
Before you click "buy," run through this checklist. It summarizes the entire decision process into eight actionable steps.
- Measure your space: Confirm at least 8 ft of clear width and a ceiling height at least 4–6 inches above the rack height. Measure twice.
- Set your budget: Decide your maximum spend, including shipping and any must-have attachments. The sweet spot for most buyers is $500–$1,000.
- Choose your rack type: Power rack for most people. Half rack or folding rack if space is tight. Squat stand only if you are on a strict budget or have very limited space.
- Verify steel gauge and upright size: 11-gauge 3x3 steel is the standard. 12-gauge 2x3 is acceptable for lighter loads. Avoid 14-gauge.
- Check hole spacing: Westside spacing (1" increments in the bench zone) is a meaningful upgrade for bench press precision.
- Decide on bolting: If you cannot bolt down, choose a rack with a wide base and weight storage posts for stability. If you can bolt down, folding racks and lighter stands become viable options.
- Prioritize safety attachments: Safety bars or straps are non-negotiable. J-hooks should be plastic-coated or you should budget for aftermarket ones.
- Plan the rest of your gym: A rack is the centerpiece, but you also need a barbell, plates, a bench, and flooring. Use our Compact Home Gym Buyer's Guide to plan the full build.
A well-chosen squat rack will serve you for a decade or more. By working through the four constraint axes — space, budget, training goals, and anchoring — you can make a decision that fits your actual situation, not a marketing department’s idea of what you should buy.


Comments
Join the discussion with an anonymous comment.