Why the Terminology Matters: Squat Rack vs Power Rack vs Half Rack vs Squat Stand vs Folding Rack
If you have started shopping for a squat rack for your home gym, you have likely run into a wall of confusing terminology. A single search can return results labeled "power rack," "half rack," "squat stand," and "folding rack" — and many retailers use these terms interchangeably. This is not just a naming problem. Searching for the wrong term can surface products that are either too large for your space, too weak for your lifts, or missing the safety features you need.
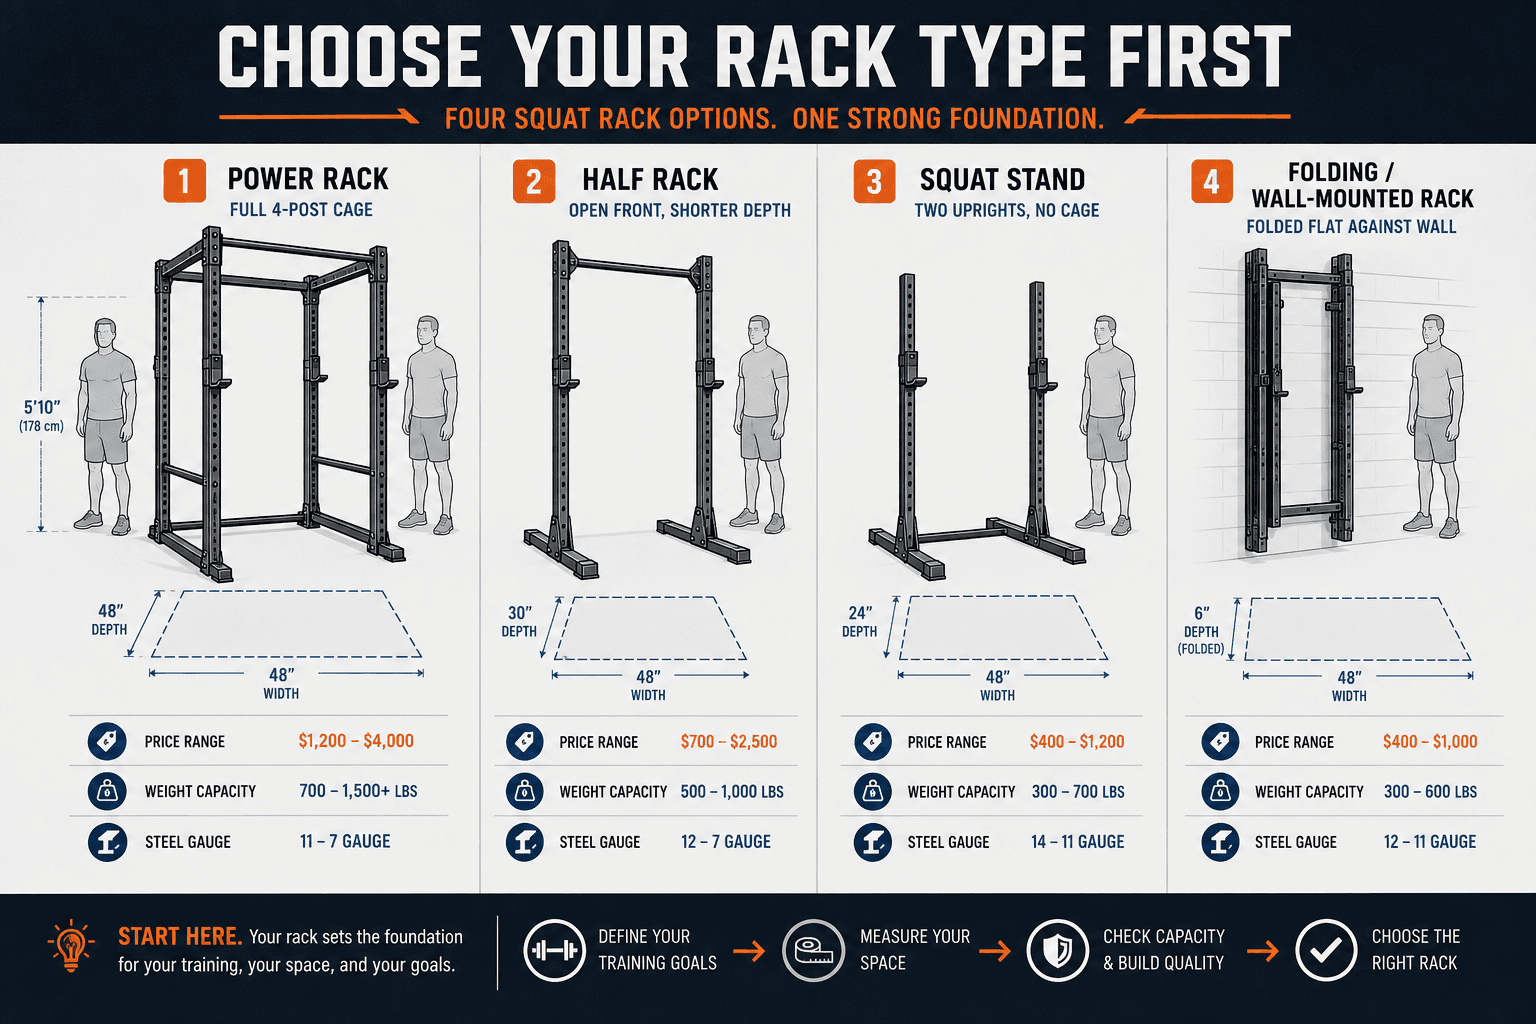
Here is the short definition of each type so you can navigate the rest of this guide with clarity:
- Power rack (full cage): A four-post steel cage with safety bars on both sides. The safest and most versatile option for solo lifting.
- Half rack: An open-front design with two uprights and two shorter rear posts. Smaller depth than a full rack, but with less safety coverage.
- Squat stand: Two independent uprights with J-hooks and no safety bars. The most compact and affordable option, but it does not catch failed lifts.
- Folding / wall-mounted rack: A rack that mounts to the wall and folds flat when not in use. Ideal for shared spaces like garages, but requires permanent installation and higher ceilings.
This article does not rank products. Instead, it provides a constraint-based decision system to help you determine which rack type fits your specific situation. The goal is to give you the framework to evaluate any rack on the market, not just the ones featured in a single roundup.
The Three-Constraint Decision System: Space, Lifting Goals, Budget
The best rack type for your home gym is determined by a hierarchy of three constraints. You must evaluate them in this order because each one eliminates options before the next constraint even matters.
- Space (floor area and ceiling height): This is the non-negotiable first filter. A power rack requires roughly 10 feet of width and 8 feet of depth for comfortable training, plus an 8.5- to 9-foot ceiling. If your space cannot accommodate that, you must consider a half rack, folding rack, or squat stand before you even look at price tags.
- Lifting goals (max weight vs. general fitness): If you plan to squat or bench press near your one-rep max, you need a rack with safety bars that can catch a failed lift. If your training stays at moderate, sub-maximal loads and you always have a spotter, a squat stand may be sufficient.
- Budget: Once space and safety needs are settled, budget determines which specific model within a rack type you can afford. Power racks range from roughly $600 to over $2,000, while squat stands start under $400.
The rest of this guide applies this three-constraint system to each rack type, providing the specs, price data, and trade-offs you need to make an informed decision.
Power Rack (Full Cage): The Safest and Most Versatile Option
A power rack is a four-post steel cage that surrounds the lifter on all sides. It includes adjustable safety bars (or pins) on both the left and right sides, which can catch a barbell if you fail a squat or bench press rep. This design makes it the safest option for solo training, which is the reality for most home gym owners.
Typical Specifications
The home gym standard for a durable power rack is 3x3-inch 11-gauge steel uprights with 5/8-inch or 1-inch holes. This construction supports weight capacities of 1,000 pounds or more. According to Garage Gym Reviews' 2026 roundup of tested models, the average squat rack price across their tested units is $708, though power racks specifically span a wider range. The REP PR-4000, a popular mid-range model, starts at $799.94 with a 1,000-pound capacity, 3x3 11-gauge steel, and Westside hole spacing. At the premium end, the Rogue RM-6 uses the same steel spec with 1-inch holes and is made in the USA.
A typical power rack footprint is 48 to 52 inches wide and 40 to 50 inches deep. However, the total training zone is significantly larger. You need room for the 7-foot Olympic barbell, plate loading (about 2 feet on each side), walkout space for squats, and a bench for pressing. Industry guidance recommends a training area of at least 10 feet wide by 8 feet deep and a ceiling height of 8.5 to 9 feet.
Pros and Cons
- Pros: Full safety bars on both sides for failed lifts; highest attachment compatibility (pull-up bars, dip bars, landmine, band pegs); most stable under heavy loads; best for solo heavy lifting.
- Cons: Largest footprint; highest cost; heaviest to move; may require bolting to the floor or a platform for stability at maximum loads.
Ideal User
Choose a power rack if you have a dedicated training space (garage, basement, spare room) with at least 8.5-foot ceilings, you train alone or without a consistent spotter, and you plan to lift heavy — near your one-rep max on squats, bench press, or overhead press. The safety and versatility of a full cage make it the best value per dollar for anyone who can accommodate the footprint.
Half Rack: The Space-Saving Middle Ground
A half rack has two front uprights and two shorter rear posts, creating an open-front design. It is essentially the front half of a power rack. The open front makes it easier to step into and out of the rack for squats, and it takes up less floor depth than a full cage.
Typical Specifications
Half racks typically use the same steel gauge as power racks — 3x3 11-gauge is common — and support similar weight capacities of 1,000 pounds or more. The Rogue HR-2 Half Rack, a leading example, is priced at $765 and uses 3x3 11-gauge steel with 5/8-inch holes, available in 90-inch or 108-inch heights. The price range for half racks generally falls between $500 and $1,500.
The key dimensional difference is depth. A half rack's footprint is 48 to 52 inches wide but only 30 to 40 inches deep, compared to 40 to 50 inches for a full power rack. The recommended training zone is about 10 feet wide by 6 to 7 feet deep, and ceiling requirements are similar at 8 to 9 feet.
Pros and Cons
- Pros: Smaller depth than a full rack; open front for easier bar transitions; more affordable than comparable power racks; still accepts many attachments.
- Cons: Less safety coverage — safety bars are typically only on one side; may wobble under very heavy loads unless bolted to the floor; fewer attachment options than a full cage.
Ideal User
A half rack works well if you have enough width for a rack but limited depth — for example, a garage bay where you need to park a car, or a room that is wider than it is deep. It suits moderate to heavy lifters who train with a spotter or who are confident in their ability to bail safely, since the safety coverage is less complete than a full cage.
Squat Stand: The Most Compact and Budget-Friendly Option
A squat stand consists of two independent uprights with adjustable J-hooks to hold the barbell. There are no connecting cross-members at the top and no safety bars. It is the simplest and lightest rack type available.
Typical Specifications
Squat stands are the most affordable rack type, with prices ranging from roughly $300 to $900. The Titan T-3 Series Squat Stand, for example, starts at $379.99 and offers a 1,000-pound capacity with 2x3 11-gauge steel at a 73.5-inch height. At the lower end, the Fringe Sport Squat Rack is priced at $349 with a 600-pound capacity using 2x3 12-gauge steel. The Rogue SML-2C Squat Stand, a premium option, uses 3x3 11-gauge steel with 5/8-inch holes and costs more.
The footprint is the smallest of any rack type: 40 to 48 inches wide and only 24 to 36 inches deep. The recommended training zone is 8 to 10 feet wide by 5 to 6 feet deep, and ceiling height requirements are the lowest at 8 feet or higher.
Pros and Cons
- Pros: Smallest footprint; lowest cost; easy to move and store; good for Olympic weightlifting movements that require walking the bar out.
- Cons: No safety bars to catch failed lifts; can wobble under heavy weight; limited attachment compatibility; requires a spotter or a practiced bail-out technique for heavy sets.
Ideal User
A squat stand is the right choice if you have very limited space or a tight budget, you train at light to moderate weights, or you always have a spotter. It is also a good option for a temporary setup — for example, if you are renting and cannot install wall-mounted equipment, or if you plan to upgrade to a larger rack within a year or two.
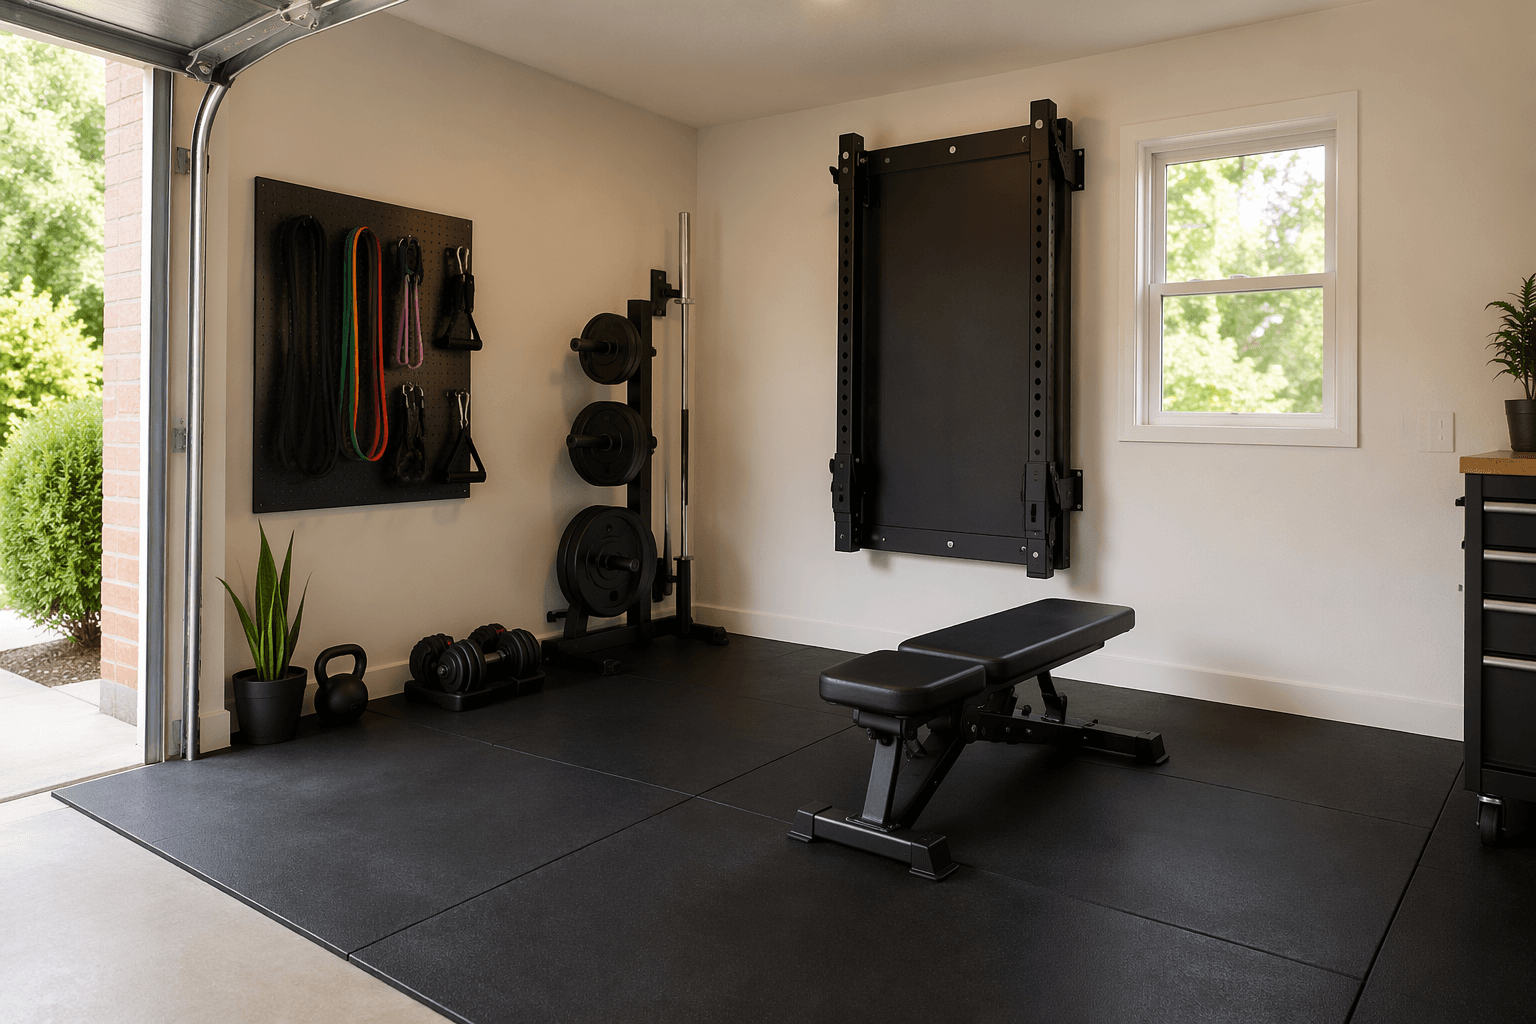
Folding / Wall-Mounted Rack: The Shared-Space Solution
A folding rack mounts directly to the wall and folds flat against it when not in use. When unfolded, it functions similarly to a half rack or a power rack, depending on the model. This design is specifically for spaces that must serve multiple purposes — a garage that also parks a car, a spare room that doubles as an office, or an apartment corner.
Typical Specifications
Folding racks use the same premium steel as standalone racks. The PRx Profile PRO Squat Rack, a well-known model, is priced at $1,099.99 and uses 3x3 11-gauge steel with a 1,000-pound capacity. When folded, it protrudes only 8 to 29 inches from the wall, depending on the configuration. When unfolded, it provides a full training station with spotter arms. The price range for folding racks is generally $400 to $1,400.
The critical requirement for a folding rack is ceiling height. The PRx Profile PRO's 90-inch model, for example, requires a 108-inch ceiling (9 feet) to fold down fully. Always measure the lowest point in your room — including garage door tracks, ceiling beams, and light fixtures — not just the highest point. The recommended training zone for a folding rack is 10 feet wide by 5 to 6 feet deep, with an 8- to 9-foot ceiling.
Pros and Cons
- Pros: Minimal footprint when folded (8-29 inches deep); good safety with spotter arms when unfolded; frees up floor space for other uses; high weight capacity comparable to power racks.
- Cons: Requires permanent wall mounting into studs; needs higher ceiling clearance for fold-down models; cannot be moved once installed; more expensive than squat stands and some half racks.
Ideal User
A folding rack is the best solution for a multi-use space where the rack must be put away after each session. It is particularly well-suited for garage gyms where you need to park a car, or for apartment dwellers who have a wall they can dedicate to training. If you have the ceiling height and are comfortable with a permanent installation, a folding rack provides near-power-rack functionality with a fraction of the daily footprint.
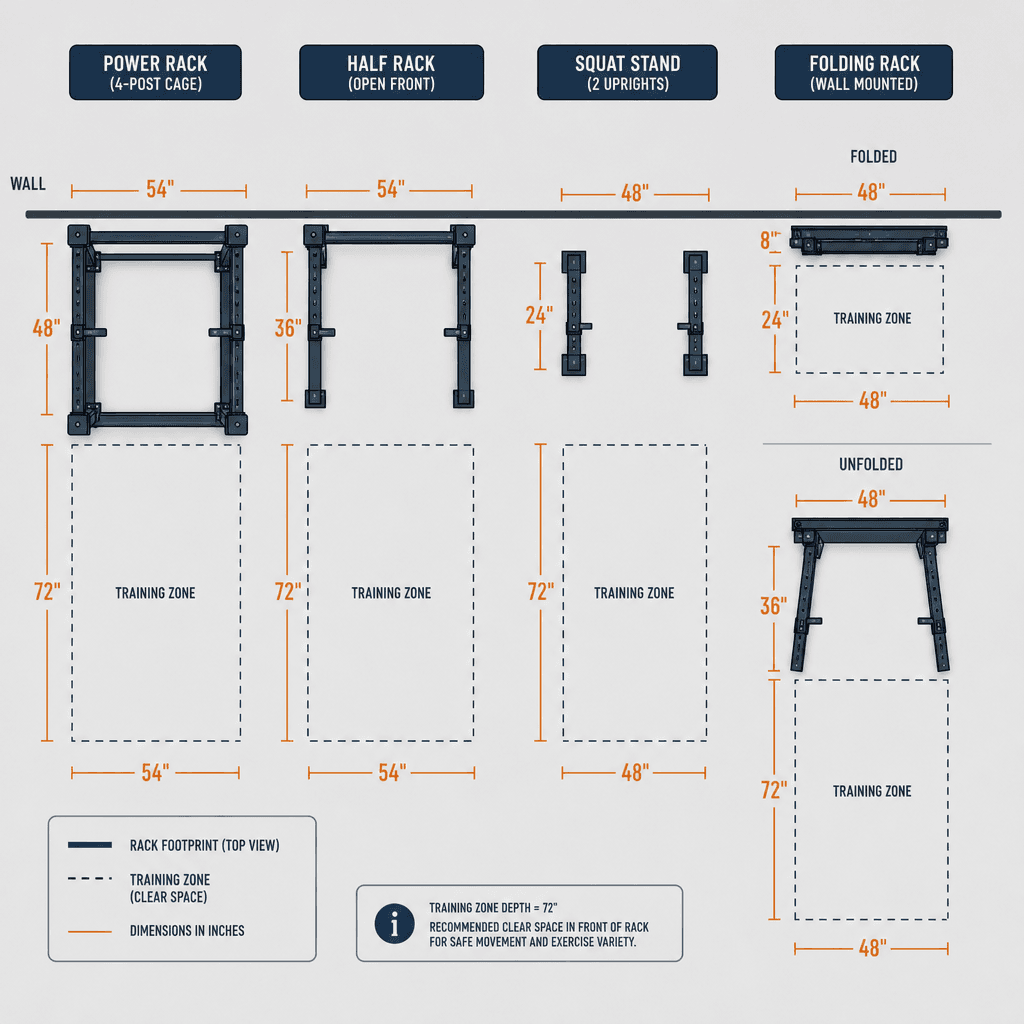
Space and Dimension Planning: Rack Footprint vs Training Zone
One of the most common mistakes new home gym buyers make is confusing the rack's physical footprint with the space required to actually train with it. The rack itself may be 48 inches wide and 40 inches deep, but you need significantly more room to load plates, unrack the barbell, squat, and rerack safely.
The table below shows the rack footprint and the recommended training zone for each type. These are practical minimums — more space is always better.
| Rack Type | Rack Footprint (W x D) | Recommended Training Zone (W x D) | Minimum Ceiling Height |
|---|---|---|---|
| Power Rack | 48-52" x 40-50" | 10 ft x 8 ft | 8.5-9 ft |
| Half Rack | 48-52" x 30-40" | 10 ft x 6-7 ft | 8-9 ft |
| Squat Stand | 40-48" x 24-36" | 8-10 ft x 5-6 ft | 8 ft or higher |
| Folding Rack | 48-52" x 20-30" (unfolded) | 10 ft x 5-6 ft | 8-9 ft (check specific model) |
The training zone dimensions assume you are using a standard 7-foot Olympic barbell. The barbell itself is about 6.5 feet long between the collars, and you need roughly 2 feet on each side to load and unload plates. The walkout space in front of the rack is where you step back for squats — this requires at least 2 to 3 feet of clear floor.
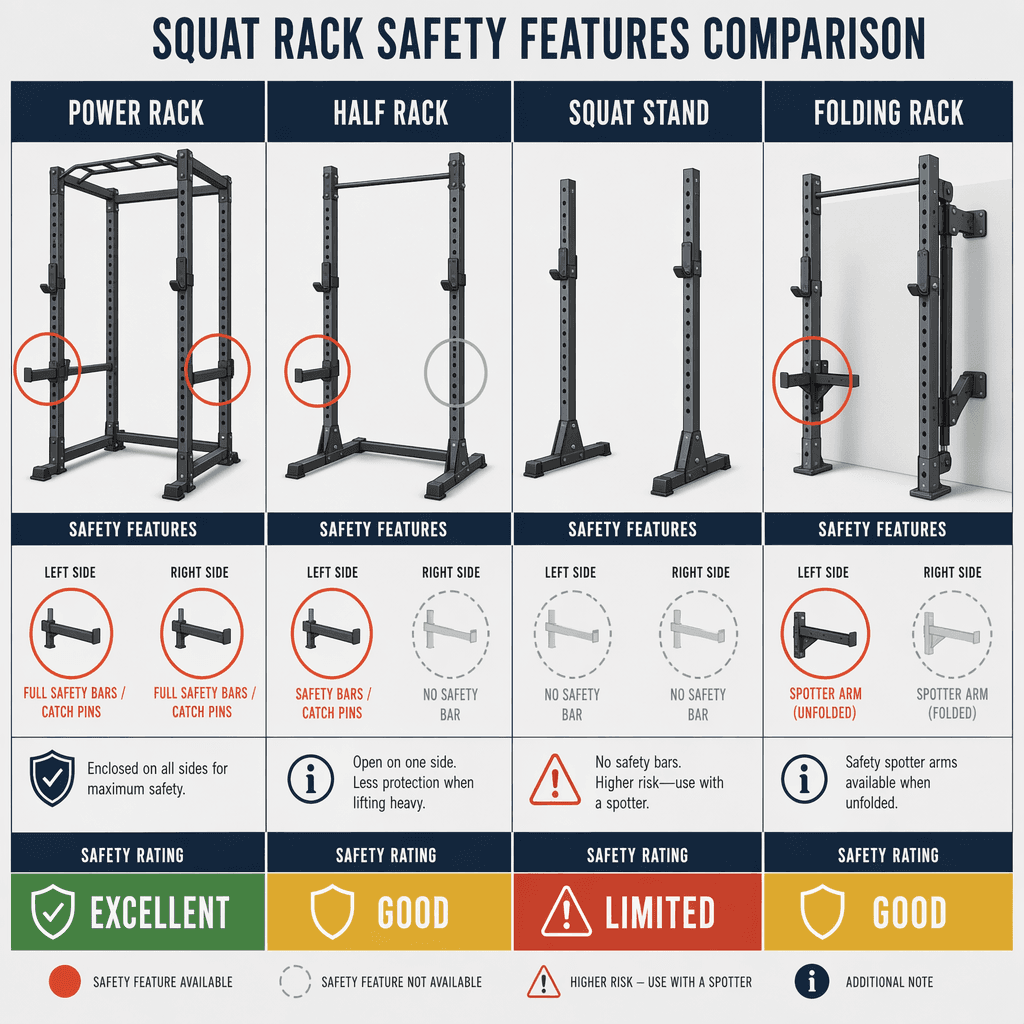
Safety Comparison: How Each Rack Type Protects You During Failed Lifts
Safety during a failed lift is the single most important functional difference between rack types. A power rack's full cage with safety bars on both sides can catch a barbell at any point in the squat or bench press range of motion. A half rack provides safety bars on one side only — the front is open. A squat stand has no safety bars at all. A folding rack, when unfolded, uses spotter arms that provide similar protection to a half rack.
The table below summarizes the safety features of each type.
| Rack Type | Safety Bars | Can Catch a Failed Squat? | Can Catch a Failed Bench? | Overall Safety Rating |
|---|---|---|---|---|
| Power Rack | Full (both sides) | Yes | Yes | Excellent |
| Half Rack | Partial (one side) | Yes, with limitations | Yes, with limitations | Good |
| Squat Stand | None | No (requires spotter or bail) | No (requires spotter or roll of shame) | Limited |
| Folding Rack | Spotter arms (when unfolded) | Yes | Yes | Good |
The practical implication is straightforward: if you train alone and lift at intensities where failure is possible, a power rack is the safest choice. A half rack or folding rack with spotter arms is a reasonable compromise if space is tight. A squat stand should only be used for solo training if you have practiced bailing out of a squat (dumping the barbell behind you) and are comfortable with the roll of shame for bench press.
Quick-Reference Comparison Table
The table below compresses all the key decision dimensions into a single scannable reference. Use it to compare rack types side by side before reading the bottom-line recommendations.
| Dimension | Power Rack | Half Rack | Squat Stand | Folding Rack |
|---|---|---|---|---|
| Price Range | $600 - $2,000+ | $500 - $1,500 | $300 - $900 | $400 - $1,400 |
| Weight Capacity | 1,000+ lbs | 1,000+ lbs | 600 - 1,000 lbs | 1,000 lbs |
| Typical Steel Gauge | 3x3 11-gauge | 3x3 11-gauge | 2x3 11- or 12-gauge | 3x3 11-gauge |
| Footprint (W x D) | 48-52" x 40-50" | 48-52" x 30-40" | 40-48" x 24-36" | 48-52" x 20-30" (unfolded) |
| Min. Ceiling Height | 8.5 - 9 ft | 8 - 9 ft | 8 ft or higher | 8 - 9 ft (check model) |
| Safety Features | Full safety bars (both sides) | Partial safety bars (one side) | None | Spotter arms (when unfolded) |
| Attachment Compatibility | Excellent (most attachments) | Good (many attachments) | Limited (few attachments) | Good (many attachments) |
| Ideal User | Dedicated space, heavy solo lifting | Limited depth, moderate-heavy lifting | Tight budget/space, light-moderate lifting | Shared space, needs to store rack |
Bottom-Line Recommendations by User Profile
Based on the three-constraint decision system, here are the recommended rack types for the most common home gym buyer profiles.
- Dedicated garage gym with heavy lifting: Choose a power rack. You have the space (10 ft x 8 ft training zone, 8.5+ ft ceiling), you train alone, and you need the safety and attachment compatibility that only a full cage provides. This is the default recommendation for anyone who can accommodate the footprint.
- Limited depth but enough width: Choose a half rack. If your space is wide enough for a rack but only 6 to 7 feet deep, a half rack saves 10 to 20 inches of depth compared to a full power rack. The Rogue HR-2 at $765 is a strong example of what this category offers.
- Very tight budget or temporary setup: Choose a squat stand. At under $400 for models like the Titan T-3, this is the lowest-cost entry point. Accept the safety limitations and plan to upgrade when your budget and space allow.
- Shared garage or apartment: Choose a folding rack. If you need to park a car or reclaim the floor space after each workout, a wall-mounted rack like the PRx Profile PRO ($1,099.99) provides power-rack-level capacity in a package that folds to 8-29 inches deep. Confirm your ceiling height before purchasing.


Comments
Join the discussion with an anonymous comment.