
Why a Single-Car Garage Gym Works (and How to Plan for It)
The most common objection to building a garage gym is space. A single-car garage typically measures between 100 and 200 square feet — roughly the size of a large walk-in closet. But that footprint is enough for a complete strength-training setup if you approach the build as a phased project rather than a single shopping trip.
The economics support the decision. According to the Garage Gym Reviews Ultimate Home Gym Guide, the average commercial gym membership costs roughly $58 per month — about $700 annually, based on 2013 data from StatisticBrain. That figure is almost certainly higher in 2026 dollars, but even at that conservative estimate, a starter home gym priced around $1,300 reaches breakeven in under two years. After that, the equipment is yours, with no monthly bill.
The key to making a small garage gym work is a phased build. Instead of buying everything at once, you start with the four pieces of equipment that cover roughly 90% of strength exercises — rack, bar, plates, and bench — then add specialty items as your training needs evolve. This approach spreads the cost over time and prevents the clutter that comes from buying gear you don't yet know you need.
Step 1: Measure Your Space and Plan the Layout
Before you buy a single piece of equipment, you need to know exactly what dimensions you're working with. Grab a tape measure and record three numbers: length, width, and ceiling height. Most single-car garages fall between 10x18 feet and 12x22 feet, but the usable floor space is often smaller once you account for shelving, water heaters, and the garage door track.
The Safety Box
For safe barbell training, you need a clear working area known as the "safety box." The Gray Matter Lifting FAQ recommends a minimum of 8 feet by 8 feet of unobstructed space for barbell movements. The RitFit guide on garage gym organization expands this to a 10x10 foot functional area, noting that you need 18 to 24 inches of clearance on each end of the barbell for safe loading and unloading of plates.
Here's what to check in your space:
- Ceiling height: You need at least 84 inches (7 feet) for overhead pressing and pull-ups. Eight feet is better. If your garage has a standard 7-foot door, measure the actual ceiling — many garages have higher ceilings than the door opening.
- Floor condition: Check for cracks, slopes, or uneven sections. A level floor is important for squat and bench stability. Small cracks are fine; major settling may require patching before you lay flooring.
- Obstructions: Note the location of water heaters, electrical panels, shelving, and garage door openers. These will determine where you can place your rack and storage.
- Vehicle parking: If you need to share the garage with a car, plan for a layout that allows the vehicle to pull in while the rack is folded or pushed to one side. This is where wall-mounted racks become essential.
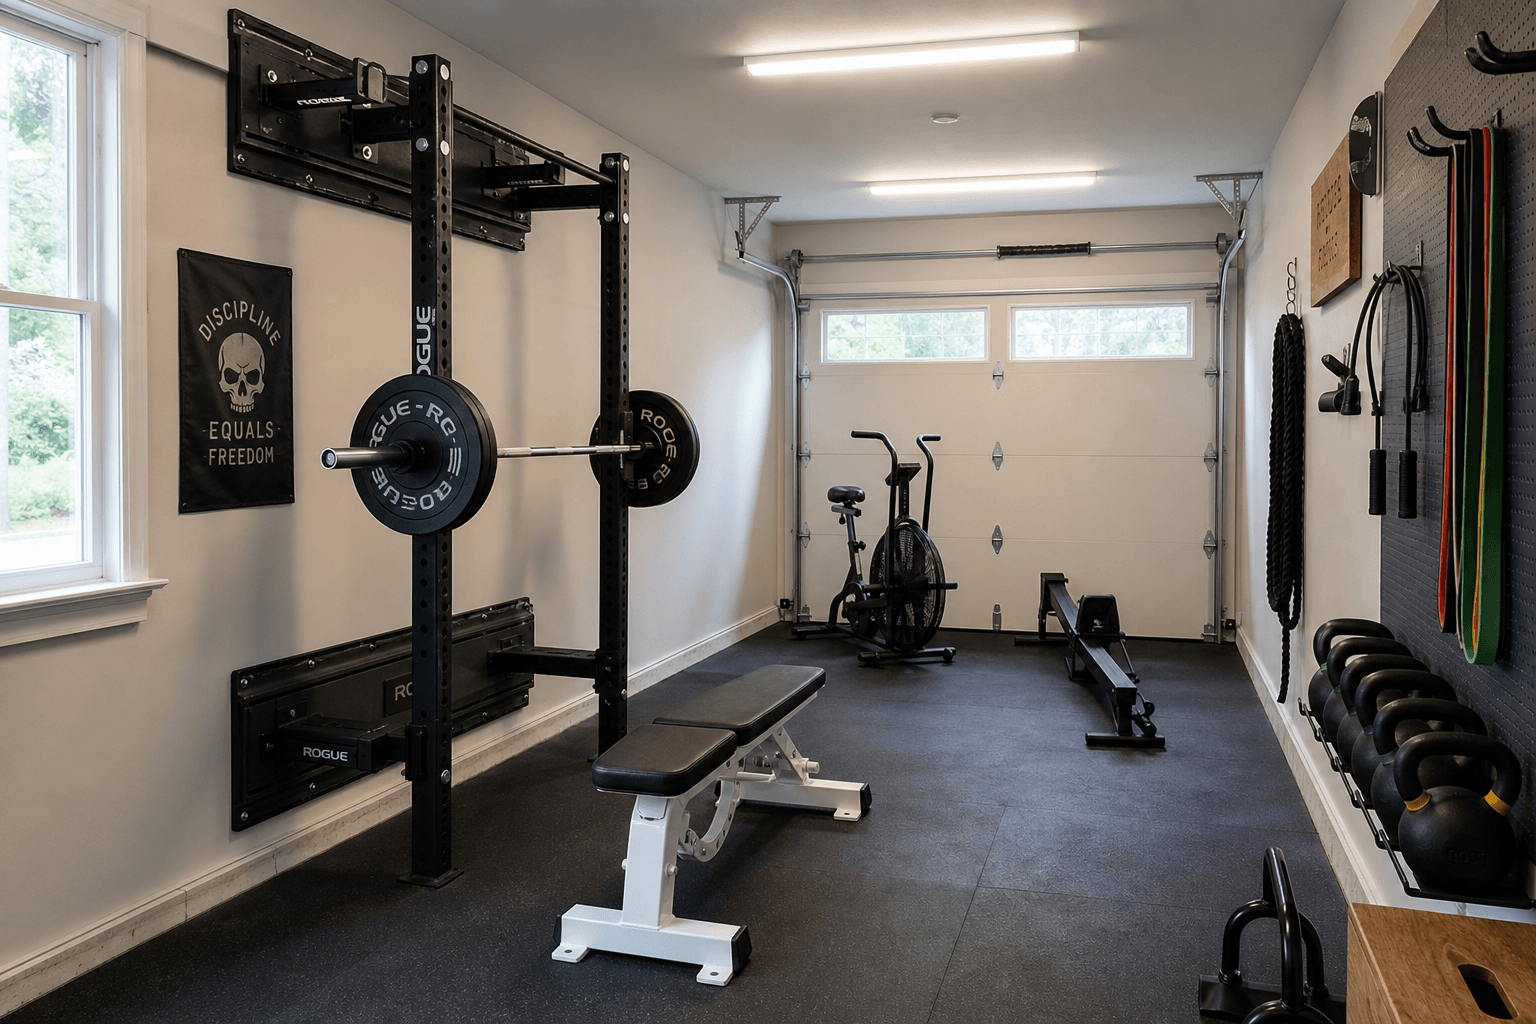
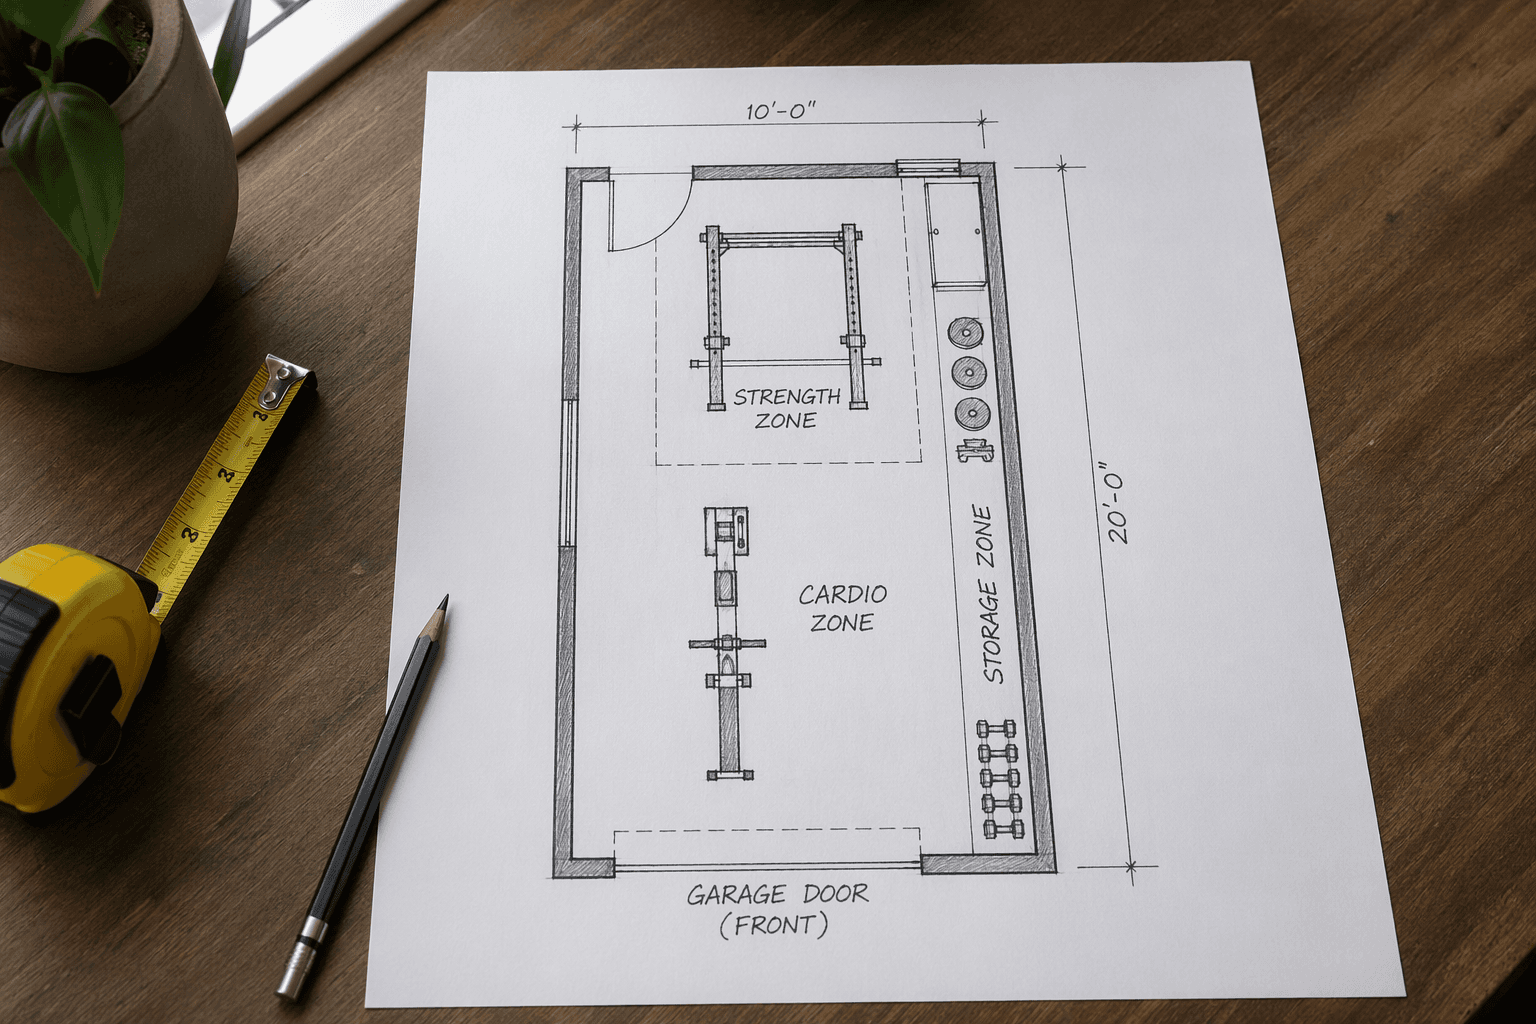
Zoning Your Space
Once you have your measurements, divide the garage into three zones:
- Strength zone: The largest zone, centered on your rack and bench. This needs the full safety box dimensions.
- Cardio zone: A smaller area for a rower, air bike, or jump rope mat. This can be as small as 3x6 feet.
- Storage zone: Wall space for plates, barbells, bands, and accessories. This zone uses vertical space, not floor space.
The Fitness Outlet garage gym guide emphasizes that clear walkways between strength and cardio zones are critical in small garages. You should be able to move from the rack to the rower without stepping over plates or dodging equipment. If you're sharing the space with a car, the "half garage" layout strategy from RitFit works well: push all equipment to the perimeter walls and keep the center lane clear for deadlifts when the car is out, and for parking when it's in.
Step 2: The Essential Four — Rack, Bar, Plates, and Bench
These four purchases form the foundation of any garage gym. Together, they enable every major compound lift: squat, bench press, deadlift, overhead press, and pull-ups. Everything else — kettlebells, dumbbells, specialty bars — is an addition, not a replacement.
| Item | Budget Pick | Price | Premium / Space-Saving Pick | Price | Key Consideration |
|---|---|---|---|---|---|
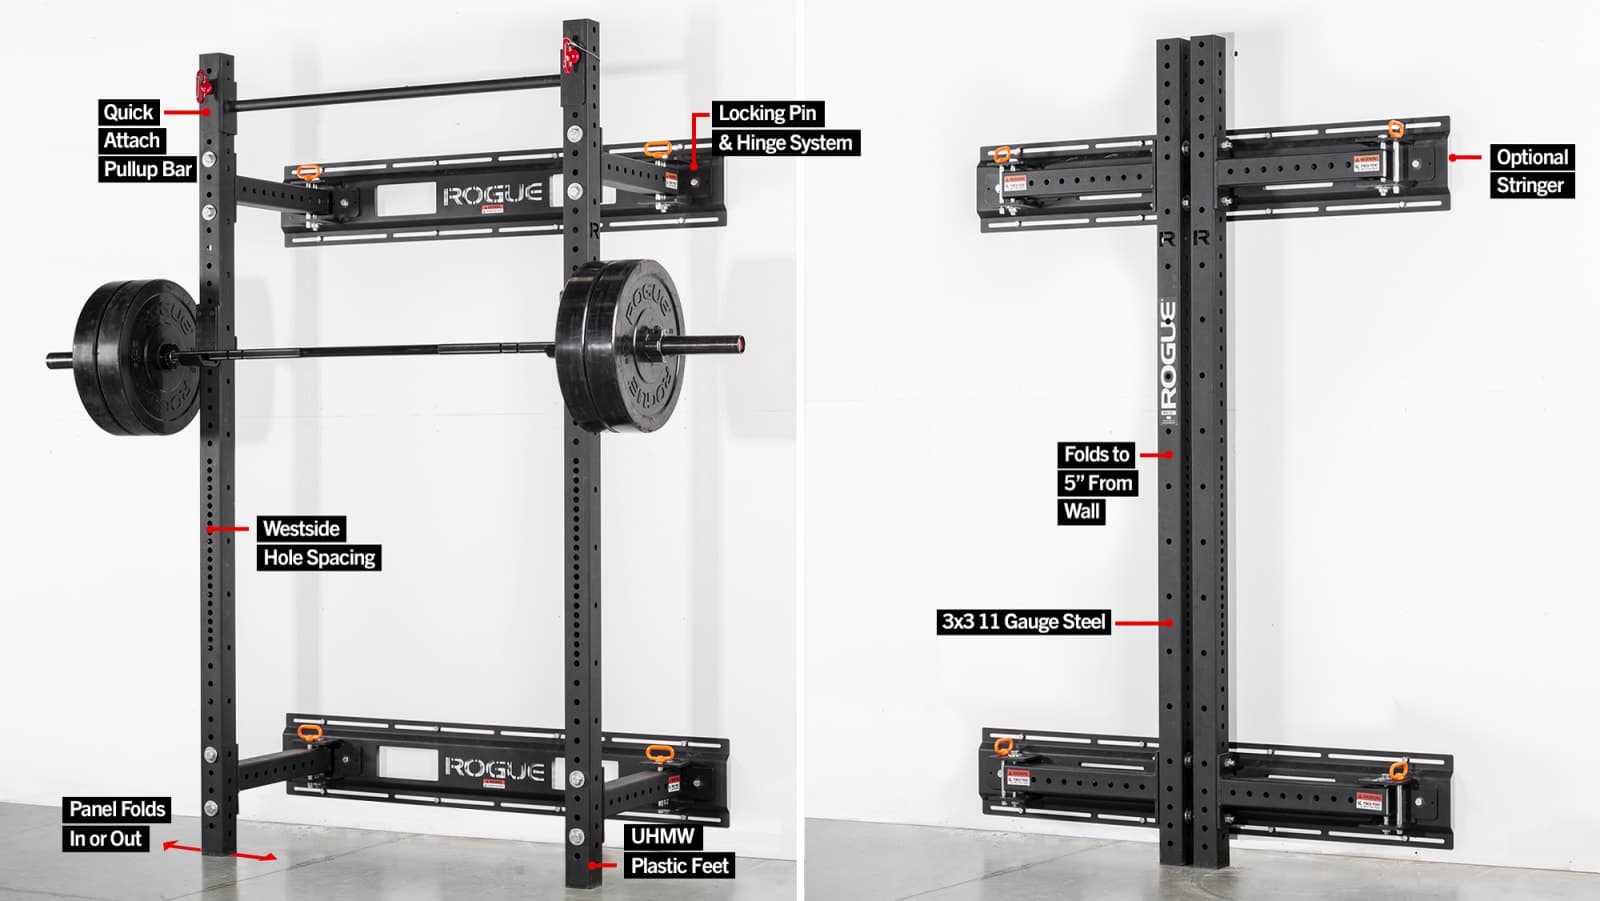
| Power Rack | REP PR-1100 | $380 | Rogue RML-3WC Fold Back Wall Mount Rack | $645 | The REP PR-1100 has a 700 lb capacity (14-gauge steel). The Rogue RML-3WC folds flat against the wall when not in use. |
| Barbell | Rogue Bar 2.0 | $250 | Rogue Ohio Bar | $295 | Both are 20 kg, 190,000 PSI steel bars. The Ohio Bar has a slightly higher tensile strength and dual knurl marks. |
| Weight Plates | Fringe Sport Black Bumper Plates (260 lb set) | $424 | REP Fitness Color Bumper Plates | $499 | Fringe Sport bumpers start at ~$2.20/lb with a lifetime warranty. Bumpers are quieter and more floor-friendly than iron. |
| Flat Bench | REP FB-5000 Competition Flat Bench | $245 | Rogue Monster Utility Bench 2.0 | $595 | The REP FB-5000 has a 1,000 lb capacity and IPF-standard height. It scores 4.8/5 on GGR. |
Why the rack matters most. In a small garage, the rack is the single most important space decision. A full-size power rack like the REP PR-1100 takes up about 4x4 feet of floor space and stays in place. A folding wall-mount rack like the Rogue RML-3WC takes up zero floor space when folded — it mounts to the wall and swings out only during use. According to the GGR Ultimate Home Gym Guide, the RML-3WC has a 1,000+ lb J-cup rating and is the best space-saving folding rack on the market. If you need to park a car in the garage, a folding rack is not optional — it's the only way to make both uses work.
For readers who want to align their purchases with specific training goals rather than just space constraints, our Garage Gym Equipment Tier System article provides a goal-based framework for prioritizing your buys. And for a broader reference that goes beyond the phased approach, the Complete Garage Gym Equipment Checklist covers every item you might eventually want.
Step 3: Flooring First — Why Horse Stall Mats Are the Gold Standard
Flooring is the one purchase you should make before you unbox a single piece of equipment. Bare concrete is hard on your joints, damaging to dropped weights, and loud enough to disturb anyone in the house. Proper gym flooring solves all three problems at once.
The consensus across every source we reviewed is clear: 3/4-inch rubber horse stall mats from Tractor Supply are the best value flooring for garage gyms. At roughly $50 per 4x6 foot mat — about $2.38 per square foot — they provide the same durability as commercial gym flooring at a fraction of the cost. According to the GGR Best Home Gym Flooring guide, these mats score 5/5 for durability and 4/5 for sound dampening. Each mat weighs roughly 100 pounds, so they stay in place without adhesive.
For a single-car garage, you'll typically need four to six mats, depending on your layout. A 10x20 foot garage with a 10x10 foot training area requires four mats (two rows of two). If you want full coverage of the training zone, six mats give you a 12x12 foot area.
Installation Tips
- Air them out first: Horse stall mats have a strong rubber odor when new. The GGR flooring guide rates the smell at 2/5. Unroll them outside or in a well-ventilated area for 3–7 days before installation. The odor dissipates significantly after that.
- Cut to fit: Use a utility knife with a fresh blade and a straightedge. Score the mat deeply on both sides, then snap it. For curved cuts around posts or corners, a jigsaw with a fine-tooth blade works well.
- Seam alignment: Butt the mats tightly together. Over time, the rubber will settle and the seams will become less visible. Some people use double-sided carpet tape under the seams to prevent shifting.
- Leave gaps at walls: Concrete expands and contracts with temperature changes. Leave a 1/4-inch gap between the mats and the wall to prevent buckling.
If horse stall mats aren't available in your area or you prefer a seamless look, the GGR flooring guide also recommends Living.Fit Rubber Flooring Rolls at $2.24 per square foot (6–18 mm thickness options, 4.7/5 GGR score, made in the USA with a 5-year warranty). Rolls are easier to install in a single piece but harder to replace if damaged. For a detailed comparison of rubber versus foam options, see our Rubber vs. Foam Gym Flooring guide.
Step 4: Storage and Organization — Making Every Inch Count
In a small garage, organization isn't about aesthetics — it's about function. A cluttered floor means you can't deadlift safely. Equipment left on the ground gets tripped over, rusts faster, and makes the space feel half its actual size. The solution is to move everything you can off the floor and onto the walls.
The Gray Matter Lifting FAQ recommends Wall Control steel pegboard systems for organizing attachments and accessories. These metal panels mount to studs and hold hooks for bands, jump ropes, resistance bands, and smaller accessories. Unlike traditional pegboard, steel panels won't sag under heavier items.
Here are the storage solutions that make the biggest difference in a single-car garage:
- Wall-mounted plate storage: A plate tree takes up about 2 square feet of floor space. Wall-mounted plate pegs take up zero floor space. The REP Fitness small-space guide specifically recommends wall-mounted plate storage as a floor-space saver.
- Vertical barbell holder: A vertical holder stores 4–6 barbells in about 1 square foot of floor space. This is the "zero-footprint hack" mentioned in the RitFit organization guide.
- Dumbbell rack (if needed): If you buy adjustable dumbbells, you don't need a rack at all. If you buy fixed dumbbells, a vertical or angled rack keeps them off the floor and organized by weight.
- Utility hooks and bins: Use heavy-duty hooks for resistance bands, ab mats, and jump ropes. Clear plastic bins on a shelf hold chalk, straps, knee sleeves, and smaller accessories.
The goal is to have a clear path from the garage door to the rack, with nothing on the floor except the equipment you're actively using. If you can walk from the door to the barbell without stepping over or around anything, your organization is working.
Step 5: Phased Additions — What to Buy Next (and What to Skip)
Once you have the essential four and proper flooring, your garage gym is fully functional for strength training. But most people eventually want to add variety. The key is to add items that expand your training options without cluttering your space.
Worthwhile Additions (in order of priority)
- Kettlebells: A single 53 lb (24 kg) kettlebell adds swings, goblet squats, and single-arm work. The GGR budget equipment guide names Rogue E-Coat Kettlebells as the best budget option ($44–$163, 4.35/5 GGR score). One kettlebell takes up virtually no floor space.
- Adjustable dumbbells: The REP Fitness small-space guide recommends adjustable dumbbells (like the QuickDraw, 5–60 lbs, 4.5/5 GGR score) over fixed dumbbell sets. They replace an entire rack of dumbbells with a single unit.
- Conditioning piece: A Concept2 rower or an air bike adds cardio without taking up much space. The Fitness Outlet guide recommends adding a conditioning piece as the third phase of a garage gym build, after the strength anchor and bench/rack setup.
- Gymnastic rings: Titan gymnastic rings ($40) hang from your rack or a ceiling mount and add rows, ring push-ups, and muscle-up progressions. They store in a drawer when not in use.
- Jump rope: The WOD Nation Double Under Speed Jump Rope ($18.99, 4.31/5 GGR score) is named the best budget cardio equipment by GGR and has been a tester favorite for over seven years. It takes up zero space.
What to Skip
Both the Gray Matter Lifting FAQ and the Hillseeker home gym guide warn against two categories of equipment that are particularly tempting for small-space buyers:
- Expensive all-in-one machines: Multi-gyms, Smith machines, and cable crossover towers often become "dust collectors" (Gray Matter Lifting's phrase). They take up a lot of floor space, and most users find they prefer the barbell and dumbbell work that the essential four already covers.
- "Smart" equipment that requires power or syncing: Motorized treadmills, app-connected resistance systems, and touchscreen-equipped machines add complexity and failure points. In a garage environment — where temperature swings, humidity, and dust are factors — simpler is more reliable.
Sample Layouts for a 1-Car Garage
The following layouts are based on common single-car garage dimensions. Each assumes you've installed horse stall mat flooring in the training zone and have wall-mounted storage for plates and accessories.
Layout A: 10x20 ft Garage (200 sq ft) — Full Strength + Cardio
- Left wall (front to back): Wall-mounted plate storage → folding power rack (Rogue RML-3WC) → vertical barbell holder.
- Right wall: Concept2 rower (stored vertically when not in use) → Wall Control pegboard for accessories → utility hooks for bands and jump rope.
- Center lane: Clear 8x8 ft safety box for deadlifts and Olympic lifts. The folding rack extends into this lane during use and folds back when the car is parked.
- Garage door end: Kettlebells stored on a small shelf or in a corner. Jump rope and ab mat hang on hooks.
Layout B: 12x22 ft Garage (264 sq ft) — Strength + Storage + Parking
- Left wall: Full-size power rack (REP PR-1100) with plate storage pegs on the rack itself. Bench stored under the rack when not in use.
- Right wall: Wall-mounted adjustable dumbbell rack → pegboard for accessories → vertical barbell holder for specialty bars.
- Back wall: Air bike or rower (stored against the wall) → shelving for mats, foam roller, and recovery tools.
- Center lane: 10x10 ft safety box for deadlifts. When the car is parked, the rack is pushed slightly to the left to accommodate the vehicle.
For additional compact setup strategies and gear ideas, see our Garage Gym Equipment for Small Spaces article, which covers more layout variations and product recommendations for single-car garages.
Tiered Budget Breakdowns: $500, $1,500, and $3,000
The following budget tiers translate the phased approach into concrete shopping lists. Prices are as of Q2 2026 and include the essential four plus flooring. Sales, used equipment, and regional pricing may shift these totals.
| Tier | Total Cost | What You Get | Best For |
|---|---|---|---|
| $500 | $500–$550 | Barbell (Rogue Bar 2.0, $250) + 160 lb bumper plate set (Fringe Sport, ~$220) + two horse stall mats ($100). No rack or bench — you'll squat and bench from the floor or use a DIY squat stand. | Absolute minimum start. You can deadlift, clean, press, and do floor presses. Add a rack and bench as soon as your budget allows. |
| $1,500 | $1,300–$1,500 | REP PR-1100 rack ($380) + Rogue Bar 2.0 ($250) + Fringe Sport 260 lb bumper set ($424) + REP FB-5000 bench ($245) + four horse stall mats ($200). Total: ~$1,500. | The core thesis starter gym. Covers all major compound lifts. This is the sweet spot for most single-car garage owners. |
| $3,000 | $2,800–$3,200 | Rogue RML-3WC folding rack ($645) + Rogue Ohio Bar ($295) + REP Fitness 260 lb color bumper set ($499) + Rogue Monster Utility Bench 2.0 ($595) + six horse stall mats ($300) + Rogue E-Coat kettlebell ($63) + Concept2 RowErg ($900). Total: ~$3,300. | Full-featured garage gym with folding rack, premium bench, and a dedicated cardio piece. No compromises on space or quality. |
For readers who want complete pre-built setups at these exact price points, our Compact Home Gym Budget Builds article provides detailed shopping lists with links to each product.
Building a garage gym in a single-car space is not about squeezing a commercial gym into a closet. It's about making intentional choices — a folding rack instead of a full cage, wall storage instead of floor racks, a single kettlebell instead of a full set — that prioritize function over volume. Start with the essential four, add flooring before anything else, and let your training needs guide every subsequent purchase. In under two years, your garage gym will have paid for itself, and you'll never have to wait for a squat rack again.
Comments
Join the discussion with an anonymous comment.